What is Transform in Photoshop: Essential Guide for Beginners
Transform in Photoshop is a powerful feature that allows users to modify images or objects within the program to fit their creative needs. This essential tool enables resizing, reshaping, rotating, and moving elements within a document, making it a valuable skill for any Photoshop user. With an array of options, anyone new to Photoshop or looking to expand their skills can learn how to effectively use the Transform feature to enhance their projects.
The Transform tool comprises two primary functions: Standard Transform and Free Transform. Standard Transform lets users make basic adjustments like scaling, rotating, and skewing, while Free Transform allows for a more fluid manipulation of an object, such as warping, distorting, or applying perspective changes. These capabilities, combined with the ability to adjust layers, paths, and masks, unlock endless creative possibilities when editing your photos in Photoshop.
Key Takeaways
- Transform in Photoshop is essential for resizing, reshaping, rotating, and moving elements in a document
- Standard and Free Transform functions allow for various manipulations of objects
- Learning this tool can enhance creative possibilities when editing photos in Photoshop
Transform Basics
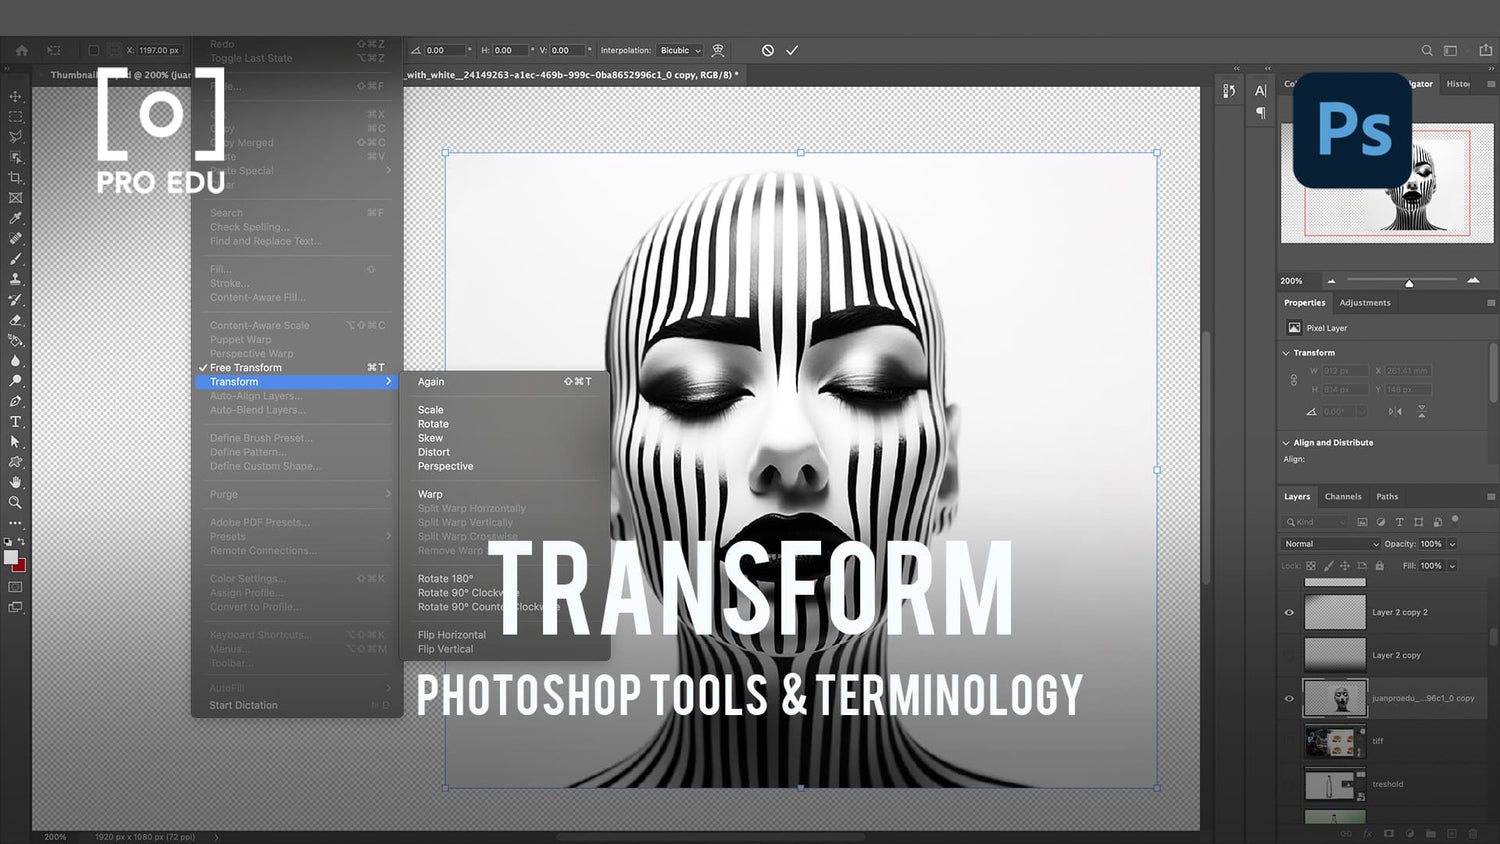
In Photoshop, the Transform feature enables us to manipulate layers in various ways, such as resizing, rotating, and flipping. There are two main functions in the Transform tool: the Standard Transform and the Free Transform function. By using these tools, we can edit elements both subtly and drastically.
To access Transform tools, first make a selection around the object or layer you want to modify. Then, go to Edit > Free Transform or use the [keyboard shortcut] (https://helpx.adobe.com/photoshop/using/free-transformations-images-shapes-paths.html) Ctrl+T (Windows) or Command+T (Mac). The selected object will now show transform handles that can be manipulated.
To maintain the aspect ratio of the object while transforming, press and hold the Shift key while you drag the handles. This is especially useful when resizing images or smart objects to maintain their quality.
Another feature of the Transform tool is the ability to move the reference point (https://www.bwillcreative.com/how-to-use-the-transform-tool-in-photoshop/). The reference point defines the anchor around which objects are transformed, such as rotating or scaling. By default, it is located at the center of the object, but it can be moved to any position to fit your needs.
In conclusion, the Transform tools in Photoshop provide us with a versatile set of options to manipulate our layers and objects. By learning to master these tools, we can create intricate and professional designs with ease.
Using Free Transform
In Photoshop, the Free Transform command allows us to easily manipulate our images and layers through various transformations. This includes actions such as scale, rotate, flip, and distort. We can access the Free Transform command easily by clicking "Edit" from the menu bar and then selecting "Free Transform" or simply by pressing the keyboard shortcut "Ctrl+T" (or "CMD+T" on Mac) 1.
When using Free Transform, it's important to first choose the desired layer from the Layers Panel. To maintain the aspect ratio while scaling or resizing an image, remember to hold down the Shift key during the transformation process.
By rotating an image, we can manipulate the angle at which it's displayed. Click and drag outside the bounding box to rotate the layer manually, or enter a precise angle in the options bar at the top 2. With the Free Transform command, we can also quickly flip our layer horizontally or vertically by right-clicking within the bounding box and selecting "Flip Horizontal" or "Flip Vertical" 2.
If we need to distort the layer, clicking and dragging from any corner while holding the Ctrl (or CMD) and Shift keys will enable the distortion. Furthermore, the Free Transform command allows us to apply more complex warping to our layer by right-clicking within the bounding box and selecting "Warp" 2.
Overall, the Free Transform command in Photoshop is an invaluable tool for our image editing needs. It provides us with a wide range of possibilities for manipulating our layers, making it a versatile and powerful asset in our design process.
Advanced Transform Techniques
In Photoshop, advanced transform techniques allow us to manipulate images with more precision and control. They are essential for creating realistic compositions, adjusting perspectives, and tweaking the overall appearance of an image.
Warp is a powerful tool that lets you distort an image by freely dragging its control points. It's useful for making subtle adjustments to the shape of objects within an image. For example, you might use warp to bend a straight road into a curve or fit a flat object onto a curved surface.
Skew alters the structure of an image by tilting or sloping it along the X or Y axis. This technique is commonly used for adjusting the angle of a photo to match the perspective of its surroundings. You can learn more about skewing in this Adobe Photoshop tutorial.
Perspective change simulates a third-dimensional viewpoint by adjusting the vanishing points of an image. It's especially useful for architectural photography and graphic design when aligning objects within a scene. You can discover more about perspective in this Youtube video.
The Liquify filter is another advanced transform tool that allows you to push, pull, bloat, and deflate pixels in an image. We often use this filter for retouching images, such as shaping facial features and smoothing out clothing wrinkles.
When using any of the above techniques, a transform box appears around an object, allowing you to scale, rotate, and move it without directly altering its pixels. This makes it easier to experiment with different transformations while preserving image quality.
Finally, it's worth mentioning that many of these techniques can be applied in a non-destructive manner. This means that you can make changes to your image without permanently affecting the original content. Utilizing adjustment layers, smart objects, and layer masks helps to maintain flexibility throughout your editing process.
Preferences and Settings
In Photoshop, preferences play a crucial role in the way the software behaves and how various tools, including the Transform tool, function. To access the preferences dialog box, go to Edit (Win) / Photoshop (Mac) > Preferences > General. Here, you'll find a variety of options to customize Photoshop's behavior to your liking.
One of the crucial settings related to the Transform tool is the Legacy Free Transform option. By ticking this box, you revert to the pre-CC 2019 legacy transform behavior. This can be helpful if you're more familiar and comfortable with the older way of working with transformations.
As for the transform options, they offer a wide array of possibilities for manipulating images, shapes, and paths. Some of these options include scaling, rotating, skewing, and warping. We can apply these transformations to a selection, an entire layer, multiple layers, or even layer masks.
In order to get the best results, it's essential to understand how these preferences and settings affect our work in Photoshop. Taking the time to customize our preferences according to our needs and workflow will not only make the Transform tool more intuitive but also improve our overall experience with the software.
Additional Tips and Guides
When working with Photoshop's Transform tool, it is essential to follow some tips and guides for the best results. Firstly, when manipulating vector shapes or shape layers, it is crucial to maintain their quality and sharpness by selecting the appropriate interpolation method. You can do this by going to Edit > Preferences > General and choosing the right interpolation method.
To move an object efficiently, use the Move Tool or the keyboard arrow keys for precision. Don't forget to enable Snap to Grid or Snap to Guides features if you need accurate alignment. For more flexibility, consider using the Free Transform function, which allows you to manipulate objects in various ways, such as rotating, resizing, and warping.
Here are some quick tips to improve your experience with Photoshop's Transform tool:
- Hold the Shift key while moving corner handles to maintain the aspect ratio of the object.
- Use the Ctrl (Cmd on Mac) key for free transformation, providing more control over reshaping.
- Pressing Alt (Option on Mac) while transforming will resize the object from its center.
Finally, always keep an eye on the Options bar to access specific functions like the Maintain Aspect Ratio button or Rotation Angle. Take advantage of these photoshop transform tool tips and guides to enhance your editing skills and achieve the desired results.
Frequently Asked Questions
How does the Free Transform tool work in Photoshop?
The Free Transform tool in Photoshop allows us to modify the size, position, rotation, and skew of an object or image. To access it, select the object or layer and press Ctrl+T (Windows) or Command+T (Mac). Once activated, you can click and drag the corner handles to manipulate the item as desired.
What are the different types of transform options available?
Photoshop offers various transformation options, including scaling, rotating, skewing, distorting, and warping. You can apply these transformations to selections, layers, layer masks, and more. For instance, you can use the Free Transform command to apply basic transformations or the Warp mode for more advanced shape manipulation.
How can I use Perspective Transform effectively?
To use Perspective Transform effectively, select the object or layer you want to modify and activate the Free Transform tool. Press and hold Ctrl+Alt+Shift (Windows) or Command+Option+Shift (Mac) while dragging a corner handle. This will stretch or compress the image to create the desired perspective effect.
What are the steps to skew an image in Photoshop?
To skew an image in Photoshop, start by selecting the object or layer you want to skew. Activate the Free Transform tool (Ctrl+T or Command+T) and hold down Ctrl (Windows) or Command (Mac) while dragging a side handle. This will create a skewed effect by moving the selected side handle while keeping the opposite one fixed.
How can I scale an object proportionally in Photoshop 2023?
To scale an object proportionally in Photoshop 2023, select the object or layer to be scaled and activate the Free Transform tool (Ctrl+T or Command+T). Click and hold on a corner handle while pressing the Shift key, then drag the handle to resize the object while maintaining its aspect ratio.
What is the role of Transform Again feature in Photoshop?
The Transform Again feature (Ctrl+Alt+T on Windows or Command+Option+T on Mac) allows you to repeat the previous transformation applied to an object or a layer. This can be useful for creating patterns, aligning objects, or quickly applying a series of identical adjustments to multiple elements.


