What Is An Unsharp Mask In Photoshop: A Comprehensive Guide
Unsharp Mask is a powerful tool in Photoshop that helps enhance the sharpness of images. Originally, this technique was employed in darkroom photography, but it has since been digitized and incorporated into digital image processing software. Its name is derived from the method it uses: a blurred, or "unsharp," negative image is created to act as a mask for the original picture.
The process involves adjusting a few sliders to control the amount of sharpening, creating more defined edges and better details in the photo. This tool is particularly useful for images that need a bit of sharpness enhancement, whether it's due to a soft lens or slightly blurred scene capturing. Unsharp Mask is a versatile and valuable addition to any Photoshop user's toolkit.
Key Takeaways
- Unsharp Mask is a Photoshop tool used to improve image sharpness by creating a blurred mask from the original photo.
- Adjusting the settings of Unsharp Mask allows for better control over the level of detail enhancement in the image.
- It's an essential tool for photographers looking to refine their images and create sharper, more defined pictures.
Understanding Unsharp Mask Fundamentals
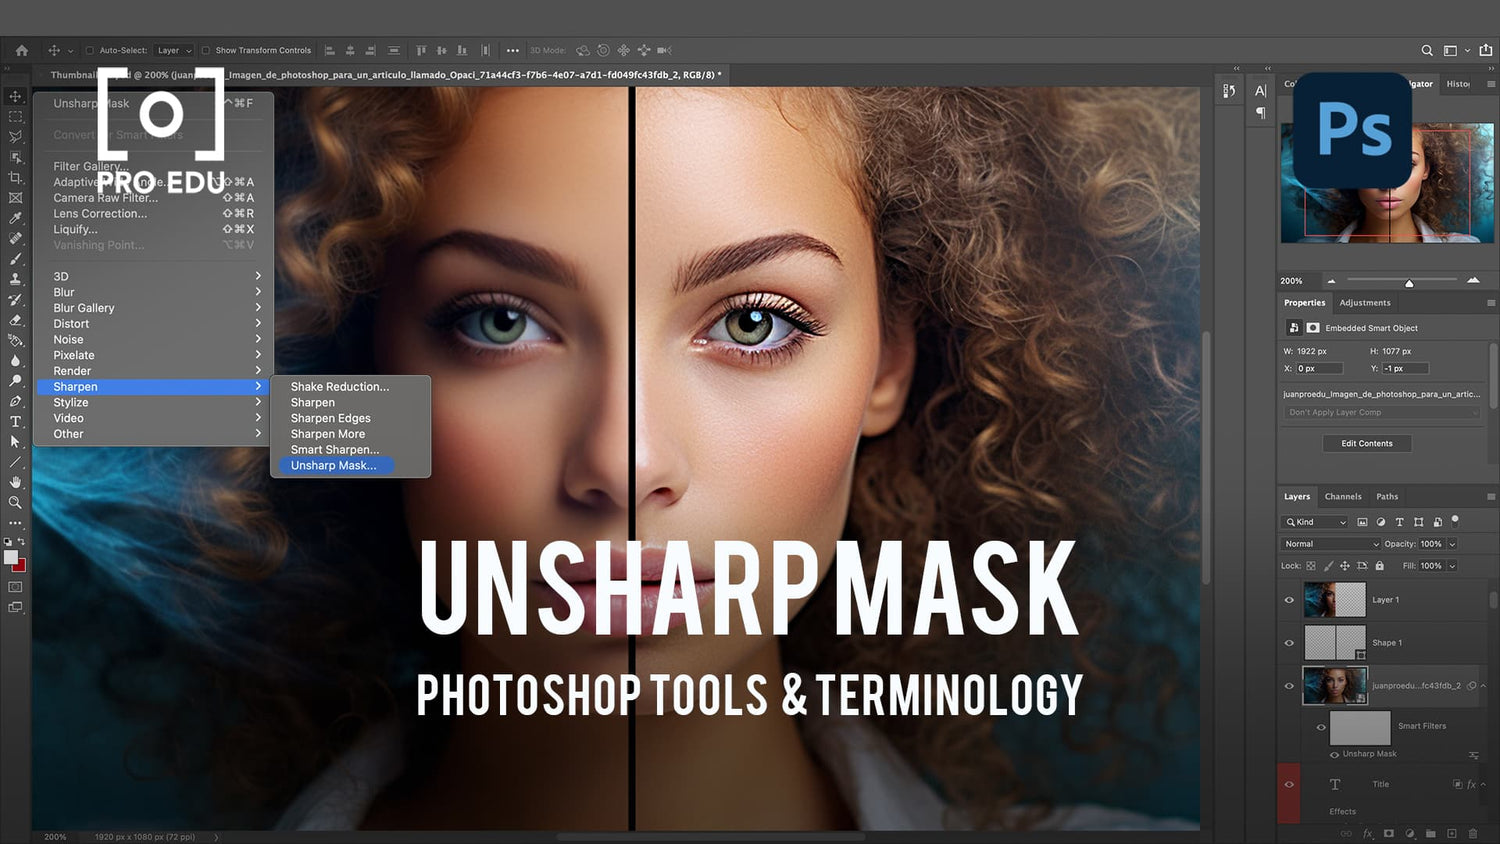
The Unsharp Mask is a powerful Photoshop tool used to sharpen images by increasing their overall contrast and detail. To apply this technique, you'll need to access it through the Filter menu and adjust three basic parameters: Amount, Radius, and Threshold.
Amount determines the strength of the sharpening effect. A higher value produces more noticeable results. However, avoid applying too much, as it can create a noisy appearance. Radius controls the width of the edge regions where the sharpening is applied. A larger radius leads to a more exaggerated effect, while a smaller radius will create subtler results.
Threshold acts as a safeguard, preventing noise from being unnecessarily sharpened. It sets a limit below which differences in pixel intensity won't be affected. Values closer to zero will allow more delicate details to be sharpened, but at the risk of introducing noise. Conversely, larger values protect larger areas of the image, ensuring a smoother result. This balance between sharpness and noise is crucial when using the Unsharp Mask filter.
In summary, understanding the Unsharp Mask fundamentals in Photoshop involves adjusting the Amount, Radius, and Threshold parameters to achieve an optimal balance between sharpness and preserving image quality. By using this tool effectively, we can enhance the details and contrast of our images without introducing unwanted noise or artifacts.
How to Use Unsharp Mask Correctly
Adjusting the Unsharp Mask in Photoshop is a technique that enhances the details within a photo to create sharper images. It works by applying a Gaussian blur to a copy of the original image and then comparing it to the original source.
To use Unsharp Mask correctly, we should first convert our image layer into a smart object. This lets us apply Unsharp Mask as a smart filter, providing two main advantages: it keeps the sharpening effect editable and preserves the original image's quality.
In the Unsharp Mask dialog box, we have three sliders to fine-tune the effect: Amount, Radius, and Threshold. The Amount slider controls the overall strength of the effect, while the Radius slider adjusts the size of the sharpened details. Finally, the Threshold slider determines the level of contrast difference for applying the effect, to avoid sharpening noise.
It's crucial to understand the impact that Unsharp Mask has on different aspects of your photo, such as brightness, luminosity, colors, and focus. Be careful not to overdo the sharpening. Excessive application may result in unwanted noise, artifacts, or unnatural-looking images.
To maintain a natural look in our photos, we can use the Unsharp Mask in combination with other sharpening techniques like Smart Sharpen. This approach helps accentuate desired areas without degrading the overall image quality. Remember to zoom in and monitor the changes closely while adjusting the sliders, to ensure the desired effect is achieved without unintended consequences.
Unsharp Mask Vs. Other Photoshop Tools
In this section, we will compare the Unsharp Mask filter with other Photoshop tools. Unsharp Mask is a popular sharpening technique that focuses on increasing contrast along the edges while maintaining the image's texture. To understand its difference with other tools, let's briefly discuss some other sharpening methods in Photoshop.
The Smart Sharpen tool is another sharpening method that offers more control over edge detection. It can detect and protect areas containing important details, shadows, and highlights, compared to the Unsharp Mask filter, which might lead to clipping issues.
Another method is the High Pass filter that can be combined with the Overlay blending mode to achieve sharpening effects. It's a non-destructive technique, though not as precise as Unsharp Mask and Smart Sharpen when it comes to increasing the contrast on edges and improving image resolution.
To sum up, Unsharp Mask, Smart Sharpen, and High Pass filters are all useful tools for enhancing the quality of your images in Photoshop. While Unsharp Mask is a popular method that balances edge contrast and image texture, Smart Sharpen and High Pass tools offer different approaches that might better suit your creative needs.
Advanced Techniques and Tips
When working with the Unsharp Mask in Photoshop, it's crucial to pay attention to details to achieve the best results. We recommend using the Layers Panel to create a duplicate layer of your image before applying the Unsharp Mask. This way, you can easily compare the before and after results and ensure you maintain the proper image quality.
To avoid the undesirable halo effect often caused by over-sharpening, you should adjust the Radius and Amount settings. A lower radius value between 0.5 and 2 maintains the image's sharpness while avoiding an overly processed look. Also, experiment with different blend modes, such as Luminosity, to retain color information in your image without exaggerating the saturation.
Here are some tips to consider:
- Start with lower settings and gradually increase to find the optimal sharpness.
- Use a mask on your sharpening layer to selectively apply the effect to specific areas.
- Check your image at different zoom levels to ensure consistent results.
Working non-destructively is always a good practice. Convert your image layer into a Smart Object before applying the Unsharp Mask. This way, you can always go back and adjust the settings as a Smart Filter without losing any information or quality.
In summary, pay close attention to details and settings while working with the Unsharp Mask in Photoshop. With our tips, you'll achieve a sharp, crisp result, making your images truly stand out. Experiment with different settings and apply the sharpening selectively by using masks and blend modes for the best results. Happy editing!
Unsharp Mask Effect on Image Quality
Unsharp Mask is an image enhancement technique in Photoshop that significantly improves image quality by sharpening details within an image. The process essentially works by creating a blurred, or unsharp, negative of the original image and employing it as a mask over the original. The result: a sharp and crisp image with enhanced details, without over-saturation or loss of depth-of-field1.
However, Unsharp Mask must be used with caution, as it can also produce unwanted side effects when applied excessively. When overdone, over-sharpening can introduce image noise, color shifting, and a detrimental impact on overall image quality2. To asse, we recommend starting with lower settings for the Unsharp Mask filter, then gradually increasing them to achieve the desired effect3.
Furthermore, editing with Unsharp Mask requires a balance between sharpening and preserving image integrity. For example, it is essential to keep in mind how image enhancements such as Unsharp Mask could potentially impact the editable color space and depth of field4. By considering these factors, we ensure that Unsharp Mask serves as a powerful tool for improving image quality without sacrificing important visual elements.
Frequently Asked Questions
How does Unsharp Mask filter differ from regular sharpening methods?
Unsharp Mask is a technique in Photoshop that originated from an old-school film process. It works by taking a copy of the original image, intentionally blurring it, and then applying it to the original image. This differs from regular sharpening methods that simply adjust the sharpness or clarity of a photo.
What are the key settings to adjust in Unsharp Mask?
The main settings in Unsharp Mask are Amount, Radius, and Threshold. Amount controls the intensity of sharpening, Radius determines the size of the details being sharpened, and Threshold sets the minimum brightness difference between pixels that will be sharpened.
When should I use Unsharp Mask over other sharpening techniques?
Unsharp Mask is best used when you want to achieve image sharpening by enhancing the details within a photo, ensuring a more natural and controlled result. Other sharpening techniques might be suitable for quick edits or when fewer adjustments are needed.
Can Unsharp Mask be applied to scanned images?
Yes, Unsharp Mask can be applied to scanned images. It can help boost clarity in your photos, making them appear sharper and crisper. Adjusting the settings accordingly, you can improve the sharpness of your scanned images.
How do the parameters of Unsharp Mask affect the final image?
The parameters in Unsharp Mask determine the overall result. Adjusting the Amount will control the intensity of sharpening, while Radius affects the size of the details. Modifying the Threshold parameter can help prevent unwanted noise and artifacts, by only sharpening areas with significant brightness differences.
Are there alternative methods to achieve a similar result as Unsharp Mask?
Yes, alternatives like High Pass and Smart Sharpen filters can be used to sharpen images in Photoshop. High Pass offers a quicker way to sharpen details, while Smart Sharpen provides advanced adjustments and greater control over the final result.


