
What is the Mixer Brush tool in Photoshop? Of all the tools Photoshop gives us the Mixer Brush can be among the most useful when used as part of a Frequency Separation workflow. The key is knowing how to use it.
In short, the Mixer Brush lets you blend the colors and tones in your image as if they were wet paint. This brings you a lot of power, especially when it comes to working on a copy of the Low-Frequency Layer in your Frequency Separation layers.
Let’s take a quick look at the controls and talk about what settings you need to pay attention to so you can harness its power.
Mixer Brush Options
Looking at the Options Bar we see the Mixer Brush tool (1) has several options, but the ones we’re primarily concerned with are the Current Brush Load (2), the Clean Brush After Each Stroke (3), the Wetness (4), the Flow (5) and the Sample All Layers (6) controls.

The Mixer Brush tool is one of the Brush tool options in your tool palette. Clicking and holding on the Brush tool will bring up the fly-out menu where you can select the Mixer Brush, as seen in the screengrab below.

Set Current Brush Load to Clean Brush
Since the Mixer Brush picks up paint from the image you’re working on it’s important to make sure the Current Brush Load is set to “Clean Brush”. The brush automatically picks up the paint with each stroke and this will make sure the brush is not loaded with a previous color that will contaminate your work.

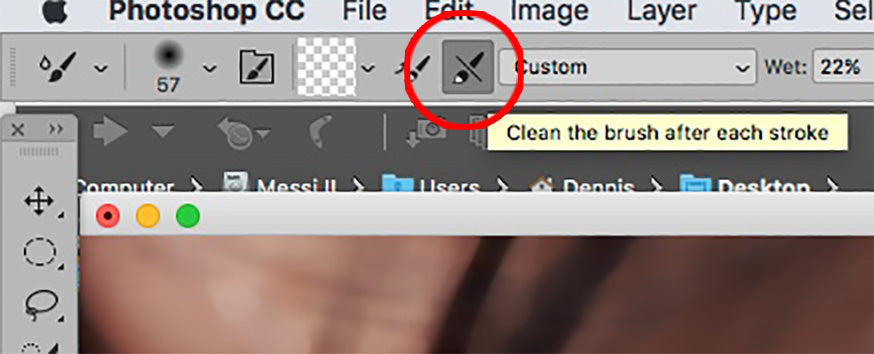
Clean The Brush After Each Stroke
The next option to pay attention to is the Clean The Brush After Each Stroke button. This will ensure you start each stroke with a clean brush, picking up only the colors you want.
When this option is not clicked on the brush will keep some of the colors from the last stroke, which can lead to contamination when it paints the wrong color.
4 Brush Settings
With the options set to clean your brush, there are 4 options for how the brush interacts with the colors in the image: Wet, Load, Mix, and Flow. These affect the way the Mixer Brush tool mixes the colors, how far it will spread those colors as well as the flow for how fast the brush will build up the effect.

Of these options the 2 that concern our workflow the most are the Wet setting and the Flow setting. The Wet option controls the amount of paint that is picked up each time you begin a stroke. Lower Wet settings mean less paint is picked up which can be a good way to lessen the effect of each stroke.
When working on blending colors in an image I’ll start with a low Wet setting, around 20%. If the effect seems to be too light I’ll boost that up to around 40% or so.
The Flow setting also works to help control how fast the paint is built up. In working with the Mixer Brush I’ll start with it set around 20% so I have a bit more control over how quickly the current brush load builds up on the image.
As with the Wet option, if I need it to work faster I can boost this setting up to around 40%.
Sample All Layers: On or Off?
The last setting we’ll focus on here is the Sample All Layers option. As with so many of Photoshop’s tools, this control determines what pixels it interacts with. When this option is turned OFF it will only sample colors from the layer you are working on. And when it is turned ON it will sample colors from ALL the layers in your image.

When using the Mixer Brush as part of my Frequency Separation workflow I will work on a copy of the Tone or Low-Frequency layer, so I make sure this is turned off. For those cases when I am working on an empty layer and just want to blend the colors of the image below I will turn it on.
Do keep in mind that if this option is turned on, any layers above the one you’re working on can affect the colors the brush is a sampling.
For instance, if you have a Curves Adjustment layer above the layer you’re working on and Sample All Layers is turned ON that Adjustment layer will affect the colors the brush samples, in effect causing it to double up on the result.
Using the Mixer Brush with Frequency Separation Layers
Now that we’ve gone over the settings, let’s take a moment to talk about a couple of examples for how you can use the Mixer Brush as part of the Frequency Separation workflow.
Here is a photo, by Emily Teague, where the model’s skin needed a lot of work. On the left, you see the original image and the retouched version is on the Right.

©Emily Teague
While I rarely use Frequency Separation when working on the skin, (it’s way too easy to go too far), this series of images presented a challenge where Frequency Separation proved very helpful.
We don’t have a lot of space here to go into the complexities of setting up the Frequency Separation layers etc, but below you can see the original Tone layer on the Left and the one I worked on with the Mixer Brush on the Right.

The goal in using the Mixer Brush on a copy of the Tone layer was to blend the colors and tones just enough to make it easier to finish the work off with the traditional Dodge and Burn layers.
After setting the Wet and the Flow settings to about 20% each I chose a Mixer Brush size so it was just a little larger than the groups of blemishes, then I made small circular strokes here and there working to blend the tones.
Using those small circular motions dabbing over the blemishes allowed me to blend the colors without changing the shape or lighting on the face.
One issue Frequency Separation is really good at addressing is wrinkles in clothing. In the image below the wrinkles on the leggings needed to be smoothed.

©Anthony Nex
In working on a copy of the Tone layer for this image I used longer brush strokes, with the goal of blending out the highlights and shadows of the wrinkles.
Since the shape of her legs is much simpler than the shape of the model’s face in the first example I could work with the Mixer Brush at a higher strength, here I used about 40% for the Wet and Flow settings.
Once you’re familiar with how the various controls for the Mixer Brush tool work you’ll quickly get the feel for how you can use this powerful tool in your own workflow. Lisa Carney also has this great PDF that highlights the various settings for the Mixer Brush.
Frequency Separation 2.0 | Advanced Texture Cleanup
If you would like to learn more about Frequency Separation, PRO EDU instructor Earth Oliver has created one of the most advanced workflows and actions for FS 2.0 that can be found in the tutorial Advanced Texture Cleanup HERE.

About Dennis: Since 1991 Dennis has been adding Photoshop Magic to movie posters and images for ad campaigns. He loves working on cool images with cool creatives whether they’re for the latest blockbuster movie or a shot of a beautiful model or a product shot for a new ad campaign. His work can be found at www.dunbardigital.com.
90 Days Of Content
Over the next 90 days we are going to be working with some top artists to explore recommendations giving you solutions to problems we have all gone through. We are paying the writers a really fair wage for every original article, and we are writing about things that aren’t sponsored by any brand. There is no one but our opinion behind it. We would love it if you do use our affiliate links here so we can continue to keep writing awesome articles that you can trust.


