How To Control Your Studio Lighting For The Best Portraits
Technical Lighting Setup and Explanation From Chris Knight
Controlling your studio portrait lighting through modifiers has an enormous impact on the mood of your final portrait. It can help drive the narrative of your subject by controlling where they eye is drawn to in the image. It can also help move your viewer’s eye through the image they way you intended. This can help draw attention to specific elements in the image like wardrobe, expression, facial features, and the overall story of your subject or subjects in the portrait.
Photographers ultimately have many decisions when it comes to creating a compelling portrait. Ultimately the biggest factor is where you are focusing, feathering, and concentrating your light and even how it falls on the subject and environment. Creating a shadow on your subject is arguably just as important as where to show the light. They both help drive your story and create a mood.
In this video from PRO EDU instructor Chris Knight, he explains some of the many choices to consider when setting up your main studio light and the differences between common modifiers available to photographers. This video is just 1 video from his 37-part online photography course on Dramatic Lighting. In this video, Chris explains some of the options that photographers have that drive the mood and story in portrait lighting and things to consider when starting out.
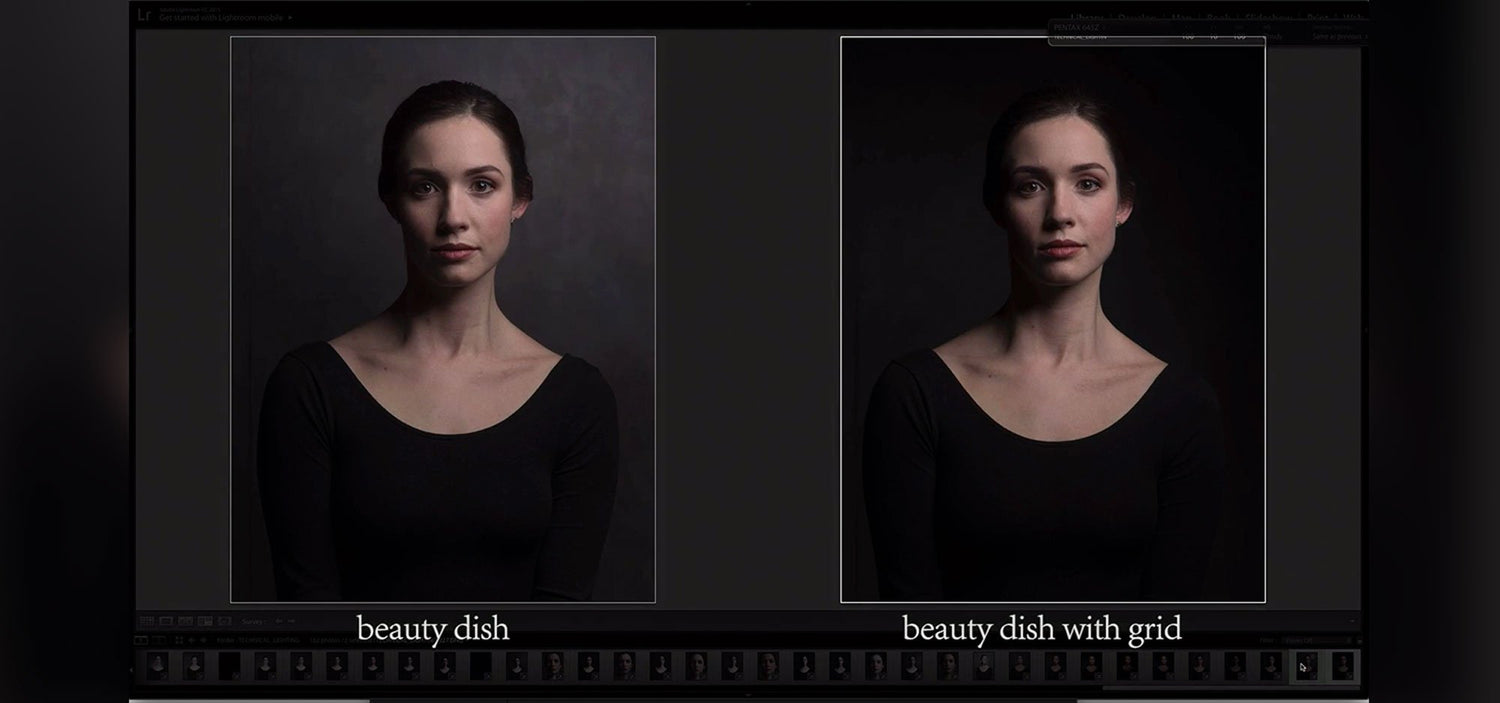
The Importance Of Grids In Controlling Your Light
Grids are one of the most important studio lighting modifiers that can be applied to modifiers like soft-boxes, beauty dishes, reflectors, and even snoots. They help direct light on your subject and also control how much light you allow on your background. Depending on your mood, and where you want to focus your viewer’s eye, you will want the most control to focus light exactly where you want it, while preventing it from falling on other parts of your studio set. This can be frustrating if you don't have the correct tools.
Ultimately it gives you precise control to place light exactly where you want it, and even create shadows where you need it. While these can add additional costs to your already expensive modifier kit, they are ultimately crucial to having precise control in cinematic portraits. This is especially true if you do a lot of work in a studio space with controlled lighting.
Below are some modifiers to consider that work with a variety of lighting brands. Just make sure that you get a modifier and/or speed ring that will work with whatever lighting brand you have. In my experience modifiers can get really expensive, and for the most part there are very affordable modifiers for almost every brand that can be purchased by a third party brand at a much cheaper price. Below are a few ideas and prices that are quite affordable.
How Many Grids Will You Need?
The amount of grids you need ultimately depends on the type of modifier you are using. For soft-boxes there are typically only 1-2 sizes of the fabric grids. For modifiers such as a common 7 inch reflectors there can be 5-6 sizes of the plastic grids. The size of the grid helps control and focus light with the utmost precision.
Many grids are universal for modifiers, which can save you money since grids aren’t an important investment to spend a lot of money on. In deciding on your grid setup, you will need to make sure that the grids work for the brand of beauty dish, reflector, or soft-box that you own. Some grids use pressure to hold the grid in place and will work on various brands.
Some lighting brands require a very special type of grid (often made by them) so make sure to double check if the grid you are buying will work if it is from a third party manufacturer. I have made the mistake of buying the wrong cheap grid in the past and had to use gaffer tape in order to mount the grid on the reflector. Don't make the same mistakes as me, do your due diligence.
If your budget allows, many retailers will sell a small kit of honey-comb grids for modifiers that each come in 3-4 focus patterns ranging from 10 degrees-40 degrees. Each grid comes with a number attached which determines how concentrated or broad the lighting pattern is. The higher the number of the grid, the broader the light pattern will be and the larger the holes in the grid. The lower the number on the grid, the narrower the beam of light will be and the smaller the holes will be.
In the video below, Jake Hicks introduces some studio lighting fundamentals for gelled lighting and some tips for using grids to control light. In this case he is demonstrating the use of gels with grids, but the knowledge for how grids work is ultimately the same with white light.
What Camera & Lenses Are Great For Portraits?
In addition to the right lighting modifiers, you also have a big choice in your camera type. An even bigger, and arguably a much more important choice, is the lens you use in your portrait work. While every camera sensor and lens has a different look and feel, photographers can often times feel overwhelmed with the amount of options out there. Camera brands also want you to feel insecure about the amount of megapixels you have and will always encourage you that the new camera will make your work better. No offense but it probably wont.
Don’t feel like you have to upgrade if your primary focus in studio portraits. As a rule of thumb, anything above 8-10 Megapixels is perfectly fine with the right lighting. Megapixels ultimately don’t always matter for making great studio portraits and neither does owning a camera with ISO that goes to one million. Using an older camera is perfectly fine. Your clients certainly won’t care. They care about the end result. And the end results is ultimately determined by your lighting, posing, wardrobe, and story in the image.
For example PRO EDU instructor Jake Hicks used a $200 ten year old Nikon D7000 to create stunning studio portraits in the entire tutorial. The camera sensor doesn’t really matter. Anything that is recently new in the last decade should work fine, especially if you are not printing huge billboards or most of your work lives on the web. If you are looking to excel at studio portraits then first invest in your modifiers (or make them) and then your lens selection.
Ultimately your choice of lenses and lighting are far more important in creating a great portrait. In this video below, Sandro Miller explains his choices for using both Hasselblad medium format, and also his Nikon 35 mm in some cases. For most photographers a medium format camera will be completely out of the budget. And like I said above, you probably don't need it.
For Sandro’s commercial work he requires these to create huge images for billboards, large print campaigns, and huge brands that require that size image. For the most part though, he uses a 35mm Nikon for a lot of his work. For a photographer at Sandro’s level he can create a stunning portrait with whatever camera you give him. His use of light and his knowledge on where to put light is what puts him at the top of commercial portrait photography.
What Are Great Lenses For Portrait Photography For Dixie
Before you invest in a new camera body with more megapixels, consider investing in the correct portrait lens. If studio portraiture is something you want to build a career out of, then having the right lens for the job will help you immensely. While there are many options, we typically recommend a fixed “mm” lens with a faster aperture. Very common lenses you should invest into would be a fixed 85mm, 50mm, and the 100mm lens, probably in that order.
Most of these lenses range anywhere from $800-$1800, depending on the manufacturer. These can vary in pricing, so you will want to make sure the lens you are getting has an F-stop of around f/1.8 to f2.8. These are typically the sharpest lenses, which often times mean the sharpest. If you want to see a score for the lens you are looking for, check out lens reviews from DXOMARK if you are curious where your lens stacks up.
In this video PRO EDU instructor Dixie Dixon explains here choice of lenses and camera gear for her lifestyle work.
Below we have put together a kit of lenses that you should consider if you are just getting into portraiture. Depending on your camera body, there will obviously be different limitations, pricing, and choices, but consider a fixed lens in that range of mm and f-stop. We also suggest renting them before you buy them to make sure that you like the look and feel of the lens, and it suits your budget, workflow, and desired look.
For More Portrait Photography courses, visit our tutorial page here.


