The photography industry is, by nature, gear and gadget led. The temptation to constantly want another piece of equipment, the newest camera, and latest release is immense.
With the urge to keep building our arsenal comes the illusion that “If only I owned a new camera, my images would be so much better!”
But do we really need to splash the cash in order to improve our game? Does a smaller budget mean we can’t level up?
The reality is as simple as this: Stop hiding behind expensive gear!
I have seen striking images shot with inexpensive vintage cameras and whole magazine spreads that were produced entirely with a disposable camera and point-and-shoots.
Photography on a budget doesn’t mean we can’t polish our portfolios, improve our skill and ultimately take better quality pictures that will attract our dream clients.
Learn how to save some money not only by substituting pricey camera and lighting gear with cheaper alternatives, but also by finding cost-effective ways to challenge your creativity while saving your hard-earned dollar.
DIY Alternatives – How To Make Your Own Gear
Sure, you will need a camera and a lens in order to take an image. This was the beginning of every one of our photography love stories, and of course it didn’t end there.
A newer camera? Another lens or 3? Yes please. Lights? Backgrounds? And not to mention the abundance of accessories for every possible scenario.
After buying my first camera I learned very early on that I had one of 2 options. In order to level up my photography I had to either spend all my money on more refined gear or come up with creative ways to, well, make my own. With photography not paying the bills at this early stage, something most new starters and hobbyists can identify with, spending a lot of money on gear was not an option.
There were so many items I wanted, but fortunately there are also many different ways to fake it before you make it! While nothing beats the pure joy of unboxing a brand new product fresh from the factory, my number one budget saver will always be second-hand gear.
My first camera and lens were pre-owned and they perfectly earned my first paychecks that later on enabled an upgrade. If you’re toying with the idea to add a new lens to the family, the internet is full of second-hand platforms, offering quality gear even with low usage.
But let’s take it one step further. Introducing DIY alternatives!
Reflectors & Flags
The choice of photography accessories is endless. One of the biggest game-changers for many photographers are flags and reflectors. Their primary use is the blocking or bouncing of light, as well as being used for light shaping.
Reflectors themselves are often a cost-effective alternative to adding fill lights into your setups.
With their key feature being their dark, light or metallic surfaces, there are plenty of options for us to find alternative objects and materials that will do a similar job.
Before investing in a beautiful set of VFlats, my flags were made from inexpensive white Styrofoam insulation boards I bought at a DIY store, clumsily painted black on one side. Large black or white cardboard sheets from craft shops equally do the trick and cost only a couple of dollars.
Subjects deliberately positioned next to bright walls equally have the effect of bouncing light back into shadows the same way a white reflector would.
When it comes to metallic reflectors, tin foil is a lifesaver! Wrap a sheet of foil around some card and you’ve got yourself a handheld silver reflector.
By no means am I suggesting to present commercial clients with our DIY projects but until we book those, there’s no harm in enhancing our skills with the items we have available!
Backdrops
When it comes to photographic backdrops, there are many options available on the market. Fabric and paper backdrops come in many colours and sizes, tailored to every budget.
While clients require crisp, clean, wrinkle-free backdrops I have found no harm in experimenting with anything from bedsheets to gift wrap in the past.
A great alternative to buying that statement turquoise roll of professional background paper you’ve ALWAYS wanted to try during a test shoot (but will 100% NEVER use again after)… craft paper from art shops comes in enough colours to keep you experimenting for years! Don’t be shy to stick them to a wall and add some colour to your portfolio.

I created this image, taping some colourful cardboard onto my living room wall.
A friend and fellow photographer Scott Chalmers has recently blown my mind with this amazing hack for unique, creative backdrops; Scott hurls talcum powder at his backgrounds to add some texture and a wonderful dramatic quality to it:
Other Useful Multifunctional Kit
Here are a few other must-have items that don’t break the bank but are a great addition to your kit.
Keen to explore and improve your lighting skills? First and foremost, exhaust all the natural lighting options available to you. Natural light flooding in from windows provides a great base, and paired with a reflector you’ve got yourself a key and a fill on a budget!
Before taking the leap into professional lighting equipment, experiment with desk and bedside lamps. While you can’t control their intensity and colour temperature in the same way a constant photographic light source is able to, these are still great tools to learn basic lighting principles.
I have used the torch (flashlight) of my mobile phone in the past, adding light to a test shoot I didn’t have my studio lights available for. While these aren’t forever-options, understanding lighting with simple means helps you master light once you add professional equipment to your setups.

My Phone Torch Highlights!
Other little life savers that cost a few dollars and make your life as a photographer a whole lot easier:
- Gaffer tape
- Rubber bands
- Safety pins
Simple but ever so effective when it comes to holding backdrops, props and garments in place!
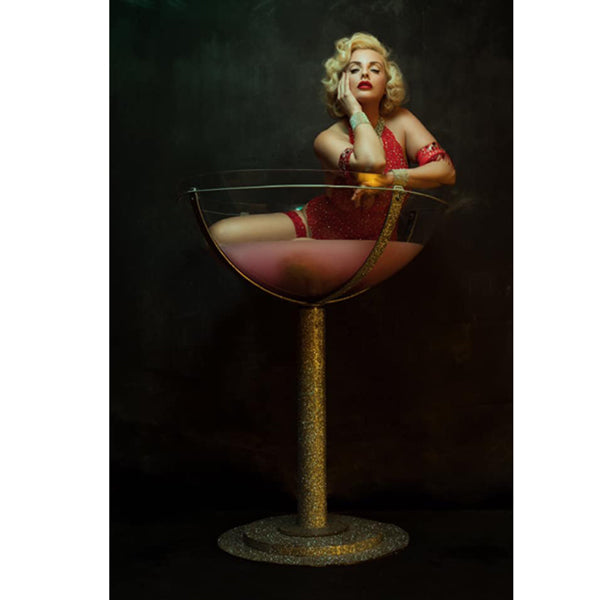
Get Creative – Add Interesting Visual Effects
Apart from finding alternatives for traditional studio equipment, a great way to level up your photography game is to be more experimental and creative in your approach.
Creative Lighting
Do you own 1 or 2 studio lights and you’re convinced that you need another few in order to be “creative?” No longer an excuse, get resourceful with the ones you have!
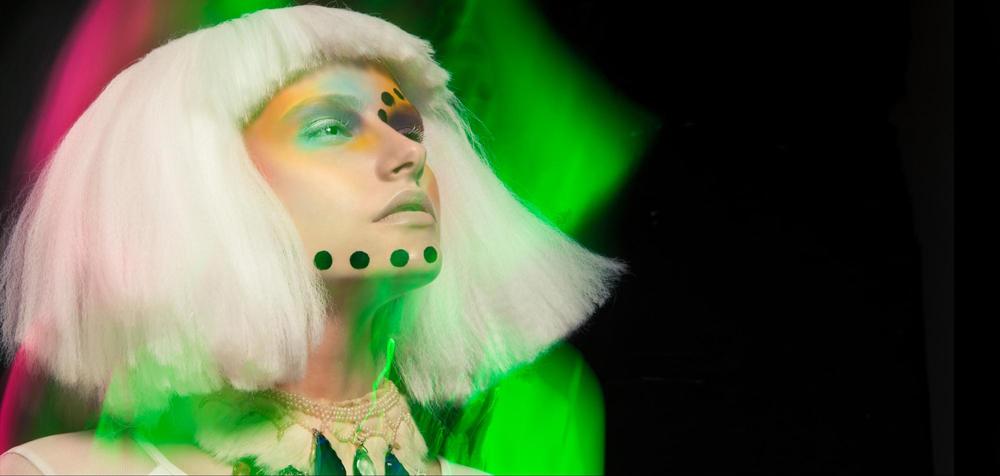
Coloured Gels are a perfect accessory to experiment with different effects and spice up your existing portfolio. They don’t need to be a professional version, grab a few rolls of coloured transparent foil from the craft store:

I shot this using pink and green foil wraps, $2 a roll using a Canon 5D Mark IV
Gobos, objects you place between your light source and your subject, are another item you don’t necessarily need to buy.
Household items such as sieves, blinds, flowers, the possibilities are endless:

I shot these using a fresnel light, dried plants and a pasta strainer.
Another lighting modifier hack from fellow photographer Dave Schick!
Grids, modifiers that are used to control the spread of light from your source or modifier are effectively fabric or metal structures resembling a honeycomb shape.
Look what you can achieve with some sticky tape and a bunch of straws, channeling the light of an on-camera flash in the same way a grid would:

Dave’s DIY grid and the difference it makes to the spread of light! (top without grid, bottom with grid)
Fun with Lenses
It doesn’t always have to be a distortion lens or an expensive filter to create some exciting effects.
The ways in which you can add distortions, flares, and filters to your lenses are plenty. Please always bear in mind that no substance should ever be applied directly to the lens as it might compromise its coating and performance.
To add an interesting “milky” vintage feel to your pictures, try shooting through a pair of low opacity tights pulled tight over your lens. Similarly, for a warm, sepia feel, try shooting through a pair of tinted sunglasses.
Wrapping clear cling film over your lens and coating its sides with Vaseline or coloured gel can add some intriguing effects to your photos.
Crinkled foil and even torn plastic bags held in front of your camera can add some beautifully soft edges.
Shooting through crystals (e.g. from chandeliers) and prisms creates some stunning lens flares as fellow photographer Caterina Gualtieri shows us in her examples:

A money-saving tip from Katie Forshaw on how to get creative with macro photography without having to lash out hundreds on a macro lens! An inexpensive macro extension tube (£20) helped Katie create some inspiring photos:

Other Hacks to Improve Your Craft
Apart from finding alternatives to pricey equipment, here are a few other ways to improve your craft while saving money.
A big cost when it comes to shooting and testing is hiring studio space and locations. The ability to build a home studio space for myself not only gave me immense freedom to create and improve my work on my own schedule but saved a ton of money on studio hire. (Here are some tips on how to get started with that!)
When it comes to location, photography related deals can keep your hire costs at bay. I have shot stories at interesting locations in the past such as spas, hotels, and bars on the basis that these establishments would get photos useful for them in return.
Another factor when it comes to leveling up your images is shooting with other skilled creatives such as professional models, makeup artists, and stylists. Their level of expertise will improve your portfolio and putting a price tag to that skill is of course justified. But, just like with location space, trades are possible.
TFP arrangements are test shoots in which creatives offer their time and skill in return for images for their portfolios. These are common and the fact that you might just be starting out as a photographer shouldn’t put you off from contacting professional models and agencies. Creatives have the same need to improve their skill and keep their portfolios fresh, and they are often happy to trade their time for yours.
And as with most things, regardless of how elaborate or unrefined a test shoot might be, the more you practise the better you get. Whatever equipment you have available at this moment in time, use it. Shooting more is the most effective way to improve and regardless of equipment, there is something that can be learned each time.
Conclusion
In order to take pictures, we need a base of camera gear, there are no two ways about it. How we use this gear to its full capacity, how resourceful we are when it comes to accessories, and how we build our teams is down to us.
Instead of waiting for that new camera or latest gear to hit the market and forever saving up for that ONE gadget that will be the answer to all our prayers, first focus on using your time and resources better.
Make DIY your new friend, collaborate with like minded creatives who are on a similar path to yours, and shoot more often. Instead of worrying about better camera and lighting gear, invest more time into better skill.
I hope the stunning examples from photographers all over the globe have inspired you to get creative and experiment with photography on a budget!
If you’d like to see more of Scott, Dave, Caterina and Katie’s photography work, take a look here:
- Scott: www.scottchalmers.co.uk
- Dave: www.daveschickphotography.com
- Caterina: www.caterinagualtieri.com
- Katie: www.katieforshawphotography.co.uk
I’m excited to see what you come up with, feel free to share your results and photography on a budget hacks with me on @tina_eisen.

Tina is a commercial and editorial beauty photographer based near London, UK.
90 Days Of Content
Over the next 90 days we are going to be working with some top artists to explore recommendations giving you solutions to problems we have all gone through. We are paying the writers a really fair wage for every original article, and we are writing about things that aren’t sponsored by any brand. There is no one but our opinion behind it. We would love it if you do use our affiliate links here so we can continue to keep writing awesome articles that you can trust.


