One of the most important things about using lighting equipment is supporting and mounting it properly with grip. Grip is also used for props. Photo lighting grip can be a world of its own filled with the jargon to describe it. This article will give you a background understanding of the most important grip tools and what you would use them for.
It’s important to know the names of photo lighting grip to communicate with others on a set quickly when working together. You will need to request them with the correct names when placing rental orders from rental studios and grip houses, often orders are placed on spreadsheet-style lists.
Also, be aware that the film and video world often take those same items of grip and gives them an alternative name which is useful to know in your search for equipment.
Grip is equipment that can last the entire duration of your photo career so it is worth investing in quality pieces. Strong support of your equipment is important as a stand that topples over can cost a lot of money in broken or smashed lighting equipment.

Stands
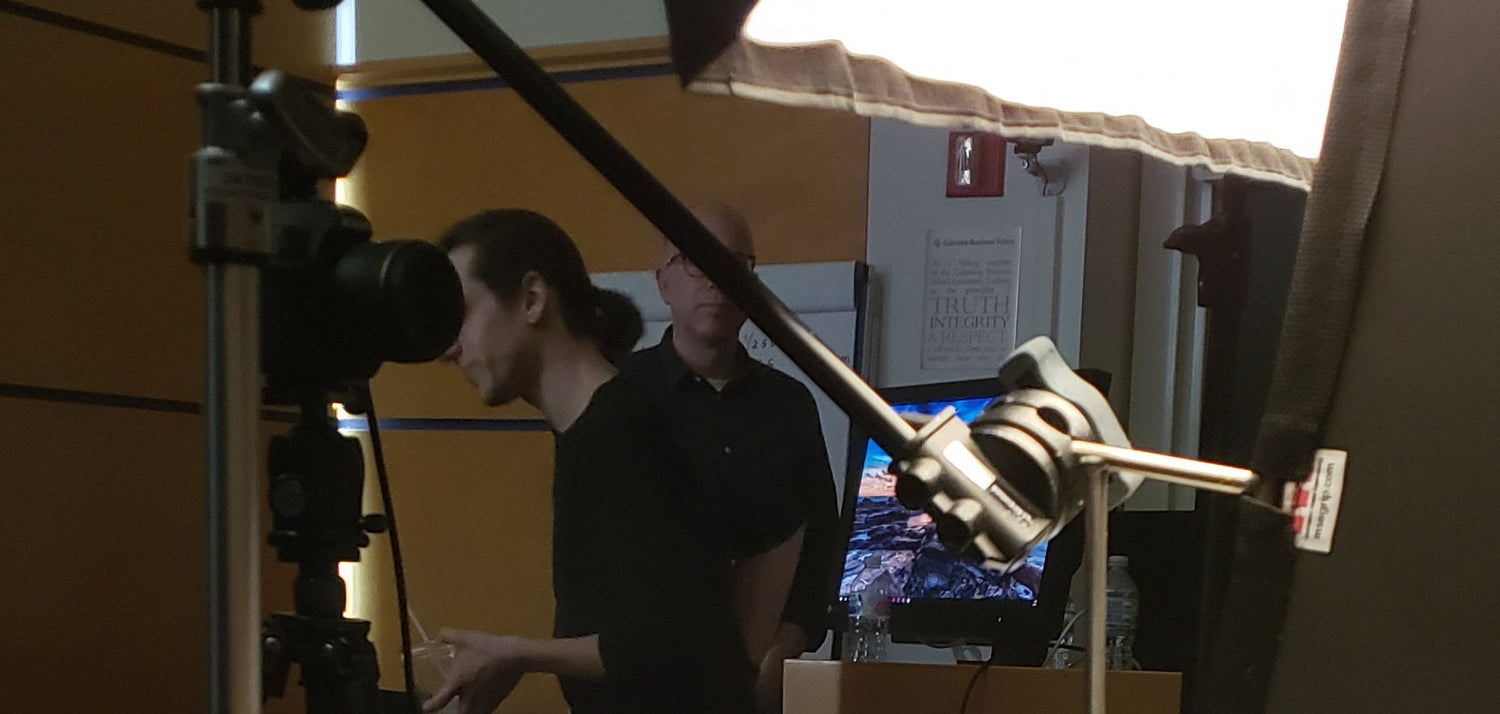
A key basic, found in every studio, is a C stand. A C stand is an indispensable industry standard as it’s durable, stable, and multifunctional. It’s also quite stackable.
Matthews created the first c stand with a folding base or turtle base in the 70s and is considered the premier brand of grip. The brand is expensive but very durable. Avenger, Manfrotto, and Kupo are other quality brands you will commonly see for grip equipment.
Generally, a standard c stand is 40” high and includes a grip head and a grip arm. A good example is Matthews 40" C+ Stand with Turtle Base, Grip Head and Arm The second most common size for C-stands are the 20” size.

A rocky mountain c stand or sliding leg c stand allows you to place stands on uneven surfaces such as stairs or a hill. Stands like the Kupo 20" Master Raiser C-Stand with Sliding Leg are commonly used on-location shoots.
Another type of stand used by photographers is a kit stand. This folds as one piece so can be more portable but is generally less stable than a c stand. Pay attention to the weight and maximum height to find one that matches your needs.
Rolling Stands
There are many different types of roller stands. It is important to look at what the load capacity of the stand is, more expensive stands will have higher load capacities, which is important as boom arms and certain heavy lights.
Some rolling stands have cranks for ease in raising and lowering heavy loads. A basic intro level rolling stand would be an Avenger High 14.10' Roller Stand 43 with Low Base.
Booms
A boom arm allows you to boom items that are heavier than a grip arm can hold. The weight capacity of a boom arm is the most important property to consider in a boom. Avenger Junior Boom Arm with CounterWeight, Chrome.

Weights
The counterweight on a boom is also sometimes known as a pumpkin weight. They are useful for weighing down many things such as a riser stand as they securely attach. A shot weight or a shot bag has 2 sections so it can be slung over the base of a c stand or a boom arm.
They come in a variety of weights with 15lb being the most common like this Matthews 15 lb shot bag. Sandbags are a crucial element when using booms, top-heavy stands, shooting outside, especially in the wind, and also around fragile interiors.
Grip Heads and Arms
A grip head allows you to securely mount grip arms to a c stand as well as quick precise adjustments of the location of whatever is mounted on the stand. A standard grip arm has another grip head permanently attached to the far end of the stand to allow for mounting the light, flag, scrim, or whatever you need at the desired angle.

Superclamp
The most ubiquitous multipurpose clamp is a super clamp with a slightly beefier version known as a mafer clamp or convi clamp. They can attach quite securely to many surfaces such as tabletops, shelves, poles, or even other stands.
When purchasing, if you don’t already own studs buy one like Manfrotto 035RL Super Clamp with Standard Stud. Two super clamps can easily be connected with one stud.
Magic Arm
A common accessory to a super clamp is a magic arm that can allow for cameras or speedlights to be mounted at a short distance with a very controllable position from the mounting point. Usually a magic arm like the Manfrotto 143A Magic Arm w/Camera Platform can be very useful when mounting a remote camera for shooting video or remote stills.

Knuckle
A knuckle is a piece with a similar function to a magic arm, it allows for precise positioning of an object (for example when connecting to a super clamp). It’s shorter but more robust than a magic arm. Matthews Knuckle Head.
Duck Bill Clamp
If you’re looking to hold something larger and floppy like a beadboard (a more rigid alternative to a reflector) the duckbill clamp is the ideal clamp Kupo Duck Bill Clamp - it can actually be connected to a super clamp.

Scrims
The scrim is a very popular piece of gear especially for shooting video but also photographers who need to control light outside. It’s a large piece of diffusion fabric mounted in a collapsible frame. It can be a powerful way to diffuse a light source (artificial or natural).
Scrims come in different sizes and are commonly referenced just by their dimensions. For example, a “6 by 6” refers to the very common 6’ x 6’ scrim mounted in a frame such as the Westcott 6x6' Scrim Jim Cine Kit. Same applies to a “4 by 4” or “12 by 12”
The easiest way to mount a scrim is to connect a grip head to the scrim frame and the top of a c stand on either side of the scrim. Extra grip heads not connected to grip arms like the Kupo 2-1/2" Grip Head with Big Handle are always useful and to have in a grip bag.
Apple Boxes
Apple boxes are a standard and useful item to have on set to quickly raise or lower items- especially useful to still life photographers or portrait photographers. They come in 4 sizes: full, half, quarter, eighth, or pancake.
Someone with limited storage space will find the Kupo 4 In 1 Nesting Apple Box Set very convenient.

How Does it All Fit Together?
The most common thread sizes for pins, screws, and adapters in photo and video are crucial for those learning about grip. This will help prevent the crisis of not having the right adapter to make two pieces go together. The most important and common sizes are ⅝ inch, ¼ inch 20 (also commonly just referred to as ¼), and ⅜”-16 (commonly referred to as ⅜)
⅝”
⅝” is a common size, also referred to as a baby pin. It’s the size of the top of the c stand column. A stand that is referred to as a baby stand has a baby pin on the top. (Baby in comparison to the much larger beefier stands used on some film sets or lighting heavy still sets like junior or combo stands).
¼”-20
1/4"-20 threaded is the size you will see on the bottom of most cameras and is also found on most tripod plates, the camera plate attached to a magic arm, the plastic cold-shoe plate included with speedlights, etc. Be aware some tripod heads and video camera mounts may be ⅜”-16.

Be Ready to Convert
When going between attaching different items of grip with different attachment sizes, most photographers have a robust collection of studs, spigots & adapters that allow conversion and connections. These always come in handy to macgyver solutions when combining and mounting different elements of photography lighting grip.
Examples of common pieces in a kit would include a Flashpoint Stud Adapter Set Female & Male 1/4" & 3/8" Studs.
Another common piece of grip you may see is a Manfrotto 014-14 Rapid Adapter - 5/8" Stud to 1/4-20" Thread. This allows you to mount a tripod head to the top of a standard light stand. In general, a ⅝ male stud is not threaded. Meaning that if you want to mount something threaded to the top of it you need something like this converter.
One Stand to Rule them All?
Many more lightweight kit stands like the Manfrotto 5001B 6' Retractable 5 Section Lightstand with 5/8" Mounting Stud, Black Anodized may have multiple options for mounting as the stand is lightweight enough to logically be used for speedlights as well as slightly larger strobes.
Therefore this stand has a 5/8" top stud topped by a 3/8"-16 thread, which is topped by a removable 1/4"-20 threaded top. Larger stronger stands will usually not have these options but it can be useful to own one where all three are included.
Sawhorses
This is a key accessory for setting up surfaces, especially in a still life studio. There is a range of different quality of these available at your local hardware store. The heavier the surface, the stronger the sawhorses will need to be.
Gaff Tape
While not officially grip, gaff or gaffer’s tape is closely related. A gaffer after all is someone who works with grip in the film world. Found on every professional set in multiple colors and widths, you never want to be without gaff tape.
Gaff Tape will hold strong and leave no residue. Strong enough to hold a reflector to a wall, mark a model’s spot on the ground, hold down the edges of a seamless, keep stray cables in line; and it peels off afterward like it was never there. White 2” Pro Gaff tape is a good place to start.
This article provided an overview of the essential elements of photography lighting grip and will allow you to better navigate purchasing, renting, and using the grip.
There is a wide variety of tools and niche products available for more specific needs but the general rule is stick to gear made with metal components, not plastic. Don’t skimp on the tools that will support your beloved lighting and camera equipment.
 This article was guest authored by our collaborator Laura Barisonzi.


