TURN EVA FOAM INTO AWESOME COSTUMES FOR PHOTO PROPS
If you’re a photographer who has a bit of time on your hands and the desire to make things yourself, this blog series is for you.
Styling a shoot can be a difficult thing to tackle. To create the perfect look for a photo shoot you have to handle wardrobe or costuming, accessories, props, sets, and more. Most of the time photographers will choose to work with a stylist who can source things, collaborate with a designer, rent costumes, or buy props.
But there is another way for those intrepid photographers who want total control and don’t mind getting their hands dirty: DIY.
Some of us will choose DIY because we might not have a strong enough portfolio to tempt a designer to work with us. Others because we can’t afford the costumes or props we’d love to own. Still others will DIY because we want to create something that aligns with our vision for a shoot, and we enjoy the process of bringing those one-of-a-kind pieces to life.
Whatever your reason for a DIY build, this series will aim to give you tips and resources you can use to create your own costumes, props, accessories, and other things you can use to create the awesome ideas in your brain.
FOAM
I stumbled upon building with foam a few years ago when I had a bunch of leftover foam floor mats and I wanted to make my kiddo the Hylian Shield from Legend of Zelda. Yes, I’m a nerd but that’s not the point. The point is that I happened across all the amazing things Cosplayers have been making out of foam for years, and realized just how much was possible.
Recently I had an idea for a photoshoot that would require armor but quickly realized that a good set of plate armor for a photoshoot would cost me upwards of a thousand dollars. So, I jumped back into the cosplay world and learned as much as I could about Foamsmithing.
What I learned is that EVA foam can be used to create almost anything. And since I’ve already got craft supplies galore and I love making things, I thought I’d try my hand at creating armor from foam for a photoshoot. Even better, I could create the armor so that it works in separate pieces. This way, once the shoot is over, I can continue to reuse the different pieces in other costumes.
In this blog post, I’m going to share a bit of the process I’ve used to create the upper body armor you’ll see in the photos below, as well as the resources I’ve learned from.
WHAT IS EVA FOAM?
EVA foam is a thermoplastic with many applications, from children's crafts to floor mats, shoe soles, and yoga mats. You’ve probably already used EVA foam countless times without realizing it.
It’s sturdy, lightweight, and cheap, and it can be shaped with the careful application of heat.
This means you can heat a piece of foam, bend it into the desired shape, and it will retain that shape when it cools. It can also be cut, sanded, and burned to create form and texture. This makes it an ideal material for crafting costume pieces and props.
Applying heat to EVA foam does release toxic fumes, so a respiratory mask and a space with open ventilation is a must.
TOOLS
These are the tools you’ll need to get started foamsmithing. They’re pretty universal whether you’re creating props or costumes, and you might already have many of these things at home.

- EVA Foam: It is available in several types and thicknesses, from the floor mats you can buy at Walmart to Cosplay specific types like HD foam from Blick Art Materials. You can find thin craft foam, 1mm and up, at most department stores. 5-6mm foam is common for costuming, with thicker pieces, such as 10mm, used more often for props, and the thinner pieces used for detailing or layering.
- Craft Knife and/or Box Cutter: to cut the foam cleanly you’ll need a very sharp knife.
- Cutting Mat: protects surfaces from gashes and scoring.
- Heat Gun: to heat shape and seal the surface of the foam by closing the pores so it can be painted.
- Hot Glue Gun: to affix pieces of foam or other materials to the foam
- Contact Cement: to connect the foam to itself.
- Respirator: protects you from the fumes released by the foam and contact cement
- Dremel: for shaping the foam
- Wood Burner or Soldering Iron: creates texture in the foam by burning it
- Gloves: protects your skin from contact cement, paint, etc.
- Flexible Sealant like Flexbond or Plastidip: the foam will need to be primed after it is heat-sealed. The primer needs to be flexible so the paint doesn’t crack and the foam is still able to bend freely.
- Acrylic Paint: acrylic paint remains flexible after it’s dry, which makes it perfect for painting foam.
- Paint Brushes: to paint your piece and make it look pretty.
- Patterns: there are ways you can create your very own patterns, but I suggest starting with pre-made patterns from other artists. They’re inexpensive and you’ll learn how to work with the patterns with less pressure. That way you can create your own in the future and understand how the process works.
You can, and probably will, acquire more tools, but these are the very basics that will get your project started.
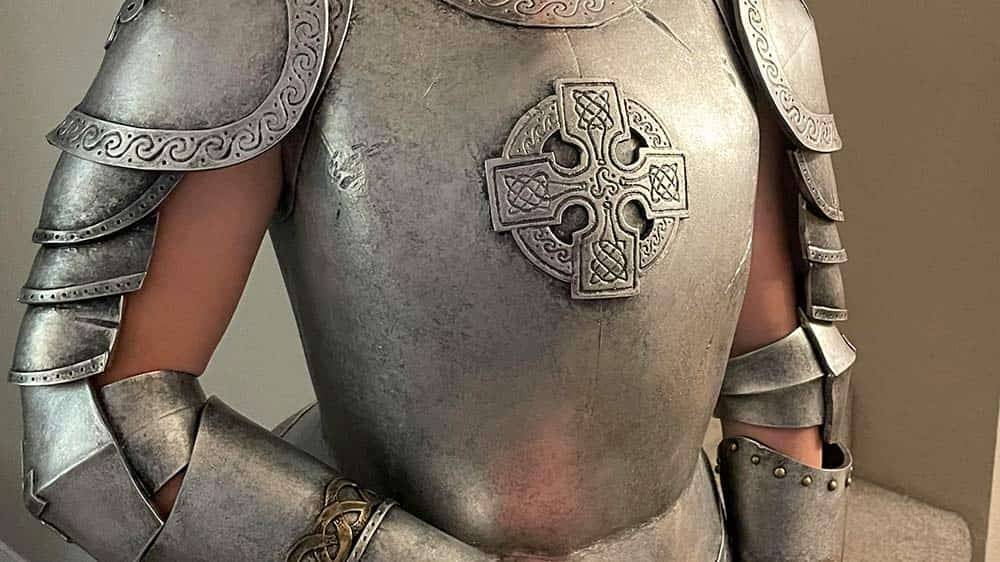
I chose to start with plate armor because it is relatively simple and I can hide my mistakes with battle damage and it should still photograph well. I suggest your first project not require too much skill because, like anything, learning to work with foam requires practice.
MY FIRST BUILD
I have a photoshoot idea that will require some killer props and costumes that will cost me an arm and a leg to buy, so I thought I’d turn my crafting skills loose and see what I could create. Plate armor can be made of simple shapes that will let me learn the techniques I’ll need for more complex builds but still give me the flexibility to be imperfect. This is what my process was like.
I found the base patterns from Kamui Cosplay. They’re easy to use, clear, and the shapes were exactly what I wanted. You can see the patterns HERE.
This is the general process I’ve used for each piece so far, with a few variations depending on the piece.
PROCESS
- Print the pattern
- Tape it together if required
- Cut the pattern out with scissors
- Trace the pattern onto 6mm foam, making sure to mark the pattern so it lines up later
- Cut the pattern out of foam with a box cutter using pressure and one smooth stroke so the foam cuts cleanly
- Put contact cement on the edges of the pieces where they’ll join the other pieces of the pattern
- Wait for the contact cement to try
- Line up the pieces using the alignment marks and press them together, being careful to make the joints smooth with no gaps
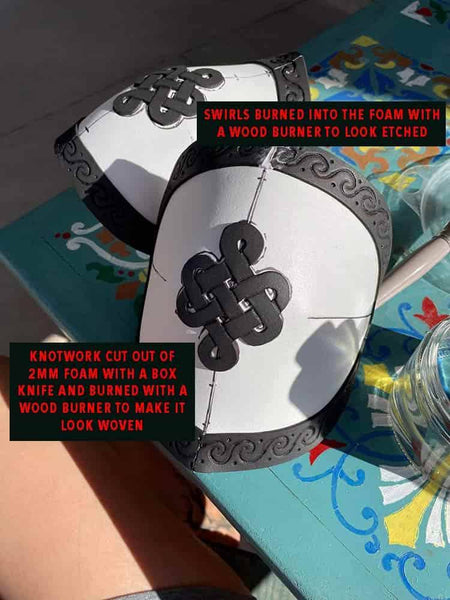
- Follow the same steps outlined above for any details or layered pieces to be added to the design, such as the sigil on the front of the breastplate or the edges of the armor.
- Do any shaping or detail work that needs to be done with the Dremel tool
- Use the wood burner to burn in any inscribed detail
- Heat seal and shape the piece (if required) with the heat gun
- Prime the piece with Flexbond thinned with a bit of water
- Paint the piece with acrylic paint

That has been my overall process so far, simplified a bit. I think the more experience I get, the more this will alter and get finely tuned to the nature of the piece, but it is working for me so far.

As you can see, there was a lot to learn in the process, and the armor can be used in multiple applications since the pieces can be used separately. And now I have multiple pieces of costume I can use in my photographic wardrobe for all kinds of shoots.

I didn’t break every step down because I would rather send you off to people and resources who know a LOT more about foamsmithing than I do. These are the builders and cosplayers I used as resources to learn what was possible, what techniques to use, what tools to purchase, and how to troubleshoot the problems I ran across.
I’ll continue to share my progress as I learn more about how photographers can use this discipline to create costumes and props for photoshoots, but keep your eyes on these artists if you want to gain the skills needed to create awesome things out of foam.
RESOURCES
All of these resources have both free and paid products including education, materials, patterns, books, and links to Patreon pages.
An amazing resource for ALL things Cosplay, with engaging videos that give clear instructions and provide lots of resources to learn from.
Lots of beginner videos and technique videos on everything from texturing to vacuum forming foam.
Props galore, free patterns, techniques, painting advice, and highly instructional videos.
Intricate builds using simple, affordable tools, with a subtle sense of humor.
CONCLUSION
The goal of this blog series on DIY techniques for photographers is to give you as many ideas and resources as possible to help you build the technical skills that will allow you to make anything you want or need for a photoshoot.
DIY isn’t for everyone, though, and it’s always fantastic to support the other artists in the community who make their living creating amazing art for photographers to photograph. Personally, there are some things I won’t even try to create for myself, and I’d rather depend upon a professional. But I love to make things and sometimes I have a vision that might cost more than I could afford if I needed to commission an artist.
The ability to make things for myself means that I don’t have to put off a photoshoot or shelf an idea because I can’t afford to pay someone else to make it for me.
Hopefully, the series gives you some insights into things you can create for yourself and use to help realize your vision.


