
Editing can not only be a tedious and time-consuming task, but it can seem quite daunting, especially to photographers just starting. Using Lightroom Classic allows you to efficiently batch edit a photo session. It is a time-saving process that can help shorten turnaround time to clients.
This, in turn, allows you to get through jobs quickly but efficiently without compromising the quality and opens your availability to take on more work. Let’s go through how to batch edit in Lightroom.
What is Batch Editing?
Batch editing allows for the ease and ability to apply one or multiple edits and settings from one photo to others in the same session. The trick is they have to share the same lighting and exposure.
Batch editing can assist in creating an efficient post-production workflow and lead to photos that look cohesive. Additionally, you’re also able to export the batch of photos to a specified folder to keep you and your work organized.
Editing Options
The edit options in Lightroom allow you to manipulate a variety of settings. Whether the edits are basic and minimal or more involved and create a big impact, it creates an ideal space to batch edit photos.
Editing with Presets
Presets are often a go-to and the easiest way to apply edits. You can apply during import into Lightroom or when you edit your photos in the Library Module.
While Lightroom offers existing presets, you’re able to create your own to apply frequently used adjustments to your photos instead of having to apply them individually. Presets that other photographers have made can also be sourced when looking for a specific look.
Applying/Adjusting Images Manually
Presets, while convenient, are not your only option. Lightroom is a useful editing platform that can be used to edit photos. Housed under the Develop tab is a wide range of tools to edit your photos with. It allows you to develop your retouching skills and editing style.
Editing Upon Import
You have three options when it comes to importing photos into Lightroom Classic.
- First off, the most obvious option is to select the Import button on the lower-left corner of the Library Module.
- The second option is to select File > Import Photos from the Main Menu.
- Lastly is to drag a folder or selected files into the Grid view.
Whichever method you use, all yield the same result.

For the first two import options in the upper left corner of the import window, you will see Source as a means to navigate to the files you’ll be importing.
You have the option to select all or a few photos to import. The checkmark on the upper left corner of the image lets you know which photos are selected for import. Once you have selected the photos you can specify on the top center of the import window how you want to add your files to the catalog.
Each option gives you a brief synopsis of how it imports. I definitely recommend importing your images into a labeled folder to keep your work organized.

On the right-hand side of the import window is a tab labeled Apply During Import. Under Develop Settings you will find a variety of edits you can apply to the images upon import. They include edits like Color, Creative, B&W, and many more.
Editing in the Library Module
Editing in the Library Module is one of the options on how to batch edit in Lightroom.
Synchronize Settings
By double-clicking an image in the Library grid view it will bring you to the Loupe view, which enlarges the image. You’re able to apply edits or presets to an image before applying them to the rest of your batch.
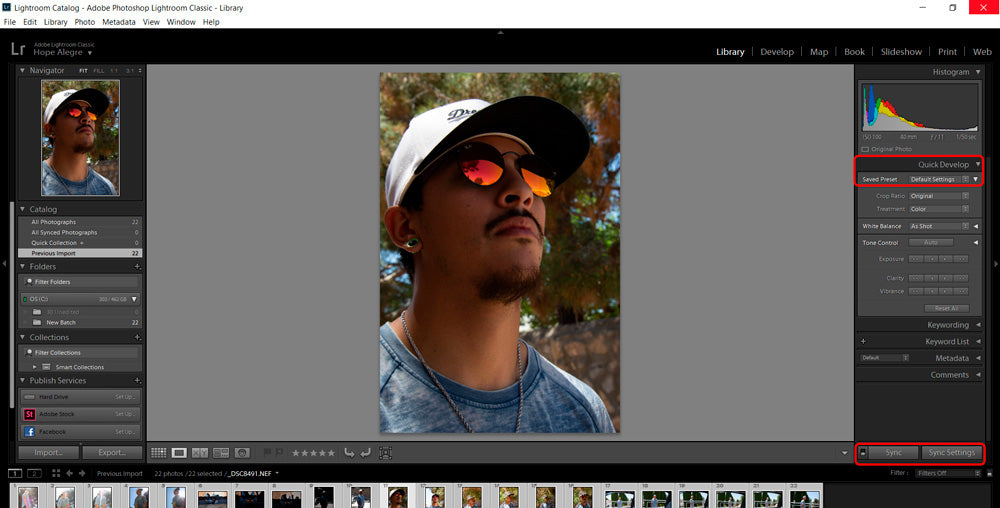
Under the Quick Develop panel, there is a drop-down menu of preexisting presets, presets you have made and saved or sourced presets that were added. All the edits included in the preset are automatically applied.
Once the edits have been applied and meet your expectations, you can move on to applying them to the photos that will be receiving the same edits. If the edits will be applied to all the photos press Ctrl + A (on Windows) or Command +A (On Mac) to select all photos in the batch.
To select only a few, you will press either Command or Ctrl accordingly and select the individual photos that will be receiving the same edits.
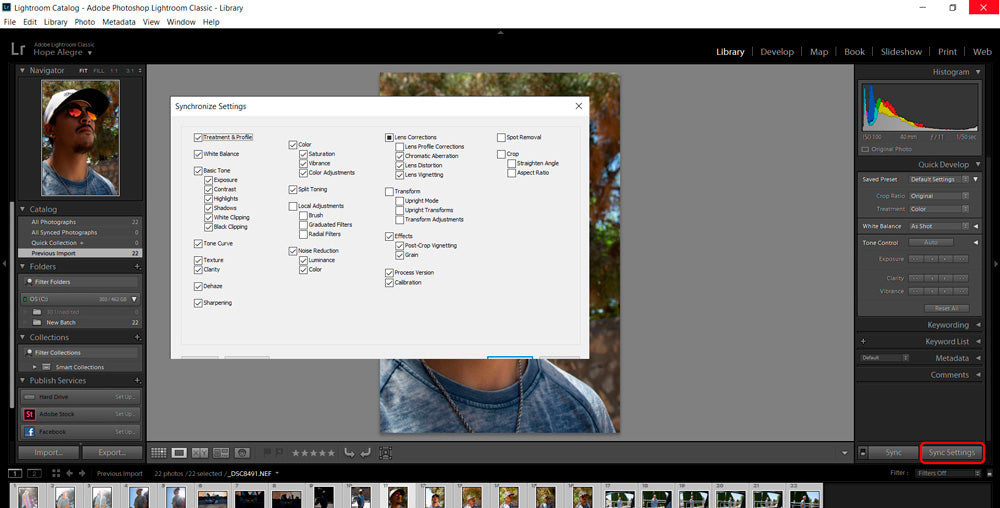
On the bottom of the Quick Develop panel, you will see the options Sync and Sync Settings. You will select Sync Settings, and in the pop-up window, you will hit Synchronize. All edits will be applied to the selected images. If any adjustments are needed on the photos, they can be made under the Develop Module.
Auto-Sync
To use Auto-Sync to apply presets is similar to Synchronize Settings. However, you will need to toggle the switch on Sync to turn on Auto-Sync before selecting it. A window will pop up to Synchronize Metadata where you would click Synchronize.

At this point, any preset added from the Saved Preset dropdown will be applied to all selected images.
Editing in the Develop Module
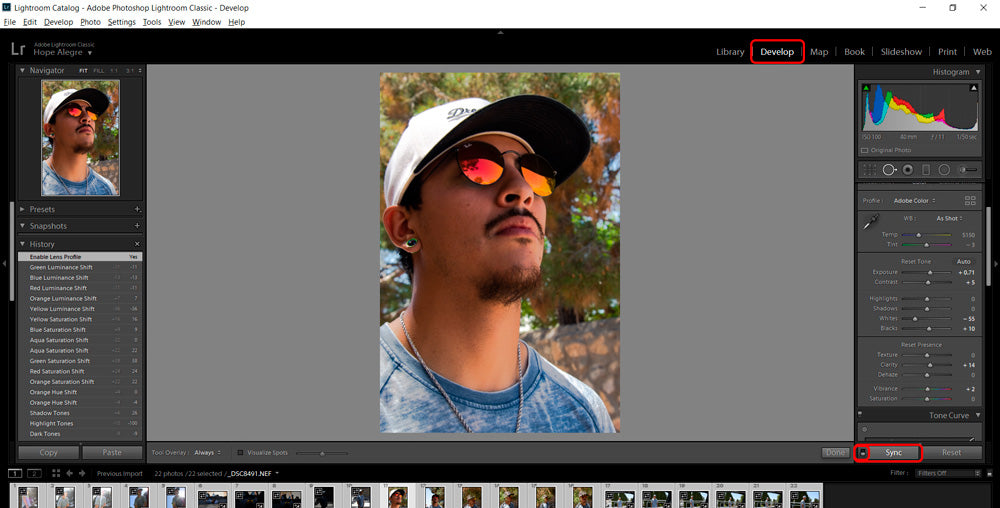
Editing under the Develop Module is another option on how to batch edit in Lightroom. You’re able to apply more specified edits with the large range of options that it provides — with the option to Sync or Auto-Sync.
Once you apply edits to a single image and fine-tune the look you envision, the rest of the photos will be selected as stated previously — either using Command/Ctrl + A to select all, or Command/Ctrl while selecting specific images.
From there you click the Sync button and the Synchronize Settings window will pop up for you to hit Synchronize. All the photos will now be synced and have the same edit settings applied.
To Auto-Sync, all the same steps used in the Library Module will be followed. Select all the photos before toggling the switch on the Sync button to activate Auto-Sync. This will ensure that any other edits made to an image will be applied to the rest that is selected.
Working through Settings
Other options to batch editing, besides Sync or Auto Sync, are to Copy and Paste Settings or Paste from Previous. Edits, however, can only be pasted to individually selected photos.
Copy/Paste Settings
Another option to apply edits from one image to the rest of your batch is as follows. Start by copying the edits from the photo you were working on. On a Mac, you hit Command + Shift + C or on Windows, it will be Ctrl + Shift + C.
The Copy Settings window will pop up where you can click and copy. To paste the edits that were previously copied, you will hit either Command + Shift + V or Ctrl + Shift +V.

Paste Settings from Previous
Another way to apply edits from an image you’re working on to others in the batch is to select the new image and press Command + Option + V on Mac or Ctrl + Alt +V on Windows. Without having to copy, this shortcut will automatically paste all settings from the previous image you were working on and give you a good starting point.
Select Settings
When you Sync Settings, either in the Library or Develop Module, the Sync Settings pop-up window gives you the option to apply all edits or select a few that will be applied. The same goes when you’re copying edits to paste onto other photos. The Copy Settings pop-up window allows you the same option to select all or only a few edits to be pasted onto other photos.
Editing in Adobe Lightroom CC (Cloud version)
All the steps above are specific to Adobe Lightroom Classic. If you are editing in Lightroom CC, unfortunately, the batch editing options are limited, and the navigation to achieve them is slightly different.
The First Option Is To Paste From Previous
Since there are not actual Modules like in the classic version, all edits are made under the Edits panel located at the top of the toolbar on the right-hand side. Under the Edit panel, you have your standard tools for Color, Light, Effects, and so forth. At the very bottom of this panel is your Presets.
Whether you’re applying presets or manual edits, to apply them to other photos in your batch will require you to copy and paste to each photo. For Mac, your controls would be Command +C to Copy and Command + V to paste. For Windows users, it is simply Ctrl + C to Copy and Ctrl + V to Paste.
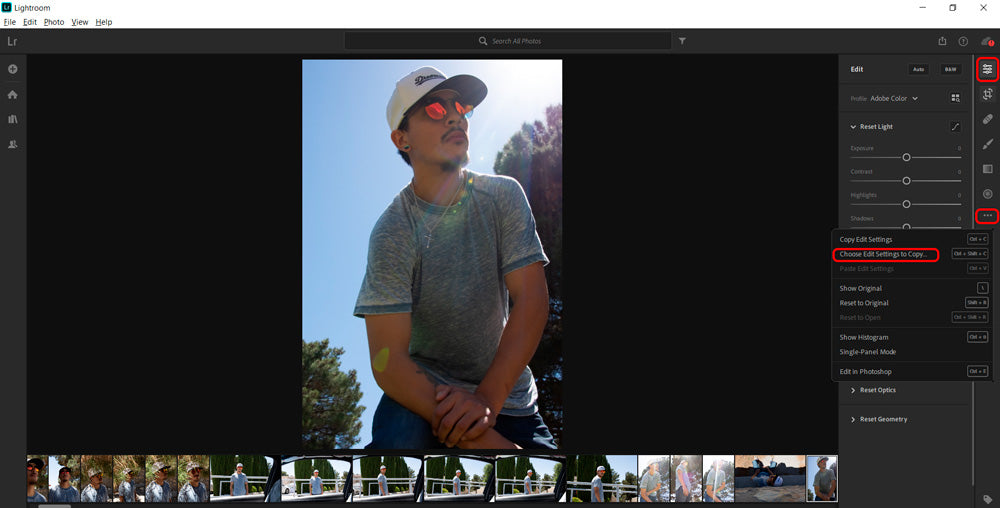
The Second Option You Have Is Choose Edit Settings To Copy
For this option, you will click the three dots (•••) located on the toolbar. In the pop-up window, you will see “Choose Edit Settings to Copy,” which will bring up a new popup window, where you’re able to select which edits you wish to copy onto other images.
The shorthand for this option is Command + Shift + C for Mac users or Ctrl + Shift + C for Windows users. You’re able to select or deselect settings you want and click Copy. The selected settings can be pasted the same way, using Command or Ctrl + V.
Summary
As photographers, we know there are almost always photos to be edited. Lightroom can be a powerful tool, and it empowers beginners and other users to edit photos in large batches and end with cohesive, quality work.

90 Days Of Content
Over the next 90 days we are going to be working with some top artists to explore recommendations giving you solutions to problems we have all gone through. We are paying the writers a really fair wage for every original article, and we are writing about things that aren’t sponsored by any brand. There is no one but our opinion behind it. We would love it if you do use our affiliate links here so we can continue to keep writing awesome articles that you can trust.


