What Is An Eraser Tool In Photoshop: A Concise Guide
The Eraser tool in Photoshop is an essential feature that allows users to get rid of unwanted elements in their images. Essentially, this powerful tool can make pixels transparent or match them to the image's background color, giving you the flexibility to remove or modify parts of your photos without causing any visual distortions. By customizing tool settings such as size and hardness, users can achieve their desired effects with ease.
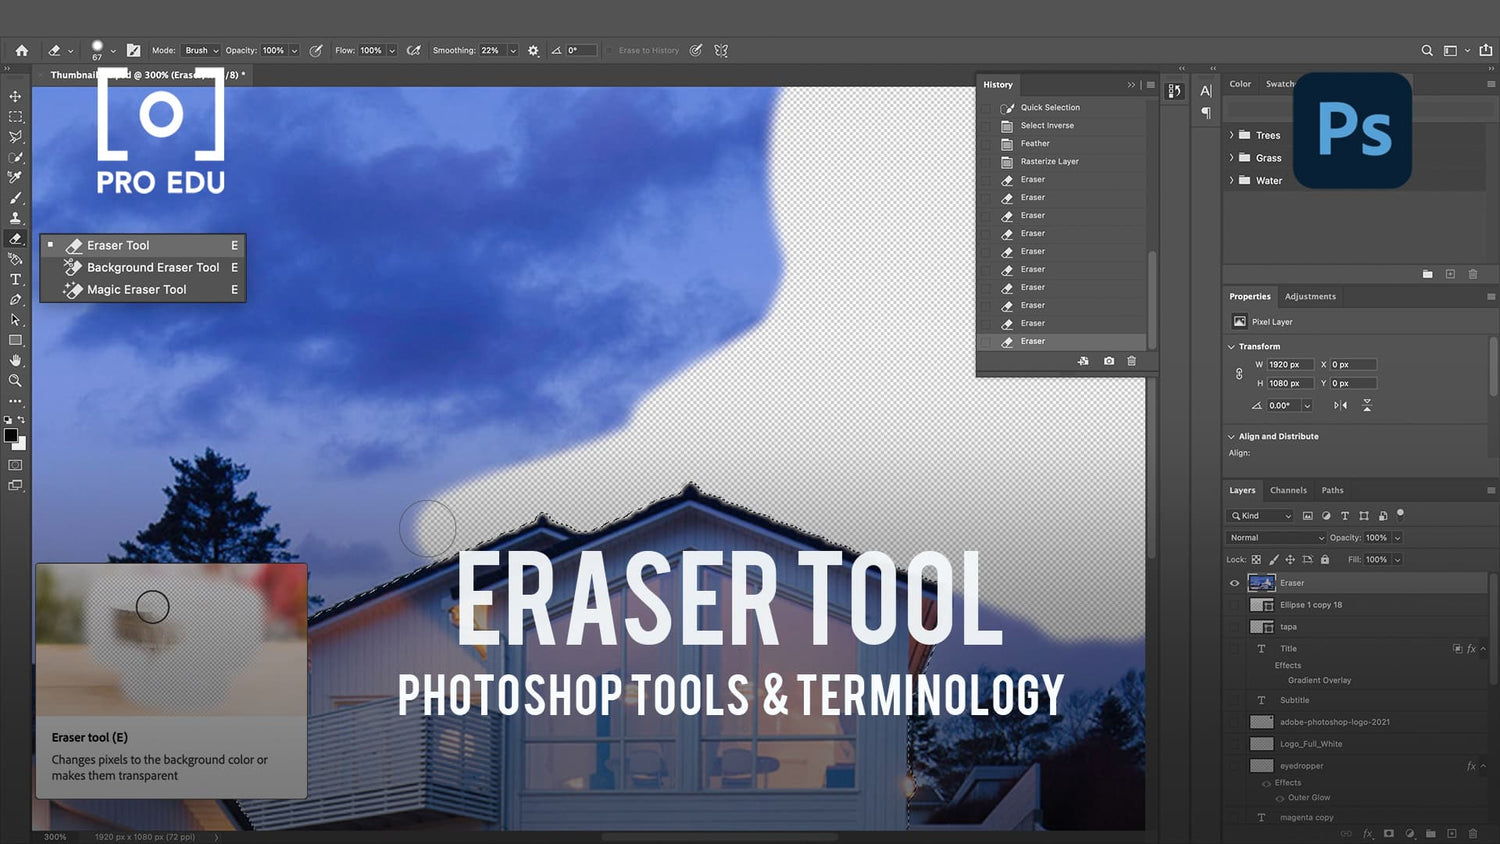
Adobe Photoshop offers various iterations of the Eraser tool, including the standard Eraser tool, the Background Eraser tool, and the Magic Eraser tool. Each type has its unique capabilities and uses, allowing users to work effectively on different aspects of their images. Gaining a thorough understanding of these tools is crucial to enhancing your Photoshop skills and improving your editing workflow.
Key Takeaways
- The Eraser tool in Photoshop allows users to remove or modify elements in their images
- There are multiple types of Eraser tools available in Adobe Photoshop, each with unique uses
- A deep understanding of these tools can greatly improve your editing workflow and overall Photoshop skills.
Understanding the Eraser Tool in Photoshop
Eraser Tool Features
The Eraser Tool in Photoshop is a versatile utility for removing specific parts of an image. It comes with different settings such as the size, hardness, and opacity of the brush, allowing us to customize the erasing effect. We can select between the Brush, Pencil, or Block eraser, depending on the desired level of precision and control.
Some other noteworthy features include the ability to erase to a saved state or snapshot of the image. This can be especially helpful in case we need to revert back to a specific point in our editing process. To do so, simply select the appropriate state in the History panel.
Differences between Eraser, Background Eraser, and Magic Eraser
In Photoshop, we can find three distinct erasing tools: the standard Eraser, Background Eraser, and Magic Eraser.
- Eraser Tool: This tool erases the pixels beneath the cursor, depending on the previously mentioned brush settings.
- Background Eraser Tool: Unlike the standard Eraser, the Background Eraser detects the edges of an object and erases the color surrounding it, while maintaining the object's edge details. This tool is ideal for removing backgrounds or isolating objects in an image.
- Magic Eraser Tool: This tool is similar to the Magic Wand selection tool, but instead of creating a selection, it erases the selected area automatically. It works by erasing contiguous colors based on a specified tolerance range.
By understanding the differences between these three erasing tools, we can make better decisions when choosing which one suits our editing needs. Each tool has its unique strengths and is tailored for specific situations, allowing us to create clean and professional edits in our Photoshop projects.
Working with the Eraser Tool in Photoshop
Exploring the Options Bar
When using the Eraser tool in Photoshop, we'll first encounter the Options Bar. This features various settings like mode, brush size, and opacity. We can choose between Brush, Pencil, or Block types for our eraser and adjust settings accordingly. It is essential to explore these settings to maximize our usage efficiently.
Understanding Destructive Tools
The Eraser Tool is considered a destructive tool. When erasing pixels, they are permanently removed rather than hidden, which might cause issues for future edits. To work around this, it's advisable to duplicate the background layer in the Layers Panel before erasing. By doing so, we'll ensure we always have a backup of the original image.
To erase parts of an image, we can simply select the Eraser Tool from the Toolbar and drag across the desired areas. The eraser will either make pixels transparent or match them to the image background color based on the settings we've chosen in the Options Bar. Be mindful of using the Eraser Tool to make informed decisions about retaining essential information within our images.
Advanced Eraser Tool Techniques
Using Eraser within Different Modes
Photoshop offers various modes when using the Eraser Tool, and switching between them enables us to achieve different effects. For instance, we can use the Eraser as a Brush, Pencil, or Block. The brush tool provides softer edges, while the Pencil mode gives us hard-edged results. Block mode, on the other hand, has a square shape instead of a circle. We can further adjust the size, hardness, and opacity according to our needs, resulting in a more tailored erasing effect.
When working with multiple layers, using the option to Erase to History allows us to control the eraser's impact on the layer hierarchy. In addition, we can use Layer Masks instead of directly erasing pixels. Layer masks allow us to maintain the original image data while providing a non-destructive editing process.
Mastering the Background Eraser and Magic Eraser
Two alternate eraser tools in Photoshop are the Background Eraser and Magic Eraser. The Background Eraser is especially useful when you need to remove a specific color (typically a background) from an image. To achieve this effect, you can adjust the Tolerance level, which defines the range of colors to be erased.
Furthermore, enabling the Protect Foreground Color option will help in preserving your desired foreground colors from being erased. This tool works by keeping your specified foreground color safe while eliminating surrounding colors or background.
The Magic Eraser is another valuable tool that automatically erases a distinct color area or multiple areas with similar color properties. By modifying the Sampling and Limits settings, you can alter the precision of color selection in the image. The Magic Eraser works best when there are areas with contrasting colors, making it easier to erase specific portions without affecting the rest of the image.
Utilizing these advanced techniques with the Eraser Tool in Photoshop can significantly improve our image editing capabilities. By experimenting with the various modes, settings, and configurations, we can efficiently achieve the desired erasing effect in our projects.
Improving Workflow with Eraser Tool
Utilizing Photoshop’s Keyboard Shortcuts
When working with the Eraser Tool in Photoshop, it's essential to be aware of the keyboard shortcuts that can improve our efficiency. By pressing the "E" key, we can quickly access the Eraser Tool, and "Shift+E" allows us to toggle between different eraser types, such as the standard Eraser, Background Eraser, and Magic Eraser.
Knowing shortcuts also makes it easier to switch between tools, like the pencil tool and the Eraser Tool. For modifying brush settings like brush size and hardness, we can use the "[" and "]" keys to decrease and increase brush size, respectively, and "{", "}" keys to decrease and increase brush hardness.
Efficient Erasing with Brush Settings
The Eraser Tool features a variety of brush settings that we can use to optimize our workflow. By adjusting parameters like opacity, flow, and smoothing, we can erase with more precision and control.
For example, changing the opacity can be helpful when we want to erase part of an image subtly, while modifying the flow lets us control the erasing movement's speed. Additionally, enabling anti-alias can give a softer edge to the brush, useful for blending foreground and background elements seamlessly.
One helpful feature in the Eraser Tool is the "Auto Erase" option, which replaces an erased area with the background color, set from our color swatch. Selecting different brushes or choosing a brush mode can further improve our erasing experience.
By utilizing these brush settings and keyboard shortcuts, we can efficiently erase and edit our images in Photoshop using the Eraser Tool.
Conclusion
As photographers, we often rely on Photoshop's eraser tool to refine and perfect our images. The eraser tool in Photoshop is quite versatile, allowing us to easily remove unwanted elements and clean up our photographs. With options like the standard eraser, background eraser, and magic eraser, photographers can effortlessly enhance their work.
Mastering the eraser tool in Photoshop is crucial for creating professional-quality images for our photography portfolio. Whether we're using it for simple pixel removal or more complex tasks like separating subjects from their backgrounds, it's a powerful tool with plenty of useful features.
In conclusion, understanding and utilizing the eraser tool in Photoshop is an essential skill for photographers who strive to produce top-notch work. By familiarizing ourselves with its various functions and applications, we can ensure our photographs always look their best. Remember, practice makes perfect, so don't be afraid to experiment and develop our skills in using this indispensable tool.
Frequently Asked Questions
How does the Background Eraser tool differ from the standard Eraser?
The Background Eraser tool is designed to remove background elements in an image while preserving the main subject. It detects the difference between the desired foreground and background colors, making it easier to erase without affecting the main subject. On the other hand, the standard Eraser tool is more generalized and erases any pixels you brush over, without distinguishing between foreground and background elements.
What is the shortcut for the Eraser tool in Photoshop?
The shortcut for the Eraser tool in Photoshop is simply pressing the "E" key on your keyboard. This quick access allows you to easily switch to the Eraser tool while working on your project.
How can I erase an image without removing the background?
To erase an image without removing the background, we recommend using Layer Masks. Layer Masks allow you to hide parts of an image non-destructively, meaning the hidden portions can be revealed later by adjusting the mask. This method maintains the background while erasing or modifying the subject of the image.
What is the purpose of the Eraser tool in digital drawing?
In digital drawing, the Eraser tool serves a similar purpose to a traditional eraser with pencil sketches. It allows artists to remove unwanted lines and details, helping refine their artwork and correct mistakes. Additionally, the Eraser tool can be used to create intentional effects such as texturing or revealing underlying layers.
How does the Magic Eraser tool compare to the regular Eraser?
The Magic Eraser tool works by automatically detecting and erasing areas of similar color in the image. This can be a time-saving alternative to the regular Eraser, particularly when working with large areas of similar colors. However, it's essential to be mindful of the tool's settings, such as Tolerance, to avoid unwanted effects or alterations to the image.
What modes are available for the Eraser tool in Photoshop?
The Eraser tool in Photoshop offers three modes: Brush, Pencil, and Block. The Brush mode has soft edges and allows you to adjust size, hardness, and opacity. Pencil mode has hard edges, mimicking a traditional pencil. The Block mode erases in a square shape rather than a circular or brush-like shape, offering more rigid erasing capabilities.


