
What is an Adjustment Layer in Photoshop? Unlocking Creative Control and Flexibility
In the realm of digital image editing, Adobe Photoshop stands as a hallmark of innovation and efficiency, offering an array of powerful tools to enhance and manipulate photographs. Among these tools, adjustment layers are particularly vital for non-destructive editing. With adjustment layers, we have the ability to apply a wide range of color and tonal adjustments to our images without permanently altering the underlying pixels. Learn what is an Adjustment Layer in Photoshop with this article.

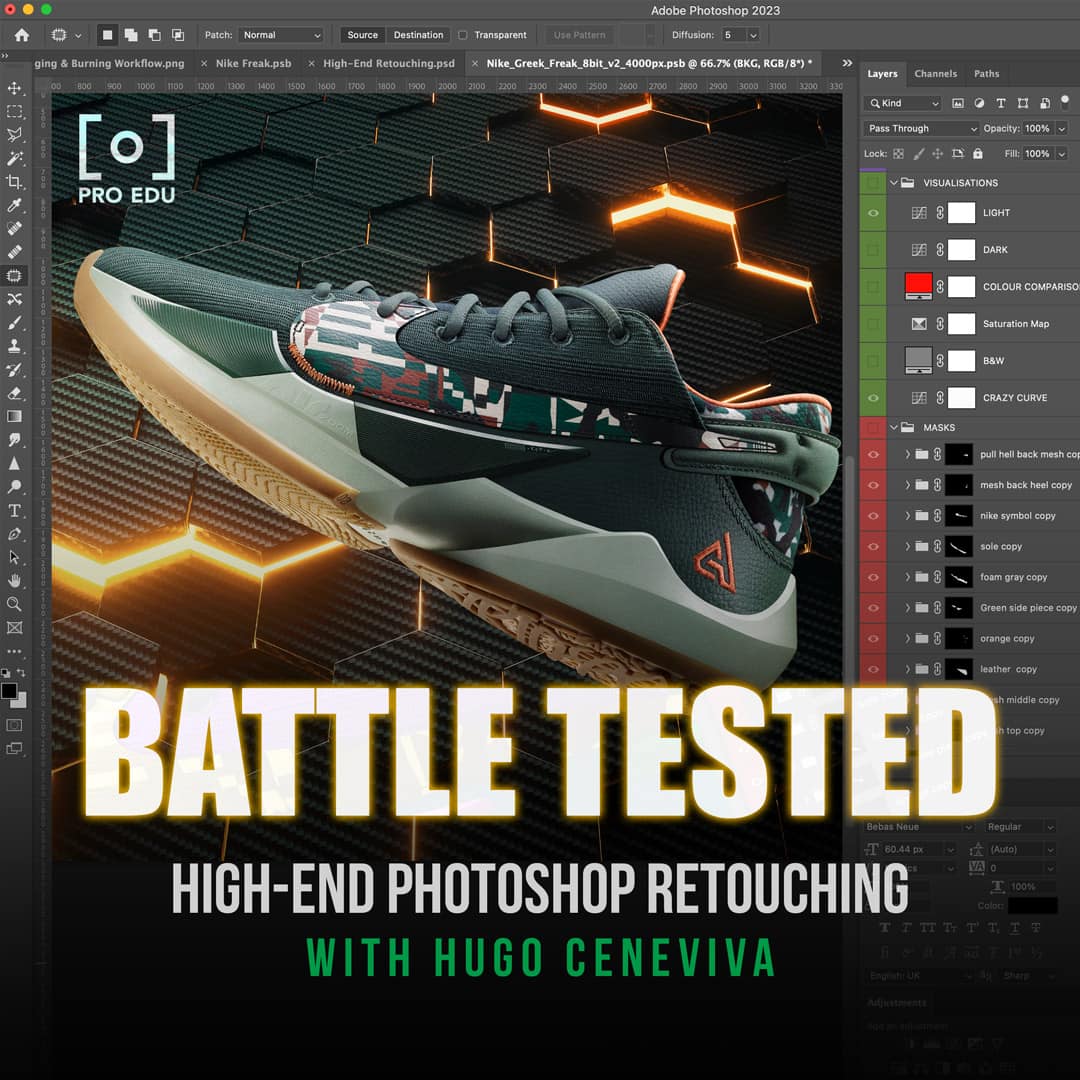
Photo from the Course "Battle Tested Retouching" with Hugo Ceneviva
Adjustment layers sit above the standard image layers and act as overlays that can adjust brightness, contrast, hue, saturation, and more, without directly affecting the actual image. This is invaluable because it allows us to experiment and fine-tune our edits, maintaining the flexibility to tweak or remove changes at any stage of the editing process. Understanding how to use adjustment layers effectively can significantly improve our workflow, giving us greater creative control and precision while preserving the quality of the original photograph.
Key Takeaways
- Adjustment layers enable non-destructive editing by overlaying tonal and color adjustments.
- They provide a flexible editing workflow, allowing changes to be tweaked or removed at any time.
- Mastery of adjustment layers can enhance creative control and preserve image quality.
Understanding Adjustment Layers
In this section, we're going to examine what adjustment layers are and how they function within Photoshop. We'll also discuss their types and demonstrate how to create one.
Basics of Adjustment Layers
Adjustment layers in Photoshop are powerful tools that allow us to make image adjustments without permanently altering the original image layers. These layers sit above our image, and any changes we make are applied nondestructively. This means we can adjust brightness, contrast, hue, and saturation among other properties and can revisit and tweak these adjustments at any time.
Types of Adjustment Layers
There are various types of adjustment layers available in Photoshop, each serving a unique purpose:
- Brightness/Contrast: Adjust the overall lightness or darkness and contrast of your image.
- Levels: Fine-tune the intensity levels of shadows, midtones, and highlights.
- Curves: Provides more control than Levels for adjusting image tones.
- Hue/Saturation: Alter the hue and saturation to adjust the color intensity and range.
- Vibrance: Increase the intensity of the more muted colors and leaves the well-saturated colors alone.
- Others include Black and White, Color Balance, and many more, often with presets for faster application.
Creating Your First Adjustment Layer
To create your first adjustment layer, we'll start by navigating to the Layers Panel. At the bottom of this panel, click the "New Adjustment Layer" button and select the type of adjustment you want to apply. This action will add an adjustment layer to our project, and from here, we can manipulate our image nondestructively. If we need to undo or make changes, we can easily do so as adjustments are not permanent until we save the final version of our image.
Editing with Adjustment Layers
Adjustment layers in Photoshop are powerful tools that allow us to apply diverse edits without altering the original image data. These layers operate as a sort of filter, adjusting attributes such as brightness, contrast, and color, which can be modified or removed at any time to fine-tune the image.
Adjusting Exposure and Contrast
To enhance the visual impact of an image, we often adjust its exposure and contrast using adjustment layers. By adding a Brightness/Contrast adjustment layer, we can make an image appear lighter or darker and increase or decrease its contrast. Alternatively, the Levels or Curves adjustment layers offer more control to target and tweak specific tonal ranges, enhancing the overall depth and dimension.
Color Correction and Enhancement
When addressing color issues, we rely on adjustment layers such as Hue/Saturation, Vibrance, or Color Balance. These allow us to correct color casts and enhance the image's overall color quality without compromising the underlying pixels. Precise control over saturation and hues ensures that the colors match our vision.
Layer Masks and Blending Modes
Layer masks and blending modes offer nuanced control over how adjustment layers affect the image. We can use a layer mask to apply changes to selective areas of the image. By painting on the mask with different opacity levels of the brush tool, we can blend the adjustments smoothly. Blending modes dictate how the colors and tones of the adjustment layer interact with the layers below, producing various effects from subtle to dramatic.
Advanced Techniques and Tips
In our exploration of Photoshop's capabilities, we'll focus on refining our work through precision tools and uncover innovative ways to apply adjustment layers for compelling results.
Fine-Tuning with Curves and Levels
When we seek to enhance our images, we often turn to Curves and Levels for fine control over the lighting and color balance. These tools allow us to make targeted adjustments to the highlights, shadows, and midtones without altering the underlying pixels, ensuring a nondestructive editing workflow.
- Curves: By creating points along the curve line in the Adjustments panel, we can manipulate specific tonal ranges. A slight S-curve can increase contrast, brightening highlights and deepening shadows.
- Levels: We use Levels to set the white point, black point, and midtones of an image. Moving the sliders, we can swiftly correct exposure or enhance the depth in textures.
Creative Uses of Adjustment Layers
Adjustment layers offer a versatile array of effects that can retouch images or contribute an artistic flair. By stacking different adjustments, we can build up complex effects while maintaining the freedom to readjust them at any time.
- Color Balance: We can shift colors to warm or cool tones, affecting the mood of the image.
- Black and White: Converting a layer to black and white can highlight textures and shape while allowing for selective color reintroduction with masks.
- Textures and Retouch: Employing adjustment layers to selectively darken or lighten areas, we can emphasize textures or soften them for retouching purposes.
By integrating these advanced techniques into our workflow, we harness the full potential of adjustment layers to refine and creatively alter our images.
Frequently Asked Questions
In our exploration of Photoshop's efficient tools, we'll address common inquiries about adjustment layers—a vital feature for non-destructive editing.
How can I create an adjustment layer in Photoshop?
To create an adjustment layer in Photoshop, we can click the New Adjustment Layer button at the bottom of the Layers panel. Alternatively, we can go to Layer > New Adjustment Layer and select the type of adjustment we want to apply.
What are the different types of adjustment layers available in Photoshop?
Photoshop offers various adjustment layers such as Levels, Curves, Exposure, Vibrance, Hue/Saturation, and Color Balance. Each one serves a specific purpose in adjusting the image's color and tonality.
How do adjustment layers affect the layers beneath them in Photoshop?
Adjustment layers apply color and tonal changes to all the layers below them without permanently altering the original image. This allows us to experiment and make adjustments while preserving the underlying pixels.
Can you explain how to use the adjustment panel for editing in Photoshop?
In Photoshop, we utilize the adjustment panel to fine-tune the properties of each adjustment layer. By selecting an adjustment layer and modifying the settings in the panel, we can control the intensity and range of our adjustments.
Is there a way to non-destructively adjust the color balance in Photoshop?
Yes, we can non-destructively adjust the color balance by using a Color Balance adjustment layer. This allows us to change the color tones in an image’s shadows, midtones, and highlights without directly modifying the image itself.
What are the steps to find the adjustment panel if it is missing in Photoshop?
If the adjustment panel is missing, we can find it by going to Window > Adjustments. This will display the panel, allowing us to access all the adjustment layer options we need.
Suggest Photoshop Course To Take


