What Is A Marquee Tool In Photoshop: Essential Guide for Beginners
The Marquee Tool is a versatile and essential feature in Adobe Photoshop that allows users to make various selections within an image. This tool comes in different shapes, including rectangular, elliptical, single row, and single column, which can be easily switched according to your specific needs. By selecting portions of an image, you can apply edits and adjustments to the chosen area without affecting the rest of the image.
Using the Marquee Tool effectively requires a good understanding of its diverse selection options and shortcuts. This will enable you to work more efficiently and creatively while making selections. Additionally, there are advanced Marquee techniques that can elevate your image editing skills even further, providing you with a professional touch.
Key Takeaways
- The Marquee Tool enables diverse selections for editing specific areas of an image.
- Selection options and shortcuts help increase efficiency and accuracy while using the tool.
- Advanced Marquee techniques contribute to more professional and precise image editing.
Understanding the Marquee Tool
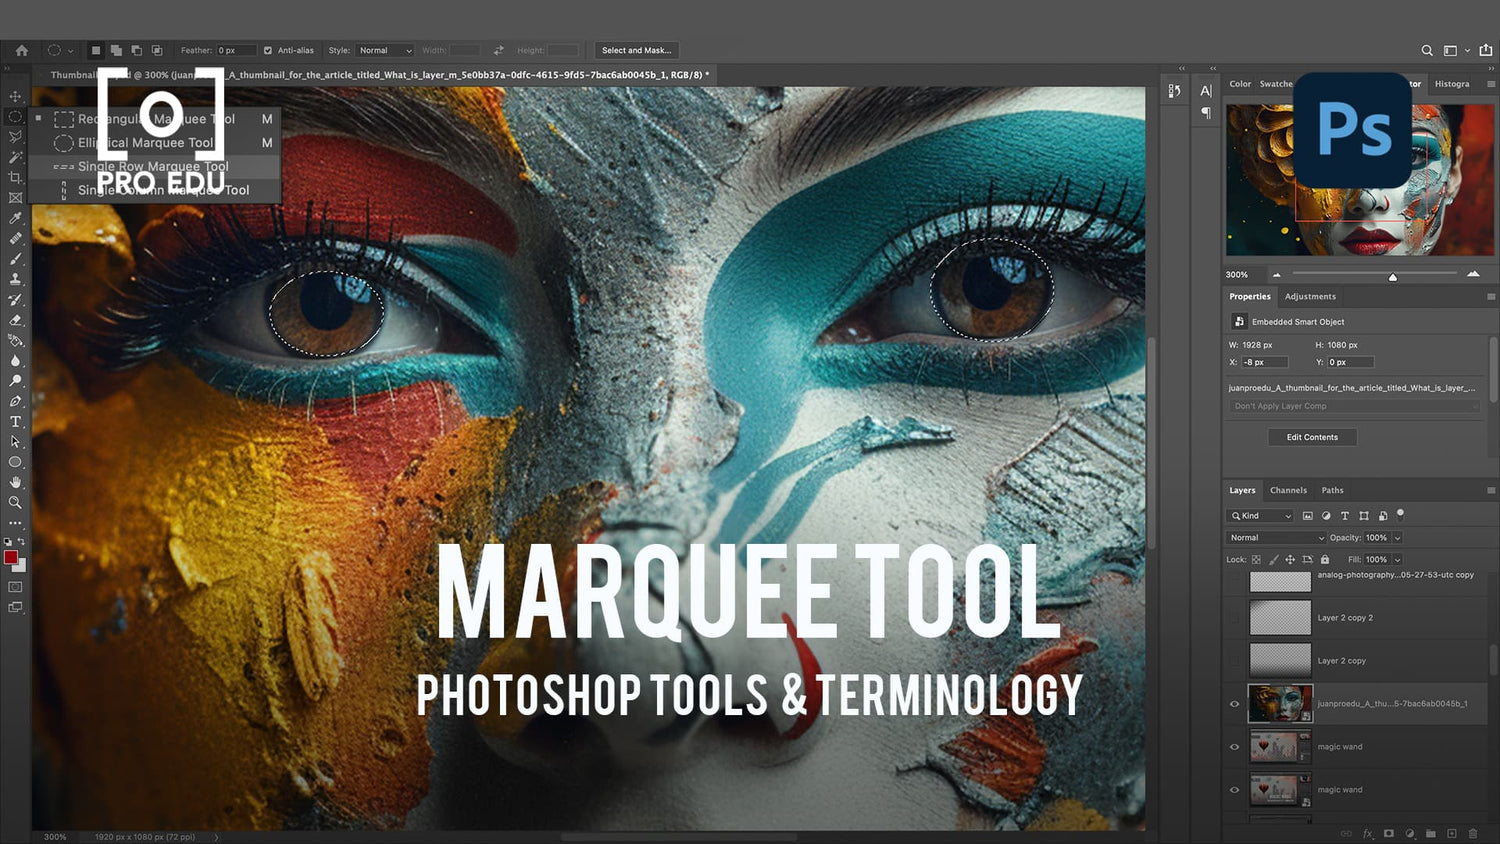
The Marquee Tool in Photoshop is a fundamental selection tool that aids in selecting specific areas within images. Located on the default toolbar, it helps users create accurate selections in various shapes such as rectangles, ellipses, and single-pixel lines. We will walk you through its various forms, while keeping it precise and straightforward.
In our initial paragraph, we will discuss the primary form of the Marquee Tool, the Rectangular Marquee Tool. This tool allows us to create rectangular selections with ease. Simply click and drag across the desired area, and the selection will be made. You can utilize this tool whenever you require a rectangular selection.
Another essential variant of the Marquee Tool is the Elliptical Marquee Tool. Similar to its rectangular counterpart, we use this tool to create elliptical or circular selections. To use it, simply click and drag across the desired area and release your cursor to finalize the selection.
Besides the two primary forms, the Marquee Tool also includes single-pixel line selections - the Single Row Marquee Tool and the Single Column Marquee Tool. We use these tools to make accurate selections of single rows or columns of pixels in an image. They add precision when working with highly detailed designs.
These tools provide value when we need to select specific areas within our images, copy them to new layers, create masks, or even cut out backgrounds. As you can see, the Marquee Tool in Photoshop is a vital component in our design toolkit and offers diverse functionality to enhance our photo-editing experience.
Shapes of Marquee Tool
The Marquee Tool in Photoshop allows us to make selections in various shapes. Among these shapes, the most commonly used are rectangular and elliptical. With the Rectangular Marquee Tool, we can create selections in the shape of rectangles or squares, depending on the aspect ratio we choose.
Using the Elliptical Marquee Tool, we can make circular or elliptical selections. To create a perfect square or circle, we simply hold down the Shift key while making our selection. These two tools can be accessed in the toolbar, directly below the Move Tool.
In addition to these primary shapes, the Marquee Tool also provides options for creating single-pixel lines, both vertical and horizontal. This can be especially useful when making precise adjustments or selections in an image. By default, the Marquee Tool makes rectangular selections, but we can change to another variant according to our needs.
To summarize, here are the main shapes provided by the Marquee Tool in Photoshop:
- Rectangular (Rectangles, Squares)
- Elliptical (Circles, Ellipses)
- Lines (Single-pixel Vertical and Horizontal)
These various shapes allow us to have control over our selections, so we can work efficiently and accurately within our Photoshop projects.
Using Marquee Tools
The Marquee Tool is a versatile selection tool in Photoshop that allows users to select specific areas of an image by creating various shapes like rectangles, ellipses, or single rows and columns. To access these tools, find them in the toolbar on the left side of the Photoshop window. There are four primary Marquee Tools: Rectangular, Elliptical, Single Column, and Single Row.
To use the Marquee Tools, select the desired tool, and click and drag over the area you want to select. Holding down the Alt (Windows) or Option (Mac) key while dragging allows you to create a selection from the center of where you initially clicked. To maintain aspect ratios in the Rectangular or Elliptical Marquee Tools, hold the Shift key. Moreover, you can set a fixed size or ratio for your selections through the tool options bar while using these tools.
A powerful feature while working with Marquee selections is to use the Add to, Subtract from, and Intersect with options. To add to your current selection, hold Shift, and for subtracting, hold the Alt or Option key. Combining these options allows for precise selection edits.
Once the desired area is selected, various actions can be performed, such as copying, cutting, transforming, or filling the area. You can also use the arrow keys to nudge your selection by single pixels. For smoother edges, apply the Feather option before making adjustments to soften the selection border.
Remember that Marquee Tools are just one part of Photoshop's selection tools arsenal, but they are incredibly useful for quick and precise selections. Utilizing these effectively can enhance your workflow and make your editing process more efficient.
Advanced Marquee Techniques
In this section, we will explore some advanced techniques using marquee tools in Photoshop. The marquee tools include the Rectangular and Elliptical Marquee tools, as well as the Single Row and Single Column Marquee tools. These tools are used to make precise selections in your images.
First, let's discuss the Options Bar, which offers additional options when using marquee tools. For example, the Feather option is useful for softening the edges of your selection. The higher the feather value, the softer the edge will be. Anti-alias should be checked to create smooth-edged selections.
Now let's talk styles. By default, the marquee tools have a Normal style, which allows us to make basic selections on the image. We can also choose from Fixed ratio and Fixed size styles for creating selections with specific dimensions or aspect ratios, available in the Options Bar.
For more advanced selections, we can use the Lasso tool to complement the Marquee tools. Lasso tools offer greater control over irregular-shaped selections. After making an initial selection using marquee tools, we can switch to the Lasso tool and hold down Shift to add to the selection or Alt/Option to subtract from it.
When working with the Single Row or Single Column Marquee tools, they create selections that are 1 pixel wide, either in the form of a row or a column. Although these tools are not commonly used, they can come in handy when needing to make precise pixel-specific selections.
To improve our overall workflow, it's essential to become familiar with various view options and shortcuts. Using Snap (found under the View menu) allows our selection edges to snap to guides or other elements on the image. Keeping an eye on the Options Bar helps us quickly access and modify essential settings for our tools.
By incorporating these advanced techniques into our Photoshop workflow, we can enhance our efficiency and create more precise selections when editing images.
Selection Options and Shortcuts
The marquee tools in Photoshop offer various selection options, which we can use effectively by incorporating keyboard shortcuts. The two primary marquee tools are the Rectangular Marquee Tool and the Elliptical Marquee Tool. To switch between these tools quickly, we can use the Shift+M keyboard command.
While creating selections, holding down the Alt key (Win) or Option key (Mac) allows us to draw selections from their centers instead of the edges. This becomes particularly helpful when selecting symmetrical elements in an image. To add to an existing selection, hold down the Shift key while making a new selection.
Additionally, we can utilize the Quick Selection tool for more automated selection tasks based on similar textures and colors. Combining these tools and shortcuts will help us in crafting precise and efficient selections in Photoshop.
Frequently Asked Questions
How does the Elliptical Marquee tool work?
The Elliptical Marquee tool in Photoshop allows us to make circular or elliptical selections on an image. To use it, simply click and drag on the canvas to create an elliptical selection. Holding down the Shift key while dragging will create a perfect circle, while holding the Alt key will make selection from the center of the starting point.
What is the Rectangular Marquee tool used for?
The Rectangular Marquee tool is used for making rectangular selections in an image. Just like the Elliptical Marquee tool, click and drag to create a rectangular area. By holding down the Shift key, you can create a perfect square. This tool is commonly used for cropping, copy-pasting, or applying adjustments to specific rectangular areas of an image.
What are the shortcuts for Marquee tools in Photoshop?
There are keyboard shortcuts for accessing the Marquee tools in Photoshop. To activate the Rectangular Marquee tool, press "M." For the Elliptical Marquee, press "M" and then hold Shift while making a selection. Switching between different types of Marquee tools can also be done by holding down Shift and pressing "M" repeatedly.
How does the Marquee tool differ from the Lasso tool?
Marquee tools and Lasso tools in Photoshop are both used for making selections, but they have different purposes. Marquee tools create geometric selections (rectangles, squares, circles, and ellipses), while Lasso tools allow for free-form selections. Lasso tools include the Lasso, Polygonal Lasso, and Magnetic Lasso, giving you more flexibility in selecting irregular shapes compared to Marquee tools.
Which shapes can be created using Marquee tools?
Marquee tools in Photoshop enable us to create rectangular, square, elliptical, and circular selections. The Rectangular Marquee tool is used for rectangles and squares, while the Elliptical Marquee tool is used for ellipses and circles. Holding down the Shift key while dragging will create perfect squares or circles, depending on the tool used.
What are some practical applications of the Marquee tool in photo editing?
The Marquee tool is useful in various photo editing tasks, such as cropping, selecting areas for adjustments, or copying and pasting specific portions of an image. For example, we can use the Marquee tool to select a color range, isolate the subject of a photo, or create frames and borders. Its ability to create geometric selections makes it a versatile tool for both basic and advanced editing applications.


