What Are Levels in Photoshop: A Comprehensive Guide to Image Adjustments
The Levels tool in Photoshop is a powerful feature that enables you to make adjustments to the tonal range and color balance of your images. By working with the shadows, highlights, and midtones of an image, you can fine-tune the overall appearance and achieve the desired look for your projects.
As an essential component of your editing workflow, understanding and utilizing the Levels tool can significantly enhance your proficiency in Photoshop. From color and contrast adjustments to nondestructive editing, mastering the Levels tool can lead to a more efficient and optimized workflow.
Key Takeaways
- Levels in Photoshop allow for precise tonal range and color balance adjustments
- Mastering the Levels tool enhances editing skills and workflow efficiency
- Nondestructive editing is possible with Photoshop Levels for a more flexible process
Understanding Levels in Photoshop
Layers and Levels
In Photoshop, levels help us adjust the brightness, contrast, and tonal range of an image. To access the levels adjustment, we can create a new adjustment layer by clicking on the New Adjustment Layer icon and selecting Levels. By using an adjustment layer, we ensure that our edits are non-destructive, meaning they can be modified or removed without causing permanent changes to the original image1.
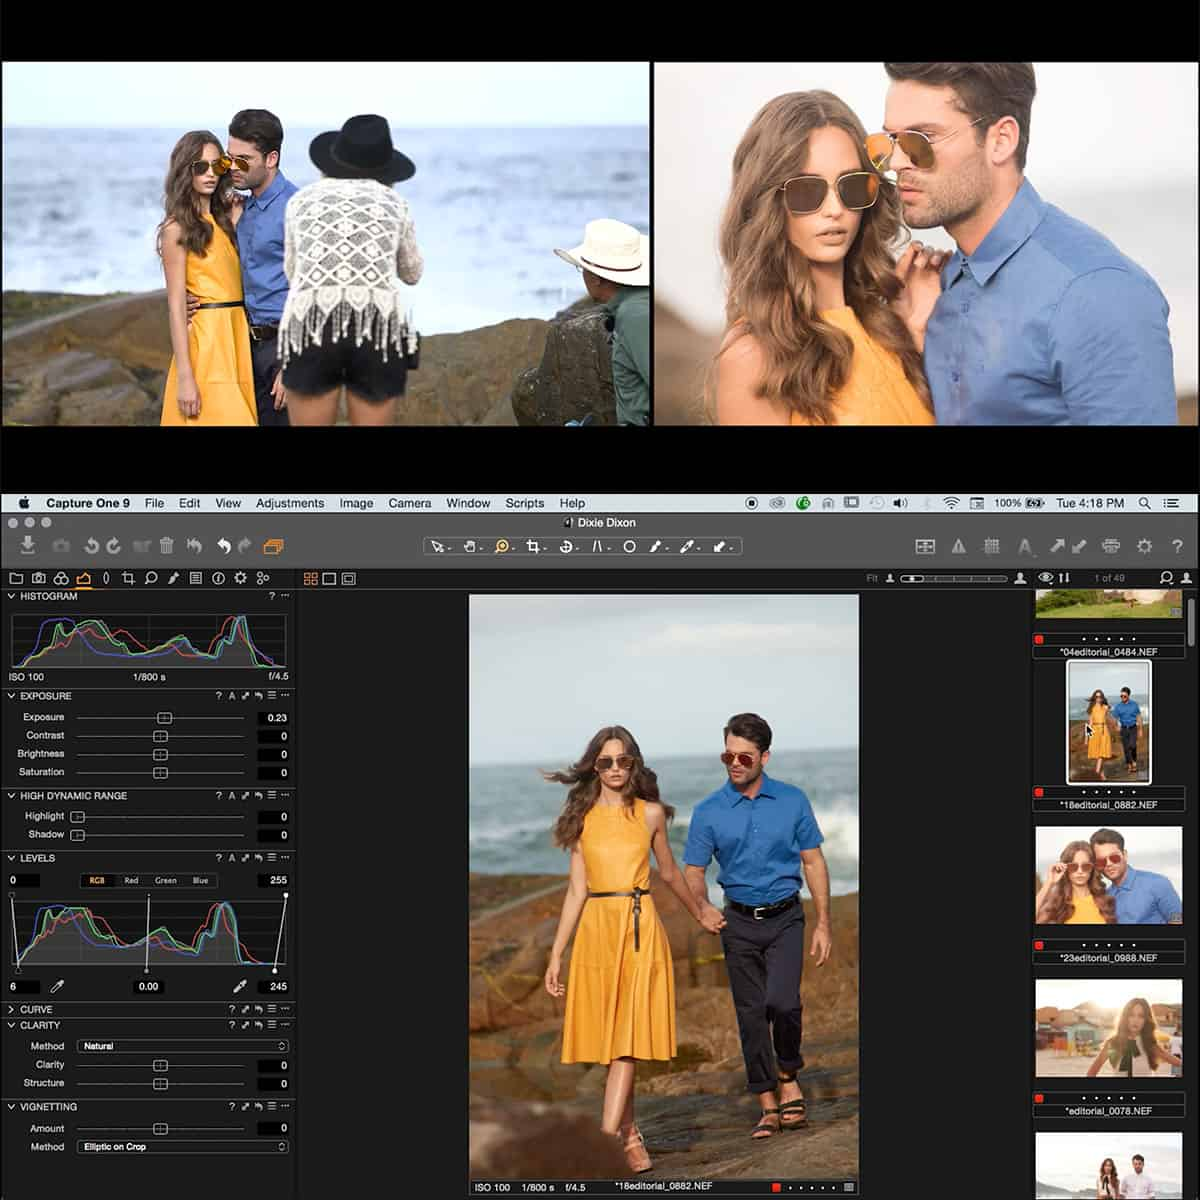
Histogram and Tonal Range
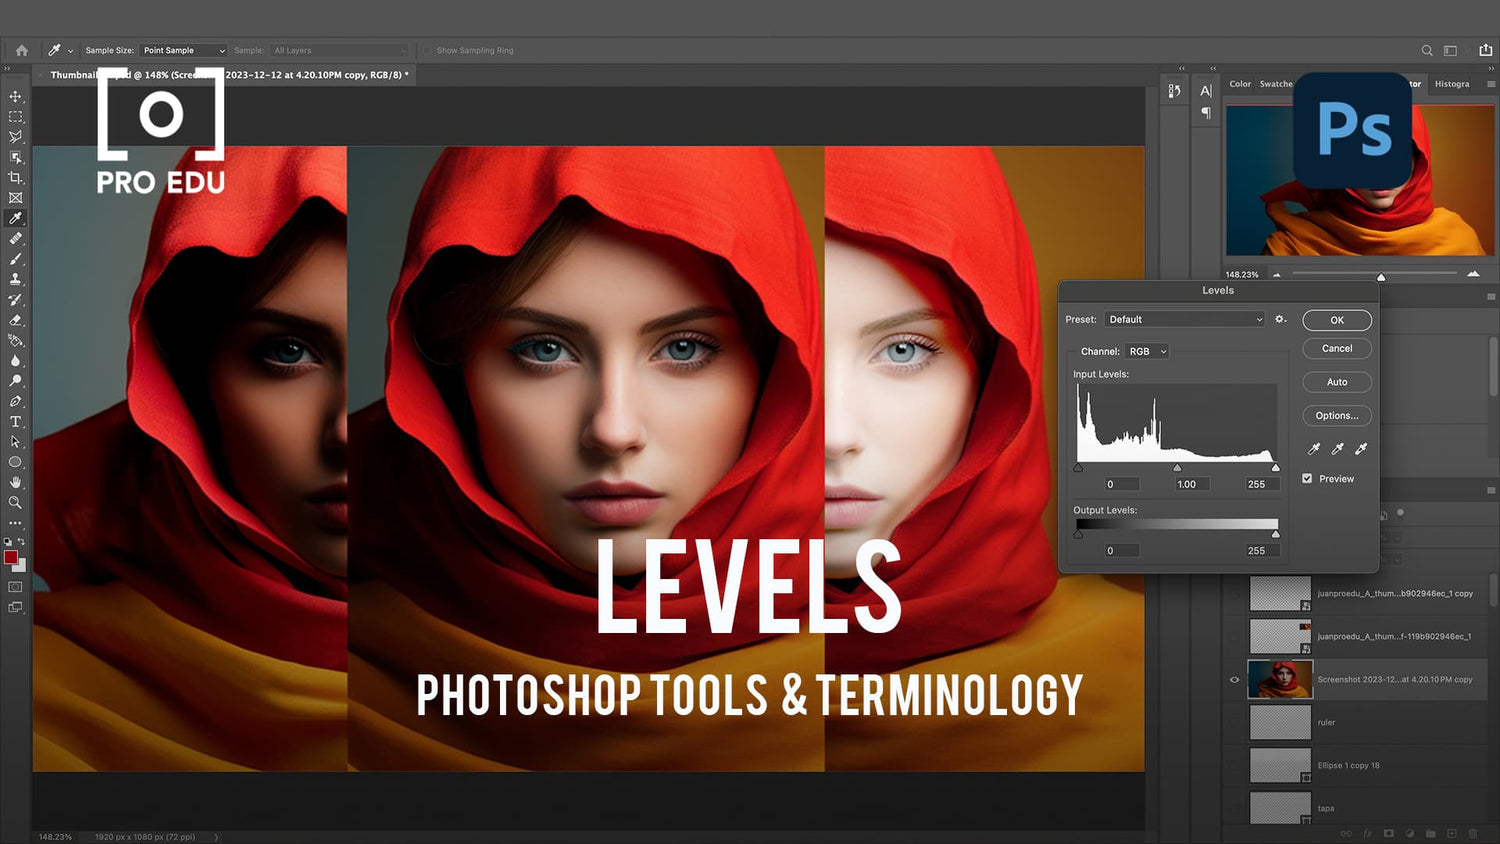
The histogram in the Levels adjustment window represents the distribution of pixels in an image, with the horizontal axis showing the brightness level of pixels, ranging from black (0) to white (255)2. The vertical axis displays the number of pixels at each brightness level. The tonal range is determined by the lightest and darkest values in the histogram. For better contrast and a more balanced image, we can adjust the Black Point and White Point sliders, bringing them closer to the edges of the histogram3.
The middle slider adjusts the overall brightness level, allowing us to control the midtones2. Using levels, we can more precisely influence the contrast and brightness compared to the Curves tool. Overall, Levels offer a simple and effective way to enhance the tonal range of an image, ensuring better quality and a more visually appealing result.
Using Levels for Color and Contrast Adjustment
Correcting Color Cast with Levels
Using Levels in Photoshop allows us to correct color cast issues in our images. We can achieve this by working with the individual Red, Green, and Blue (RGB) color channels. By using the Levels adjustment tool, we can adjust color balance throughout the entire image, ensuring consistency and vibrancy.
To start correcting color cast, create an adjustment layer for Levels. Then, choose the desired color channel (Red, Green, or Blue) and use the black and white point sliders to correct any imbalances. This process can be applied to the other color channels as needed, resulting in a more accurate and visually appealing final image.
Improving Contrast Using Levels
The Levels tool offers functionality for adjusting and improving the contrast in our images by enabling us to effectively control the distribution of shadows, midtones, and highlights. By adjusting the input and output levels in the Levels image adjustment, we can make the dark areas of the image darker and the bright areas brighter, thereby enhancing the overall contrast.
To improve contrast, first, create the Levels adjustment layer. From there, we can utilize the Input sliders to adjust the black and white points in the image. The black slider should be moved to the right, while the white slider should be moved to the left. This manipulation allows us to achieve the desired contrast and ultimately enhance the visual impact of our image.
In conclusion, using Levels for color and contrast adjustments is an essential tool in our Photoshop toolbox. This feature allows us to effectively correct color imbalances and optimize image contrast, resulting in visually stunning images that look professional and polished.
Advancing Your Skills with Levels Tools
Level Sliders Mastery
In Photoshop, the levels adjustment layer is a powerful tool that allows us to modify the tonal range and color balance of an image. By using sliders for each color channel, we can adjust the shadows, highlights, and midtones of our images to create desired effects. For example, moving the black point slider to the right will darken the shadows, while moving the white point slider to the left will brighten the highlights.
We encourage you to practice using the levels tool to become more proficient. Make adjustments to brightness/contrast, work with different adjustment layers, and experiment with the brightness level and contrast adjustment settings.
Auto Functions: Auto Color, Tone and Contrast
Photoshop offers convenient auto functions like Auto Color, Auto Tone, and Auto Contrast to quickly make adjustments to your images. These features analyze the image's histogram and make the necessary corrections automatically.
The Auto Color function corrects the color balance of an image by neutralizing the highlights and fixing the midtones, while maintaining the overall color balance. Auto Tone adjusts the tonal range by redistributing the levels for each color channel throughout the image. Auto Contrast improves the image contrast by finding the brightest and darkest pixels, and then redistributing the tonal values accordingly.
In summary, mastering the levels tool in Photoshop can significantly enhance our ability to adjust and optimize our images. Practice with level sliders, brightness/contrast adjustments, and auto functions to take your skills to the next level.
Nondestructive Editing with Levels
In Photoshop, working with levels allows us to make nondestructive adjustments to our images. This means that we can adjust the brightness, contrast, and color balance without permanently altering the original image. Let's explore how to achieve nondestructive editing with levels using adjustment layers and masks.
Using Adjustment Layers and Masks
To apply nondestructive edits, we use adjustment layers and layer masks. Here's a brief step-by-step guide to using adjustment layers and masks with levels in Photoshop.
- Open the Layers panel by selecting Window > Layers from the menu bar.
- Click the "Create new fill or adjustment layer" icon at the bottom of the Layers panel, and then choose Levels from the list that appears.
- The Adjustments panel will open, displaying the levels histogram. Here, we can adjust the Input Levels and Output Levels sliders to fine-tune the image's tonal range.
- If needed, we can also adjust the individual color channels (Red, Green, and Blue) by selecting them from the drop-down menu in the Adjustments panel.
By using adjustment layers, we ensure that our edits don't affect the original image. If we want to further refine our edits or remove them entirely, we can simply edit the layer mask or delete the adjustment layer without affecting the underlying image. This nondestructive editing approach gives us more freedom to experiment and achieve the best possible result while preserving the original image data.
Optimizing Workflow with Photoshop Levels
In our experience using Photoshop, making adjustments to an image's tone and color is vital for achieving the desired outcome. One of the most powerful and flexible tools we use is the Levels adjustment. By utilizing levels, we are able to refine an image's tonal range, balance its color, and effectively optimize our workflow.
We often begin by adding a Levels adjustment layer to our workspace. This non-destructive approach allows us to modify settings easily without affecting the original image. Through the Levels adjustment layer, we can manipulate the shadows, highlights, and midtones separately.
By examining the histogram provided in the Levels adjustment window, we can make informed decisions regarding the corrections needed for an image. Some common adjustments we perform include:
- Brightness/Contrast: Increasing or decreasing the overall brightness level of an image by moving the center slider.
- Shadows & Highlights: Refining contrast by adjusting the sliders on each end.
- Color Balance: Precisely altering each color channel – red, green, and blue – to achieve optimal results.
Additionally, we make use of presets to speed up our workflow further. These presets provide a quick starting point for common adjustments. We can also save our own custom presets for future use.
Incorporating a preview function in our workflow is essential for comparing the subtle changes between the adjusted and original image. This allows us to evaluate our adjustments effectively and ensure that we are headed in the right direction.
Overall, integrating the Levels adjustment tool into our workflow considerably streamlines the editing process while ensuring high-quality results. Through this optimized process, we can work more efficiently to create visually stunning images that meet our objectives.
Frequently Asked Questions
What is the purpose of levels adjustment in Photoshop?
Levels adjustments in Photoshop allow us to fine-tune the tonal range and color balance of our images. We can work with the image's shadows, highlights, and midtones separately, making it easier to target specific areas for enhancement or correction. Photoshop Levels Tool provides an invaluable feature for photographers and designers.
How do levels and curves differ in Photoshop?
While both Levels and Curves adjustments aim to improve the tonal range of images, they have some key differences. Levels are used primarily for balance adjustments in an image's shadows, midtones, and highlights, whereas Curves offer more precise control over the individual color channels. This allows for targeted color correction and adjustment in specific tonal ranges using Curves adjustment.
How do I use the Levels adjustment layer in Photoshop?
To use the Levels adjustment layer, start by navigating to the Layers panel and clicking the "Create new fill or adjustment layer" icon. Choose "Levels" from the dropdown menu that appears. This will create a non-destructive Levels adjustment layer, allowing you to perform adjustments without directly altering your original image. Learn more about the Photoshop Levels adjustment process for a better understanding.
What is the keyboard shortcut for levels in Photoshop?
The keyboard shortcut for accessing Levels in Photoshop is Ctrl+L (Windows) or Command+L (Mac). This shortcut will bring up the Levels dialog box, allowing you to make adjustments on the active layer.
How do levels adjustments affect image quality?
Levels adjustments can greatly enhance image quality by balancing the overall exposure and color tones of an image. However, if overdone, they can lead to a loss of detail in shadows, highlights, and midtones. It's essential to strike a balance when making adjustments to avoid compromising the image quality.
In what scenarios are levels adjustments most useful in Photoshop?
Levels adjustments are most useful in scenarios where an image has an uneven exposure, contains color casts, or has low contrast. By making adjustments to the shadows, midtones, and highlights, we can significantly enhance the overall appearance of an image. They're especially helpful in photo editing to correct tonal and color-related issues.


