Zone System in Photography: A Guide to Nailing Exposure and Achieving Dynamic Contrast
Mastering the art of photography requires a deep understanding of light and how it interacts with your camera. A fundamental technique in achieving this mastery is the Zone System, a method used by photographers to capture images with the desired exposure and contrast.
The Zone System, developed by Ansel Adams and Fred Archer, breaks down the tonal range within a scene into ten distinct zones. By learning to recognize and manipulate these zones, photographers can more effectively control the exposure of their film or digital images, ensuring that delicate shadows and highlights are preserved without losing detail.
Understanding the Zone System goes beyond the technical aspects of exposure; it's also about realizing the artistic potential of every photograph. This method allows photographers to pre-visualize the final image before taking the shot, making deliberate choices about lighting and contrast to evoke specific emotions.
It turns photography into a more intentional practice, transforming the camera from a mere tool into an instrument of creative expression. By mastering the Zone System, we not only improve the technical quality of our images but also enhance the way we communicate visually.
Key Takeaways
- The Zone System helps us control exposure and contrast in photography.
- It is an essential tool for pre-visualizing and enhancing the artistic impact.
- Mastery of this system refines both technical skills and creative expression.
Understanding the Zone System
Before we dive into the intricate workings of the Zone System, it's essential to grasp that it is a framework designed to control exposure and contrast in photography, affecting how the tonal range is captured and processed for both film and digital.
Origins of the Zone System
The Zone System was conceived by two pioneering photographers, Ansel Adams and Fred Archer, in the early 20th century. Their collaboration aimed to create a standardized method for photographers to achieve precise control over the tonal range of their images. This was particularly crucial in the field of black and white photography, where the differentiation between shades of gray can dramatically alter the mood and impact of a photograph.
Fundamentals of Zone System
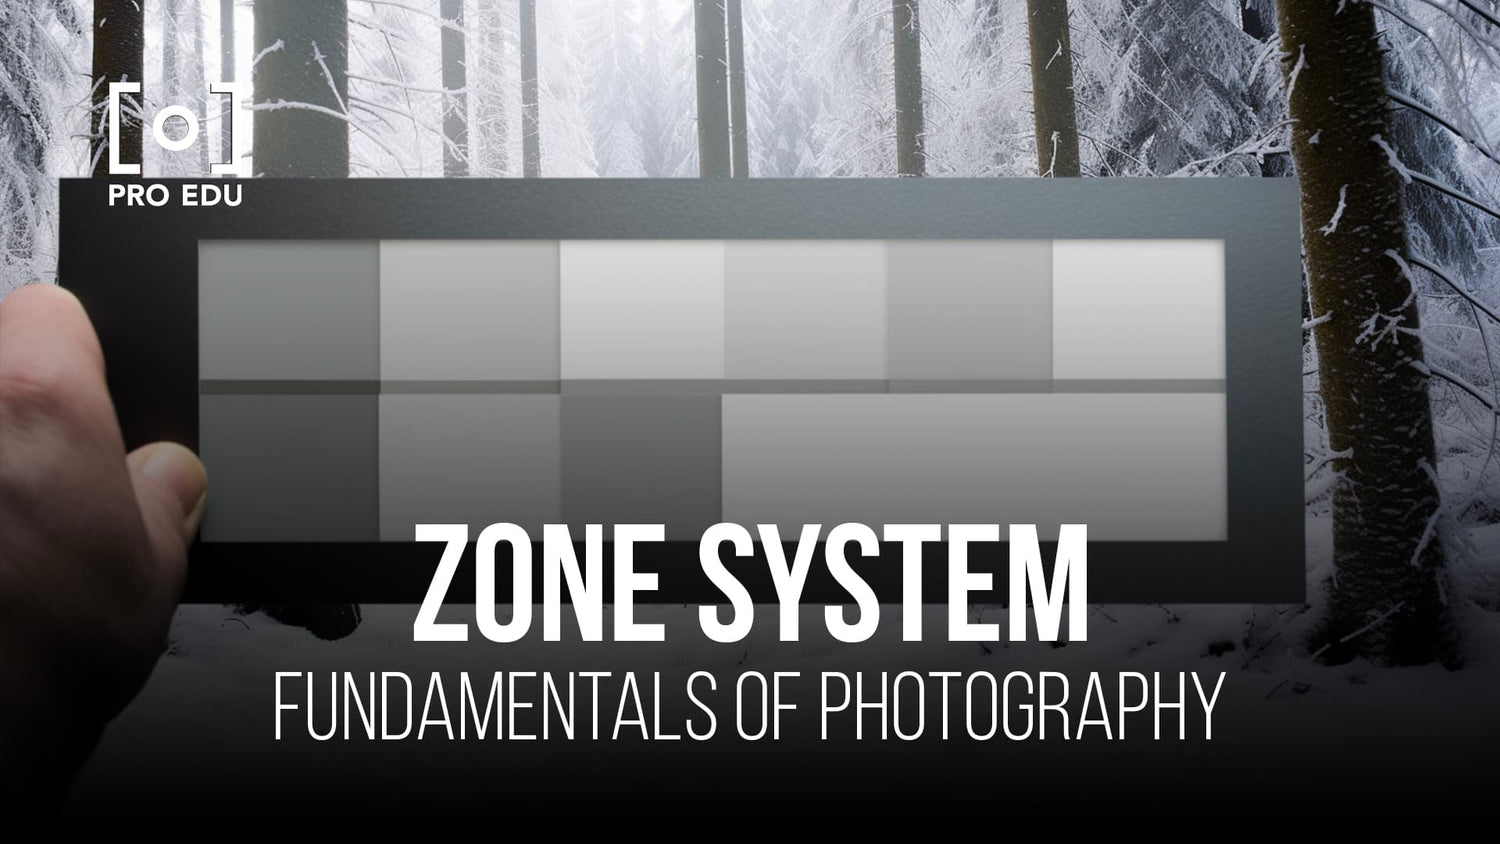
At the core of the Zone System is the division of tonal values into eleven zones, represented by Roman numerals from Zone 0 (pure black) to Zone X (pure white). Each zone differs from the adjacent ones by one stop of exposure, effectively doubling or halving the amount of light. Understanding this relationship allows photographers to pre-visualize an image in terms of zones, which can then guide exposure decisions during shooting and processing.
Zones and Tonal Values:
- Zone 0: Pure black, without detail
- Zone V: Middle gray (18% gray card), the basis for camera meter readings
- Zone X: Pure white, without detail
Zone System in Practice
When we put the Zone System into practice, metering becomes a crucial skill. Using a light meter or your camera's metering system, you can measure the light reflected from the subject and then place the measured tone in the desired zone. For example, if you're photographing a scene with a dark subject and want it to appear as a deep gray (Zone III), you would adjust the exposure accordingly based on the meter reading.
Applying the Zone System to Film and Digital
While the Zone System was developed during the era of film photography, it's just as relevant to digital photography. Film and digital sensors both have a finite dynamic range, but the method of translating a scene's luminance to the desired zones remains the same. In digital photography, the Zone System helps us prevent clipping highlights and shadows, and maintain detail across all tonal areas. Understanding the Zone System enables us to make informed exposure decisions, ensuring that both shooting and processing contribute to the envisioned outcome.
Technical Aspects of Exposure
In photography, achieving the right exposure is a balancing act that involves understanding and manipulating three critical elements: aperture, shutter speed, and ISO. We must also be adept at measuring light using various tools and adjusting to different lighting scenarios to maintain correct exposure, which preserves detail across the tonal range.
Exposure Triangle: Aperture, Shutter Speed, and ISO
Aperture, shutter speed, and ISO work in tandem to control the exposure of our photographs. The aperture adjusts the size of the lens' opening, controlling the amount of light that enters; measured in f-stops. Shutter speed dictates the duration the camera's shutter remains open, allowing light to hit the sensor; it’s measured in seconds or fractions thereof. ISO represents the sensor's sensitivity to light, with higher values used in darker conditions.
- Aperture: Larger aperture (( f/1.4, f/2.8 )) = More light enter = Shallow depth of field
- Shutter Speed: Slower speed (( 1/30, 1" )) = More light enters = Potential motion blur
- ISO: Higher ISO (( 1600, 3200 )) = More sensitivity to light = Increased noise
Metering and Measurement Tools
We use metering to evaluate the light reflected from the scene. Camera's built-in metering systems offer different modes like evaluative, center-weighted, and spot metering. A handheld light meter, like the Sekonic L-358, can be more accurate, as it measures ambient or strobe light directly.
- Spot Metering: For metering a small area, crucial in tricky light
- Evaluative Metering: Considers the entire scene, useful for even lighting
Determining Correct Exposure
We aim for correct exposure that portrays the scene closest to our vision, maintaining detail in highlights and shadows. We evaluate the meter’s reading and decide whether to adjust our settings, typically in stops, where one stop represents a doubling or halving of the amount of light.
- If foliage is underexposed, we might increase exposure by +1 stop.
- For action scenes, we might prioritize a faster shutter speed to freeze motion, adjusting aperture or ISO accordingly.
Challenges in Various Lighting Conditions
Each lighting situation poses unique challenges. In snow, light meters can be fooled by the brightness, often leading us to underexpose. Night photography often requires us to use longer shutter speeds or higher ISOs. In all situations, we may use exposure compensation to override the camera's suggested settings.
- Snow: Compensate with +1 to +2 stops of exposure
- Night: Opt for tripod use and remote triggering to avoid shake at slow shutter speeds
Adjusting for Color and Filters
Filters alter the light entering our lens, which affects exposure. A red filter, for example, would require an increase in exposure to compensate for the diminished light. Colors in a scene can also influence meter readings; bright green grass might be rendered as middle gray unless we compensate accordingly.
- Red Filter: Increase exposure by approximately 2 stops
- Blue Skies: Might require slight underexposure to retain color saturation
Artistic Elements of the Zone System
The Zone System is more than just a technical tool; it's an artistic guide that helps us achieve a compelling visual narrative through controlled tonal variations. Let's explore how we can harness its principles to enhance the artistic quality of our photographs.
Finding Tonal Balance
When we refer to tonal balance, we're talking about the distribution of tones from pure black to pure white in our image. We aim for a balance that supports the narrative of the photograph. Middle gray is our anchor, providing a reference point to measure other tones against. Observing the scene’s low values and high values, we adjust our exposure to ensure that important details fall within the desired zones, preserving crucial texture and skin tones.
Utilizing the Full Dynamic Range
Using the Zone System's methodology, we can tap into our camera's full dynamic range. This means spreading out our tonal values across all zones—from Zone 0, or pure black, to Zone X, pure white—to create an image with rich contrast and depth. We must be mindful of the characteristics of our medium, whether it's color negative film or digital, to effectively use the dynamic range to our advantage.
Visualizing the Final Image
Visualization is at the heart of the Zone System. It requires us to preconceive the final image before the shutter is pressed. This process involves considering how each element—be it a shadowed tree or a bright cloud—will be represented in terms of tone, contrast, and texture. We mentally map out the scene using zones to predict how our choices will affect the final photograph.
Applying Zone System to Color Photography
While traditionally associated with black and white imagery, the Zone System is equally valuable in color photography. The zones help us understand luminance values, which are crucial for rendering accurate colors. By ensuring proper exposure, we maintain the integrity of color tones—such as the subtle hues in a sunset or the vibrant colors of a flower—without losing details to over or underexposure. It requires a nuanced approach to capture the dynamic interplay between colors while respecting the Zone System's framework.
Workflow and Post-Processing
In our digital age, the venerable Zone System still stands as a fundamental concept for us to achieve precise exposure and contrast in our photography. We often find that understanding and utilizing this system significantly enhances our post-processing workflow, particularly when dealing with challenging lighting conditions or aiming for high dynamic range (HDR) outputs.
Integration into the Digital Workflow
When we integrate the Zone System into our digital workflow, the first step is always a precise metering of the scene, segmenting it into the different 'zones' to guide our exposure. In doing so, we ensure that during post-processing, the range of tonalities falls exactly where we want them. For a digital photographer, this means using the histogram as our modern equivalent to Adams' visualization: we aim to distribute the pixels across the tonality range without clipping shadows or highlights. This foundational work allows for far more nuanced adjustments in programs like Lightroom or Photoshop.
Advanced Techniques in Editing Software
Delving into post-processing, we use editing software to manipulate our exposures and expand upon the principles of the Zone System. Using Adobe Photoshop or similar software, we apply curves and levels adjustments to fine-tune the luminance of each zone. This is particularly effective for black and white photography, where the subtlety of grayscale tones is paramount. For color photos, the Zone System also aids in managing color saturation and balancing hues in conjunction with luminosity.
Advanced techniques often include creating layer masks that correspond to different zones, allowing us to apply selective exposure corrections ("dodging and burning") or contrast enhancements to specific areas of an image. For HDR images, we meticulously blend exposures, ensuring that each zone is represented by the best-exposed part of our bracketed shots.
Printing and Display Considerations
Lastly, we turn our attention to the translation of our processed images to prints or digital displays. Whether we are dealing with black and white sheet film or roll film that's been digitized, the end-goal is a print that accurately reflects each zone as we envisioned it. This requires careful calibration of our output devices—printers for physical media or monitors for digital display—to match the dynamic range and contrast levels we've set during editing. Selecting the right paper or screen settings is crucial, as is testing with proofs or calibration images to ensure that the contrast in our final product is true to our post-processed files.
Practical Steps for Mastering the Zone System
To effectively utilize the Zone System, we need to adopt a methodical learning approach, actively engage in practical exercises for deeper understanding, and refine our exposure metering skills to achieve the desired precision in our photographs.
Systematic Learning Approach
Learning the Zone System requires a structured approach to fully grasp its technical aspects. We must start by familiarizing ourselves with the concept of middle grey, which serves as the foundation for metering correctly. This is represented by Zone V on the Zone Scale, reflecting a middle tone that our cameras perceive as 18% reflectance—the standard for most light meters. Using a gray card can help us calibrate our cameras and understand how different light scenarios affect our exposure.
From Theory to Application: Exercises and Examples
Once we understand the technical components, we must put theory into practice. Starting with simple subjects, we can practice spot metering, aiming to place them in the correct zones. For example, we might place a subject that should appear as pure white without detail on Zone VII or a deep black with slight detail on Zone III. We should systematically practice with various lighting conditions to see how reflectance and incident light change our perception of the scene.
Achieving Precision Through Exposure Metering
The crux of mastering the Zone System lies in precise exposure metering. By using a spot meter, we can measure reflected light from our subject and decide on which zone to place those readings. We must become adept in choosing the right zone for our key elements in the composition to ensure that our final image renders detail where it's most crucial. The refinement of these exposure skills is incremental, requiring continuous learning and practice to perfect.
Frequently Asked Questions
The Zone System is a cornerstone of photographic technique for achieving perfect exposure and contrast. Here, we answer some of the most common questions about how to utilize and understand this powerful tool.
How do you apply the Zone System for controlling exposure in photography?
We use the Zone System by dividing the tonal range into eleven zones, from pure black (Zone 0) to pure white (Zone X), with Zone V representing middle gray. We meter based on our desired outcome for the key aspects of our composition, placing them in the appropriate zone to achieve the exposure we envision.
What are the principles of Ansel Adams' Zone System?
The principles of Ansel Adams' Zone System involve visualizing the scene in terms of zones before taking the photograph and then exposing and developing to control the tonality. Achieving the right exposure involves assessing the luminance of the subject and assigning various elements to different zones.
How can the Zone System improve contrast management in photographs?
The Zone System directly affects contrast control by helping us deliberately place our subject's tones in relation to the black and white points of the scale. It guides us to modify exposure and development to achieve our desired contrast level within the context of the captured scene.
What does Zone 0 represent in the context of exposure zones?
Zone 0 represents the darkest part of the photograph, equivalent to pure black with no detail. In our exposure scale, this is the point where no light is recorded on the film or sensor, and it operates as the foundational benchmark for defining absolute blacks in our tonal range.
How does the Zone System adapt to 35mm film photography?
The Zone System can be applied to 35mm film photography by adjusting the exposure and development process according to the dynamic range characteristics of the film. We need to consider the film's latitude and the intended level of detail in different tonal zones when making our exposure decisions.
What is a practical method for calculating exposure using the Zone System?
A practical method for calculating exposure using the Zone System is to take a meter reading of the scene's mid-tones to place them on Zone V and then adjust exposure accordingly for areas we want to appear lighter or darker. By extending or reducing development times, we can also control the contrast range of the final image.


