ISO in Photography: Mastering Light Sensitivity for Perfect Exposure
In photography, mastering light sensitivity is crucial for creating stunning images in various lighting conditions. ISO, a fundamental element in both digital and film photography, determines the sensitivity of a camera's sensor to light. By understanding and adjusting ISO settings, photographers can achieve optimal exposure and clarity in their images.
ISO's relation to light and exposure is essential to understand, as a higher ISO setting corresponds to a greater level of amplification, which increases your camera's light sensitivity and is ideal for low-light situations. On the other hand, lower ISO values produce images with less noise, making them suitable for well-lit conditions. Diving deeper into ISO sensitivity and adjusting it according to your photography needs can significantly improve the quality of your shots in various fields.
Key Takeaways
- Mastering ISO in photography enhances image quality by optimizing exposure and clarity
- A higher ISO setting increases light sensitivity, ideal for low-light situations, while lower ISO values produce images with less noise
- Adjusting ISO according to your photography needs can significantly improve the quality of your shots in various fields
Understanding ISO in Photography
Pinpointing ISO’s Definition
ISO, which stands for International Organization for Standardization, refers to the sensitivity of a camera's sensor to light. Initially, ISO numbers determined the sensitivity of film in cameras. However, in today's digital photography, the same numbering system is used to indicate the sensitivity of a digital camera sensor to light.
Understanding ISO Numbers
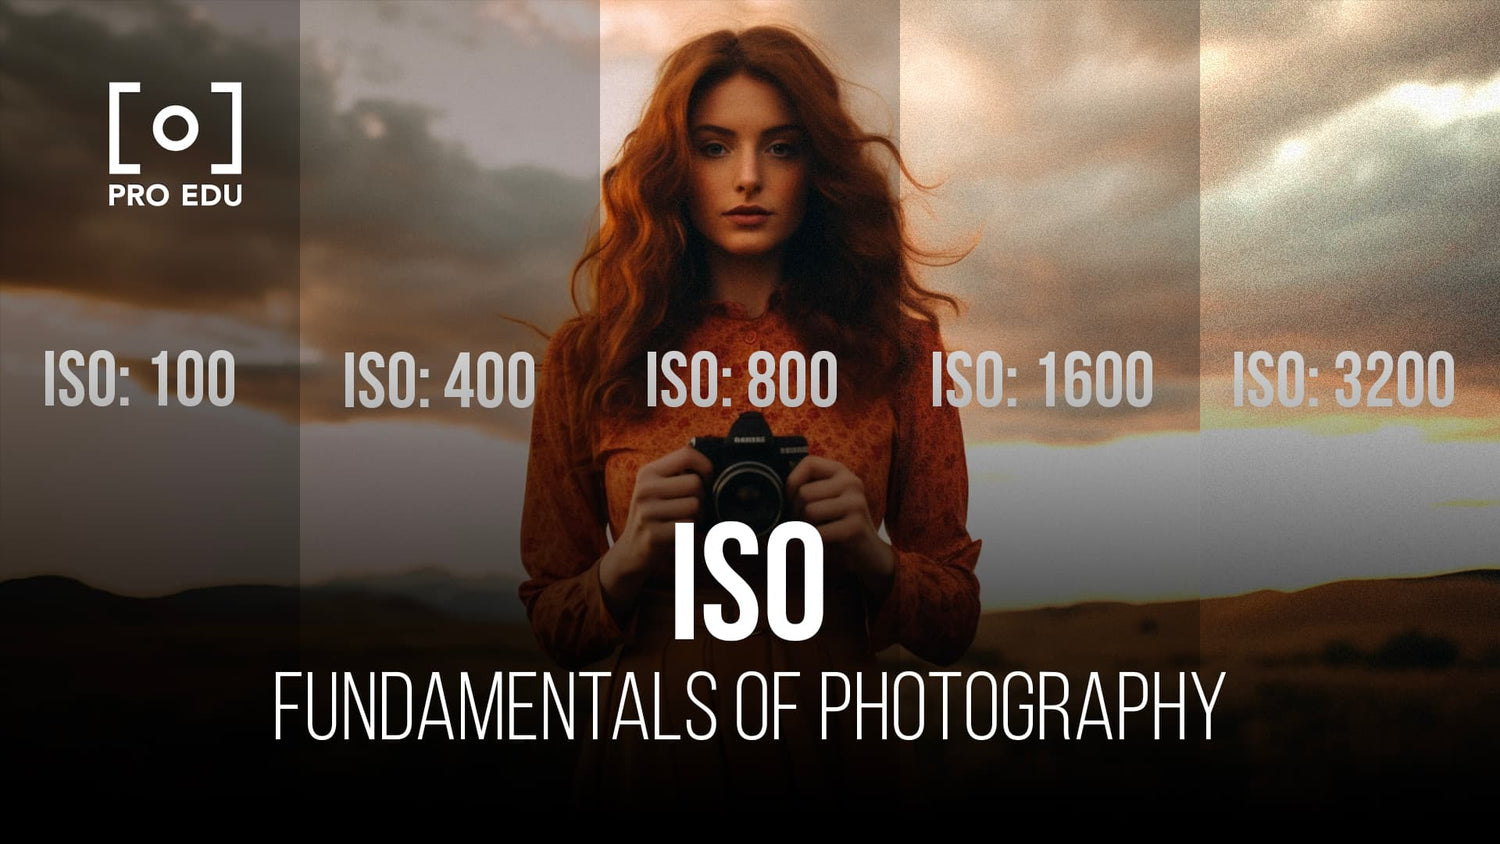
ISO is measured using a scale that typically ranges from 100 to 6400, with some cameras capable of reaching even higher values. A lower ISO number (e.g., ISO 100) indicates that the sensor is less sensitive to light and requires more light to expose a proper image, while a higher ISO number (e.g., ISO 800) indicates greater sensitivity to light, allowing for better performance in low-light conditions. ISO plays an essential role in adjusting the sensitivity of your camera sensor to light conditions, ultimately affecting the brightness and quality of your images.
A Look at ASA and DIN
Before the ISO system, two other standards were used to determine film sensitivity: ASA (American Standards Association) and DIN (Deutsche Industrie Norm). ASA used a similar scale as the current ISO system, with higher numbers indicating greater light sensitivity. On the other hand, DIN employed logarithmic scaling, resulting in a lower number representing greater light sensitivity. The current ISO system is a combination of both ASA and DIN, offering a broader scale that gives photographers more flexibility when deciding on sensitivity settings.
By understanding ISO, ASA, and DIN, we can better control our camera settings and optimize our photography work in various lighting conditions.
ISO's Relation to Light and Exposure
Balancing Exposure with ISO
In photography, we use ISO to control the sensitivity of the camera's image sensor to light. A lower ISO value represents low sensitivity, while a higher value indicates greater sensitivity to light1. To achieve the desired exposure in our photos, we must skillfully adjust the ISO settings to suit the lighting conditions we encounter.
Impact of ISO on Lighting Conditions
Different ISO values serve different purposes. In low light situations, we increase the ISO value to make the sensor more sensitive to light, allowing us to capture images with sufficient brightness2. Conversely, in bright conditions, we reduce the ISO to prevent overexposure and maintain the natural appearance of our photos. It's essential to remember, however, that increasing the ISO may introduce more noise in the photograph, reducing image quality.
Exploring the Exposure Triangle
The exposure triangle consists of three elements in photography that work together to control exposure: ISO, aperture, and shutter speed3. The aperture controls the amount of light entering the camera, the shutter speed determines how long the sensor is exposed to light, and the ISO represents the sensor's sensitivity to that light. By understanding and mastering the relationship between these elements, we can create perfectly exposed images in various lighting conditions.
Digging Deeper into ISO Sensitivity
ISO's Effect on Image Noise
As we adjust ISO sensitivity, it's vital to understand its impact on image noise. Generally, higher ISO values result in more image noise, making it an important factor to consider when optimizing your camera settings. That said, advancements in technology have significantly improved cameras' performance at high ISO settings.
High ISO vs Low ISO
When shooting in low-light conditions, a higher ISO allows for faster shutter speeds and smaller apertures. By contrast, lower ISO values typically yield better image quality, with less noise and a higher dynamic range. To achieve the right balance, photographers should consider their specific lighting situation and prioritize either image quality or proper exposure.
Managing Graininess and Detail
Graininess is influenced by both ISO and sensor size, with smaller sensors often producing more grain at higher ISO values. To maintain good image quality, photographers should strive to achieve the lowest possible ISO value without compromising on exposure. Keep in mind that post-processing techniques can help reduce noise, but overdoing it may result in a loss of detail. It's crucial to find the sweet spot between graininess and detail for each particular situation.
Mastering ISO in Different Photography Fields
ISO in Bird Photography
When photographing birds, we often encounter fast-moving subjects and varying light conditions. To freeze motion and minimize blur, we may need to use a higher ISO. For instance, in bright sunlight, starting with an ISO around 400 is ideal. In more challenging lighting conditions, such as in a shaded area or on an overcast day, feel free to raise the ISO to 800 or even 1600.
Getting the Right ISO for Low Light Photography
Low light photography requires an understanding of how a camera's ISO can impact image quality. In low light situations, using a higher ISO value like 1600, 3200, or even higher might be necessary to capture enough light for a well-exposed image. However, higher ISO values generally introduce more noise into the image. To balance image quality and noise levels, experiment with different ISO settings, and consider using noise reduction software in post-processing if needed.
Aim for Noise-Free Images in Film Photography
Unlike digital cameras, film photography has a fixed ISO value determined by the film stock used. As a result, we must be mindful of our film choice to achieve noise-free images. Lower ISO films such as ISO 100 or 200 are typically less grainy and produce more refined images, whereas higher ISO films like 800 or 1600 may show increased graininess. Experimenting with various film stocks can help photographers find the right balance between light sensitivity and image quality for their desired results.
Practical Guide to ISO Adjustment
Auto ISO and When to Use It
Auto ISO is a convenient feature that allows your camera to automatically adjust the ISO speed according to the lighting conditions. This can be helpful when you're shooting in changing lighting environments or if you aren't confident in manually adjusting the ISO. However, there may be situations where you might want more control over the final image, so it's essential to understand how to adjust ISO manually as well.
Experimenting with ISO for Unique Images
Experimenting with different ISO values is a great way to achieve unique and creative photographs. Higher ISO speeds can be used to create grainier images, evoking a more nostalgic or moody atmosphere. Lower ISO values, on the other hand, produce cleaner and smoother results. Don't be afraid to play with different ISO settings to discover the unique effects they can produce.
Reducing Noise with ISO Adjustments
One of the main concerns with adjusting ISO speeds is the potential for increased digital noise, especially when using higher ISO values. To reduce noise, it's essential to start with the lowest possible ISO setting and only increase it when necessary. Remember that each camera has a different noise threshold, so experiment with your camera to find the optimal balance between the desired brightness and minimal noise.
If you find that your images still have a significant amount of noise, you can use post-processing software like Adobe Photoshop to further reduce it. Keep in mind that higher-quality memory cards may also help decrease noise in your photos, as they can handle the larger file sizes associated with higher ISO images.
Frequently Asked Questions
What is the relationship between ISO and image noise?
As ISO increases, so does the image noise or grain. In low-light situations, using higher ISOs is sometimes necessary to achieve a correctly exposed image. However, this increased sensitivity also causes the image noise to become more prominent, often making the photo appear grainy.
How does ISO affect exposure and image quality?
ISO determines the sensor's sensitivity to light. Increasing the ISO value allows more light to be captured, resulting in a brighter image. Lower ISO settings provide cleaner images with less noise, but require more light for proper exposure.
What is the optimal ISO setting for various lighting conditions?
In well-lit conditions, a lower ISO setting (e.g., 100 or 200) should be used for clean, noise-free images, while in low-light conditions, you may need to increase the ISO to a higher value (e.g., 800 or 1600) to achieve adequate exposure. However, it is essential to balance the trade-off between light sensitivity and image noise.
How do ISO and shutter speed work together?
ISO and shutter speed both affect the amount of light captured by the sensor. When using faster shutter speeds, there is less time for light to reach the sensor, so increasing the ISO might be necessary to achieve proper exposure. Conversely, slower shutter speeds allow more light to enter, so you may need to lower the ISO accordingly.
What is the role of ISO in the exposure triangle?
The exposure triangle consists of ISO, shutter speed, and aperture, all working together to control the overall exposure of an image. Balancing these three factors is crucial to achieve the desired exposure while considering the creative aspects of each setting. The ISO, in particular, plays a vital role in regulating the light sensitivity of the camera's sensor.
When should I use a higher or lower ISO setting?
You should use a lower ISO setting in bright, well-lit conditions to maintain image quality and reduce noise. Conversely, in low-light situations or when using fast shutter speeds, a higher ISO setting should be used to compensate for the lack of light, though this can increase image noise. Finding the right balance is essential for achieving the desired exposure and image quality.


