What Is A Crop Tool In Photoshop: A Concise Guide
The Crop Tool in Photoshop is an essential feature that allows users to remove unwanted portions of an image and focus on the desired area. By using this powerful tool, we can not only enhance our photos but also maintain creativity in our work. The Crop Tool helps in refining the composition of a photograph, giving it a more professional and polished appearance.
When working with the Crop Tool, we can also straighten and resize our images, making it an incredibly versatile option in Photoshop. This tool is non-destructive, meaning the cropped pixels can be retained, and the crop boundaries can be optimized later if needed. Knowing how to use the Crop Tool effectively can significantly improve our editing skills and bring out the best in our images.
Key Takeaways
- The Crop Tool is crucial for removing unwanted areas and focusing on desired parts of an image.
- It offers versatile options like straightening and resizing, making it indispensable for photo-editing.
- Mastering the Crop Tool can greatly improve overall editing skills and enhance image quality.
Fundamentals of Crop Tool
The Crop Tool in Photoshop is essential for refining and improving the compositions of our images. We can easily select a specific area and drag the corners to adjust the dimensions, effectively removing unwanted areas from our photos.
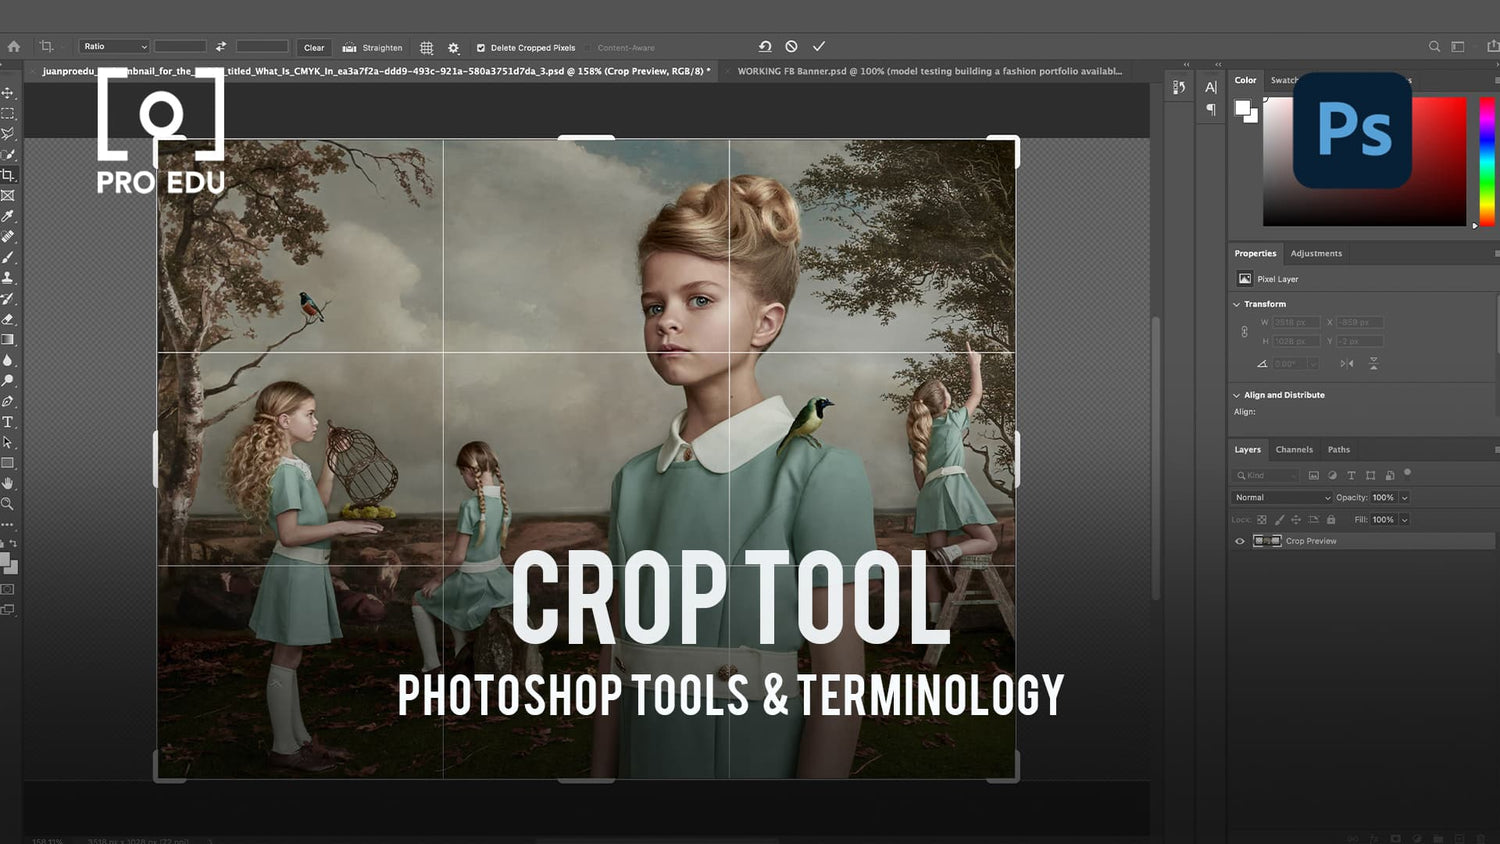
To start using the Crop Tool, simply press the C key on your keyboard, or click on the Crop Tool icon in the toolbox. Once selected, a cropping border with handles in each corner will appear around the image. We can then grab a handle to drag and modify the size of the selected area according to our needs.
Adjusting the aspect ratio is a fundamental aspect of the Crop Tool, as it allows us to maintain the correct proportions of our image while cropping. If necessary, we have the option to straighten our images using the Crop Tool, by clicking and dragging along a line that should be straight. Photoshop will automatically rotate the image accordingly.
To return the image back to its original state after cropping, simply press Esc or click the cancel button in the options bar.
In summary, the Crop Tool provides us with the essential functionalities to effectively crop, straighten, and adjust the aspect ratio of our images, allowing us to create visually appealing and well-composed photos with ease.
Advanced Features
There are numerous advanced features available within the Crop tool in Photoshop. One of the most helpful of these is the overlay feature, which allows you to use the rule of thirds guideline to compose your image more effectively. The overlay helps us position the image's focal points along the lines and intersections to create a more balanced composition.
Another powerful tool is the Perspective Crop tool, which enables us to adjust the perspective of the image while cropping. This is particularly useful when working with images that have skewed or distorted perspectives, such as those taken at an angle or with a wide-angle lens.
In addition, there's the "Delete Cropped Pixels" option, which allows us to choose whether to keep or remove the cropped pixels when using the Crop tool. By default, Photoshop retains these pixels, offering more flexibility in case we need to readjust the crop later on. However, by selecting this option, we can permanently remove the cropped pixels to save on file size and reduce the complexity of the image.
Lastly, Photoshop's Crop tool offers various helpful advanced cropping, resizing, and resampling options. We can use these features to define the desired aspect ratio, width, and height values while cropping and to maintain image quality while resizing or resampling. This ensures that our final image retains the highest quality possible, even after extensive adjustments.
Practical Applications
When using the Crop Tool in Photoshop, there are numerous practical applications that can enhance our photos. One common use is to resize the image size to keep specific portions of the photo relevant to the composition while discarding the rest.
Another useful application is to remove unwanted elements from the image. By adjusting the cropping area, we can easily eliminate distractions and improve the overall composition of the photo.
The Crop Tool also allows us to control the canvas size and aspect ratio of the image. By adjusting these settings, we can make our photos compatible with different platforms and print formats, ensuring a consistent layout and presentation.
For instance, social media platforms often have specific aspect ratios for profile pictures, cover photos, and post images. By using the Crop Tool, we can set the desired width and height values to fit these requirements with ease.
Here are some key practical applications of the Crop Tool:
- Resize images to focus on the main subject.
- Remove unwanted elements from the photograph.
- Adjust the canvas size and aspect ratio for various platforms and formats.
In summary, the Crop Tool in Photoshop is highly versatile and allows us to effectively optimize our images for a wide range of purposes. By mastering these practical applications, we can greatly enhance the overall impact of our photos.
Pro Tips and Tricks
When using the Crop Tool in Photoshop, keyboard shortcuts can save you time and effort. For instance, pressing the "C" key accesses the Crop Tool. Additionally, utilize the grid overlay options like the Rule of Thirds and Golden Ratio to improve your cropping results. To cycle through these options, press "O" while using the tool.
The Straighten Tool is another useful feature within Photoshop. If an image is not properly aligned, use the Straighten Tool to quickly fix the problem. Find it by selecting the Crop Tool and looking for the small icon with a level in the options bar.
Working with preset ratios can help speed up your workflow. Photoshop CC provides various preset aspect ratios that can be found in the top options bar after choosing the Crop Tool. These presets allow you to easily crop images to match specific dimensions.
Another tip is to adjust the Crop Tool's settings through the gear menu. Enabling "Classic Mode" and customizing other options will tailor the tool to your preferences. Also, remember to uncheck "Delete Cropped Pixels" for nondestructive editing, which preserves your original image.
Finally, when cropping an image, you might want to change its orientation. To do this, grab any of the corner handles and drag them along the border's outline. Once you've achieved the desired result, press "Enter" to apply the changes.
By incorporating these tips and tricks, we can make the most out of Photoshop's Crop Tool and enhance our photo editing skills.
Common Misconceptions and Solutions
When working with Photoshop's Crop tool, there are a few common misconceptions and issues faced by users. In this section, we will discuss these problems and provide solutions to them.
One basic misconception is that the Crop tool only crops an image in a rectangular shape. However, you can also crop a photo in a circular shape using a clipping mask. To achieve this, create a circular shape using the Ellipse tool, then select both layers and press Ctrl + Alt + G (or Command + Option + G on a Mac).
Cropping images might seem challenging when you're unable to find or adjust the crop handles. To fix this issue, first, make sure you're using the right tool (shortcut: C) and that you can see the crop overlay. If the problem persists, try to reset the tool by right-clicking on the Crop tool icon and selecting 'Reset Tool' from the context menu.
Some users experience problems when the Crop tool does not maintain the desired aspect ratio. To solve this, use the Options bar at the top of the screen to set a specific aspect ratio or choose from the available presets. You can also hold down the Shift key while dragging the crop handles to maintain a proportional aspect ratio.
Occasionally, you may find that your cropped image appears pixelated or low-quality. This is often due to inadvertently resizing the image during the cropping process. To prevent this, make sure the resolution remains unchanged by keeping the 'Width', 'Height', and 'Resolution' fields blank in the Options bar.
In conclusion, understanding the basic functionalities and common misconceptions of the Crop tool in Photoshop can help you navigate and resolve any issues you may encounter while editing your images.
Frequently Asked Questions
How does the crop tool work in Photoshop?
The crop tool in Photoshop allows us to select a specific area of an image and remove everything outside that area. We can use the options bar to customize settings like aspect ratio or width and height values to achieve the desired effect. For more detailed steps, check out this Adobe tutorial.
What are some alternatives to the crop tool?
Alternatives to the crop tool in Photoshop include the marquee selection tools (rectangular and elliptical) combined with the Edit > Cut or Edit > Clear commands, and the Lasso selection tools (Lasso, Polygonal Lasso, and Magnetic Lasso) with the same cut or clear command. These alternatives provide different ways to remove or isolate parts of an image.
How do I straighten an image using the crop tool?
To straighten an image using the crop tool, first, select the crop tool and then click on the "Straighten" button in the options bar. Next, draw a line across an image element that should be straight (like a horizon). The image will automatically rotate to align with the line created, and the Crop Tool will adjust accordingly.
What is the difference between crop and trim in Photoshop?
Cropping refers to removing unwanted portions of an image to create focus or enhance composition. On the other hand, trimming is a process that removes empty or transparent pixels from the edges of an image, typically after applying filters or effects that might generate extra space. Both tools allow us to improve the final appearance of an image.
Can the crop tool adjust perspective?
Yes, the crop tool in Photoshop can adjust perspective. We can do this by selecting the crop tool, enabling the "Perspective" option in the options bar, and then modifying the corners of the cropping border to realign the perspective. Keep in mind that adjusting the perspective might affect the aspect ratio of the image.
How to crop a specific layer in Photoshop?
To crop a specific layer in Photoshop, first, select the layer in the layers panel. Then, use any of the selection tools (such as the Rectangular Marquee Tool or Lasso Tool) to define the desired area to keep. Once the area is selected, go to the Select menu and choose "Inverse" (Shift + Ctrl + I), which selects the area to be removed. Finally, press the Delete key or choose Edit > Cut to remove the selection, effectively cropping the layer.


