
Approach
There are various approaches one can take to create conceptual portraiture. Sound logic will tell you to pre-plan your concept before the shoot and to do so in as much detail as possible. This will allow you to define the mood, plan the color palette, scout locations, gather props, etc. so that all these elements work in harmony towards the defined concept.
For this shoot, I had the luxury of having significantly more creative freedom than my typical commissions. I went into the session with no pre-defined concept in mind. The only predefined expectation was to deliver *a* conceptual portrait. The couple had complete trust in the process and did not impose any themes.
Shooting
The shoot was scheduled to take place on location. This usually helps the subjects be more at ease, especially if the shoot is taking place in their own home - which was the case for this couple.
I started this shoot with a brief dialogue with the couple to get to know them better. This is always an important part of any session I shoot. It puts the subjects at ease, allows me to get to know them better and study both their expressiveness and chemistry. We discussed which directions to explore during the session, and their wish was to showcase romance with a touch of sensuality.
Since the expected outcome was a conceptual image that was going to be worked in post-processing, the locations and background didn’t matter so much throughout the shoot. I was simply looking for neutral backgrounds that could be easily altered in Photoshop if need be.
We started the session in the comfort of the living room with some “standard” portraits to break the ice, and worked our way toward the portraits intended for the conceptual image.

The final image was shot with the couple lying on their bed. I was standing on a stool directly above them. I lit them with a Godox AD600 shot through a 42” Westcott octabox on camera left, tilted downwards towards the subjects.


In order to illustrate the marital status of the couple, I made sure to incorporate their hands with the rings into the portrait.

Culling
When shooting for conceptual art, the culling process is simultaneously easy and subtle. You know right away which scene/pose is the winner - it speaks to you instantly. It’s therefore easy to quickly discard entire sets of images.
But once you are left with the set of captures from the chosen scene, it suddenly becomes very subtle. It’s all about finding *the* perfect capture with the perfect expressions, the perfect body language, the perfect hand placements, etc.
In this particular shoot, I was able to find a single capture where I was satisfied with all these elements. However, it could happen that the perfect expression is in one photo and the perfect hands are in another. I’m not a purist, so I'm not afraid of compositing different elements if need be, but it wasn’t necessary for this shoot.
I like using Photo Mechanic in my culling to quickly move back and forth between subtle variations to pick my favorite(s).
Capture One
Capture One is an integral part of my workflow. Sure, you can probably get similar results using your favorite tools such as Lightroom or Adobe Camera Raw. But I just like the slightly different tools at my disposal in Capture One, especially those for color control. I also find that Capture One allows me to push my RAW files to slightly more extremes with cleaner outputs than what I am personally able to achieve with other tools.
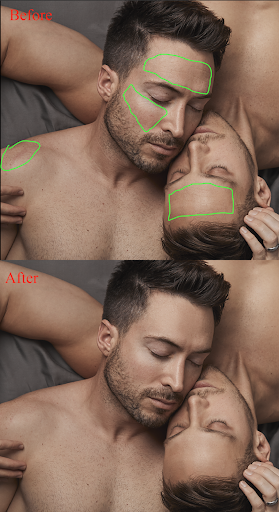
The main issues of the RAW capture were some lost details in the shadows and skin tone inconsistencies. The changes are summarized in the screen captures below.


Below is a closer look at the main areas where the changes are more noticeable. Notice the recovered details in the hair and the more uniform skin tones.

Retouching
You’ll notice that the retouching in each of these steps is very subtle, sometimes barely noticeable in a small screen grab, and that’s really the key here. The sum of subtle changes is a dramatic change.
Puppet Warp
I started the retouching process by tweaking the pose of the couple by using Photoshop’s Puppet Warp. The main goal is to add some dynamism and enhance the sensual mood of the image.

Cloning
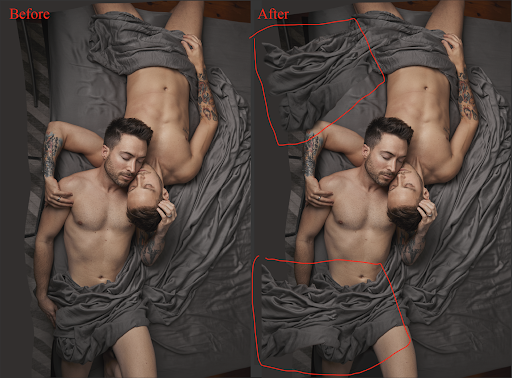
I cloned some of the sheets to add some flow to the image and hide the tense hand.
Skin Correction
I mainly evened out color density issues, cleaned some of the forehead wrinkles and improved skin tone consistency. I used a mixture of healing brush, stamp tool, gradient mask on color blending mode and frequency separation to achieve this.

Dodging & Burning
I did some slight dodging and burning to define the pectorals and to overall give the subjects a bit more depth overall. Here is the result.

Concept
I defined and refined the concept throughout the retouching process. As mentioned, you should ideally set the concept before the shooting even begins. But for the aforementioned reasons , I had some creative freedom which allowed me to define and refine my concept throughout the later stages.
The dictionary defines “concept” as an abstract or generic idea generalized from particular instances. I chose to tell the generic idea of love from the particular instance of this moment.
Illustrating “love” in a portrait is a pretty beaten path. Almost all couples’ portraits aim to do this and only this! So to bring this portrait to the next level, it needed some artistic merit. There’s no other way to attain this crucial step but to immerse yourself in art and art history (and be warned: it’s a continuous and never-ending journey).
The way I can over-over-oversimplify this concept is that a work of art is all about balancing elements with their contrasting opposites. For example, Michelangelo used the contrast of smooth skin against the textured cloth in his famous Pieta. Similarly, the smooth skin of the subjects in this portrait is contrasted by the wrinkled sheets in the original photo.
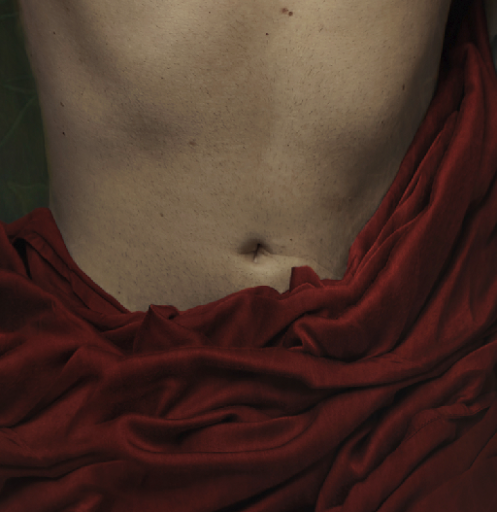
The portrait was shot with somewhat neutral gray sheets. This made it easy to color them in a different color. I chose to make them red to symbolize passion and highlight the main concept of love. I used a Hue/Saturation adjustment layer in “colorize” mode with the settings below to color the sheets.


Compositing
I wanted to elevate the image further by incorporating additional contrasting elements. I first experimented with contrasting the masculinity of the subjects with the softness of flowers. To give a more painterly feel to the image, I simply used paintings of flowers! Royalty-free old master paintings from museums, to be precise.

I then tried to contrast the main theme of Love. The overall composition and subject placement didn’t at all hint at a renaissance painting by themselves. But somehow the overall image was starting to feel like a renaissance painting, at least to me.
I wanted to continue pushing in that direction and decided to introduce the biblical symbol of a snake to add some tension with the main theme. It was a photo I had taken more than 10 years ago at the local zoo.

After matching the density and colors of this old photo with Curves adjustment layers, I added the snake in the corner, pointed directly towards the center.

Color-Grading
The final step to complete the concept and bring cohesiveness is color-grading. I opted for the below color palette and pushed the hues and saturation around to neutralize other colors.


Overall the image has an analogous scheme as becomes evident when the dominant colors are viewed on a color wheel.
… And A Title!
This step is essential as it just gives meaning to the entire piece and breathes life into it. A title sets the viewer on a certain path and mindset to begin exploring the image.
I’ve chosen to title this image “Forgive Me Father, For I Have Loved” to highlight the tension created by the various elements of the image.
With all these elements put together, here’s what I got:

Ara Hagopian is a WPPI Master Photographer and the leader of Badger Photography, a Montreal-based award-winning Studio. He wrote this blog post, and all images are shared with his permission.


