What's That Look?
Professional color grading has become one of the most essential qualities of high end commercial visual photography work in modern culture. Without the "look", images drown in an abyss of visual communication. Art directors, photographers, agencies and brands are all chasing it, trying to connect with a market segment who already understands the vocabulary of an existing visual trend.
The question is, as artists how do we achieve these looks? It certainly doesn't happen in camera, so we have to understand color grading in post which can take years to master. Which is great, we should all be working toward a better understanding of color grading in post-production.
But sometimes in this industry, we need to get the job done yesterday.
3D LUT Profiles: One-click High-End Color Grading
We've created a brand new way to apply high end looks to your images with the click of a button. Utilizing Adobe's new support for creative profiles, we combined the power of color manipulations in 3D Lut Creator with the flexibility and quality of custom profiles, all integrated into the new profile browser in ACR and Lightroom.
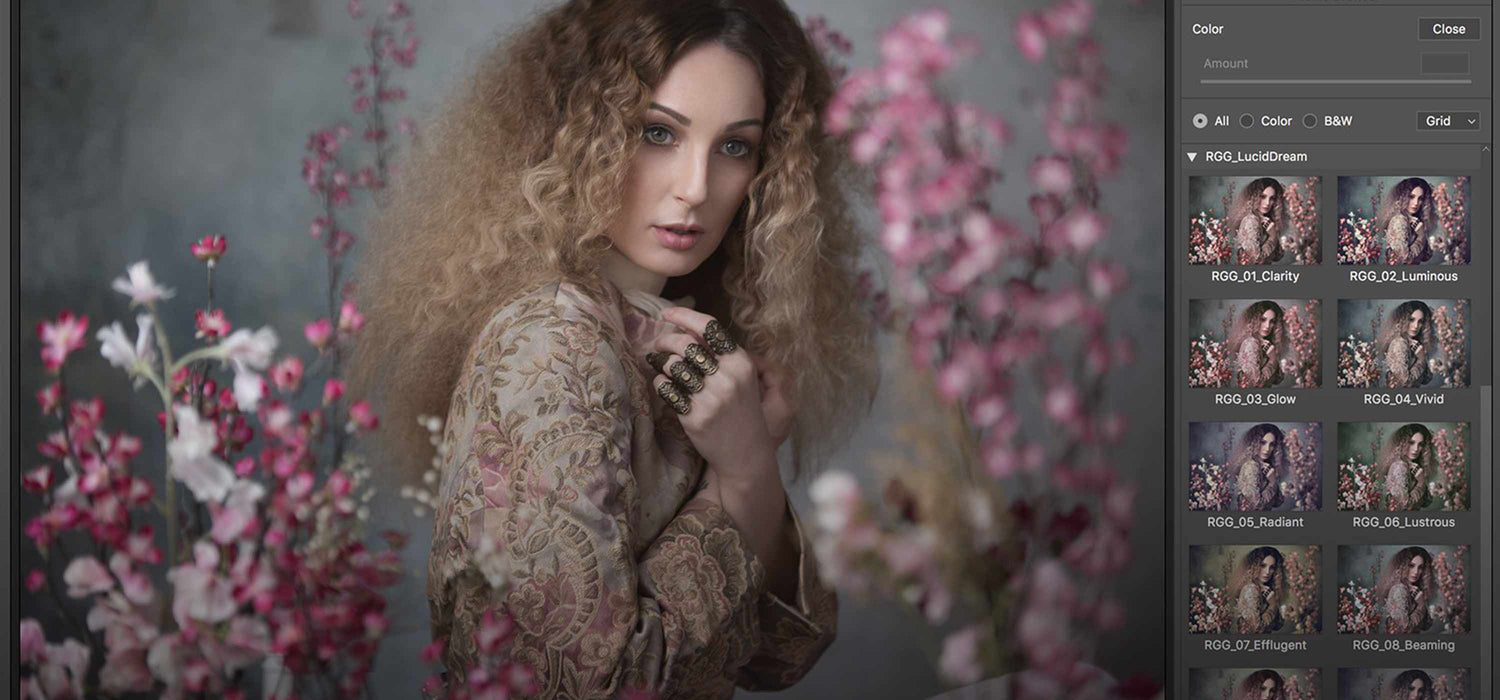
Once loaded, you'll be able to browse through an entire library of professional 3D LUT Profiles in seconds. The profile browser allows you to preview each look in your profile pack with a thumbnail of your target image, and scroll through every look with the arrow keys to immediately preview it on the full frame image.
Once you choose the LUT profile you like, it just gets better. Dial in the look to your personal taste with the density slider, which controls the amount of the look to be applied uniformly. Next, you can move on to using all of the controls in Adobe Camera Raw to even further manipulate the look closer to your vision. And one of the first things you'll notice at this stage - all the sliders are at their default. That's right. All. At. Zero. We'll explain more on this later.
We've developed an entire library of grading packs to suit every style. From very light touches that could work for landscape and wedding photographers, to heavy treatments taking that sports campaign concept deck in multiple impactful directions at once.
We set out to build automatic color grades to empower every type of artist with immediate inspiration for endless creative possibilities. Our PRO EDU Creative Color Grading Packs could provide you with the end result you've been looking for on that quick turn project or they might be just the beginning - the lift you need to get your creative process off the ground and cruising.

3D LUT Profiles - What Are They Exactly?
Up until version 7.3 of Lightroom profiles were really about the camera, the component that brings the image into the realm of a balanced photograph. Analogous to the tradition of color grading itself, profiles were primarily concerned with outputting an image that represented a complete range of values across the histogram, with accurate color balance. And as color grading has changed, so have profiles - they're now a creative tool.
The Roots of Commercial Color Grading Packs
If you've spent any time in the image-making business, you're no doubt familiar with the commercial products on the market. Actions, creative Luts, and ACR/Lightroom presets have been fabulous tools for helping creatives see a multitude of grading possibilities in an instant and have been around for a long time. They all have their benefits and drawbacks, ask any room of photographers who use them and you'll immediately have a passionate debate about what's best.

Color Grading Actions
Shortly after programmable actions became available in Photoshop version 4.0 (along with adjustment layers) people began finding ways to record their creative steps in order to run them again later on another image or share with a collaborator. Now you can find a huge variety of commercially available actions online that perform any kind of look you can imagine.
With the click of a button in Photoshop, a color grading action will spit out a folder of adjustment layers that all work together to create a look for you in a few seconds. It's great, especially now that we're mostly all familiar with adjustment layers since they've been around for so long. They're editable, can be adjusted in opacity and with blending modes, and can be turned on or off.
But editable doesn't mean non-destructive. In retouching, the notion of cross-curving (using multiple stacked adjustment layers that perform contradictory moves) is well known to degrade the image and avoided. With a single adjustment layer pushed too far, it's easy to make the histogram fall apart. Most color grading actions work best in 16-bit, but once applied to an 8-bit image can result in extensive banding, which is a deal breaker for many retouchers who need to work in 8 for file size and functionality considerations.
One of the most cumbersome aspects of traditional color grading actions is that every time a new one is executed, the artist then has to basically reverse-engineer someone else's layer stack. This can be time-consuming and frustrating - to go through every layer thinking, "I wonder what this one does, what about this blend mode? How about these 3 on with these 2 off?"
Creative LUTs
Look Up Tables, or LUTs, as they're affectionately termed, were born also from utilitarian origins, but in film, and describe a mathematical equation that takes an input and changes it to the desired output. I'm being intentionally general here as the history of Lightroom LUTs is vast and technical. For our purposes, we can think of LUTs as these containers of directions that remap all sorts of aspects of our image to new outcomes, and create a look!
In Photoshop, LUTs are commonly created from a stack of adjustment layers just like you'd find in your file after running a color grading action. They're just packaged up into a single container which is the LUT. When LUTs are applied to an image in Photoshop, they appear in the layer stack as an adjustment layer.
Creative LUTs work great for what they do. They contain a bunch of information about a transformation without you having to mess with anything. You can basically turn the volume up or down via opacity or maybe change the blend mode. They're nice and portable, as they're just one layer.
LUTs, unfortunately, are a black box. If created in Photoshop, once output as a LUT, you'll never be able to dig back in and see the adjustments that went into them. This could actually be a good way to potentially provide a layered file to your clients without giving them the ability to mess with your grade but to simply turn it on or off, but aside from that their flexibility is limited.
ACR/Lightroom Presets
Back in the day, if I had to choose a prepackaged look to use, it would probably have to be a preset. These apply at the Camera Raw level in either ACR or Lightroom and are just a way of saving out all of the settings in the Raw adjustments, same as if you get an .xmp with the photographer's settings.
I love doing all the work I can at the Raw level. Because… data. We get to work with all that data, and all the flexibility it provides. So for me, especially if doing some heavier color grading, I'd always choose to apply that to the most amount of data I can find. It's legitimately non-destructive. Sure you can still crank the adjustments so hard that the image starts to look like garbage, but all that's happening at the Raw processor level is math. The adjustments you're making don't destroy or remove any information, it's all there.
The annoying thing about a preset though is that when you open it up, all the sliders are all over the place. If in your particular image, you need to recover even more of the highlights, but the slider is up against the wall, you've got nowhere to go. It's already been cranked up based on the exposure of a different image. That and there's no easy way to uniformly adjust the entire density of the look, you have to go through and change the individual adjustments to suit your taste.

3D LUT Profiles: The Evolutionary Next Step
With 3D LUT Profiles, you have the same wide visual variety of creative grades as you would with actions, and then some. An individual profile, in reality, has multiple grades within it, depending on how you adjust the base image using the Camera Raw adjustments. Since the profile is being applied to the Raw above the adjustments level, the results become different according to the changes you make to the image it's acting upon.
We use LUTs to create our profiles, but they're not created in Photoshop using layers. Instead, we use an incredible piece of software called 3D LUT Creator. The adjustment environment that 3D LUT Creator provides in ACR and Lightroom is super robust and a skilled operator can perform incredible shifts in value and hue while preserving the fidelity of the transitional areas within an image, which often suffers hard in a really severe manipulation in Photoshop. We built our LUTs the right way up front to fuel a powerful profile.
Since the LUT is applied in Raw as a profile, it's working outside the actual Raw adjustments, "on top" of everything, so you are free to use all of the sliders starting at their zero position. This is huge. It completely solves the "up against the wall" problem and gives you the full range of adjustments that you'd normally expect when you open a native Raw file.
Extended Dynamic Range
In addition to all of these benefits, when creating the profiles we decided to increase the dynamic range setting. This is a little-known feature of custom profiles in ACR and Lightroom. They actually give you the option to change the dynamic range that's available to manipulate. Just to be clear, this doesn't create any new information in the capture data, but it does give you access to more information to manipulate.
Think of it this way, if you're used to the Shadows and Highlights sliders being able to go from 0 - 100, with the EDR it's as if they can now go to 150. If like us, you've been in the situation where you needed just a little more room to push and didn't have it, you'll think this is as cool as we do.
Where We're Going From Here
We're thrilled to finally be able to bring you the most creatively comprehensive and technically innovative color grading products available. Grades that work well for working professionals are our goal.
The only thing left to do is to wait and see what you can create with them.
Compatibility
The 3D LUT Profiles are compatible with:
- Adobe Camera Raw version 10.5 and newer
- Adobe Lightroom Classic version 7.3 and newer
- All versions of Adobe Lightroom CC


