What Is Spot Healing In Photoshop: Essential Guide for Photo Retouching
Spot healing in Photoshop is a powerful tool used by photographers and digital artists to fix imperfections in images by seamlessly replacing problem areas with nearby pixels. The concept behind spot healing is to replace unwanted texture or marks with good texture from surrounding areas, resulting in a natural-looking and clean image. Several tools in Photoshop, such as the Spot Healing Brush, Healing Brush, and Patch tool, employ this technique to make image retouching efficient and easy.
Understanding and mastering spot healing in Photoshop is essential for those who aim to improve their photo editing skills. These tools allow users to achieve a professional finish by removing blemishes, small objects, and other unwanted elements in images. Furthermore, by combining spot healing with other related tools, one can achieve more advanced and precise edits that enhance the overall image quality.
Key Takeaways
- Spot healing helps fix imperfections in images by replacing problem areas with surrounding pixels.
- Mastering spot healing is essential to achieve a professional finish in photo editing.
- Combining spot healing with related tools leads to advanced and precise edits that enhance image quality.
Understanding the Basics of Spot Healing in Photoshop
Spot Healing in Photoshop is a powerful tool that helps in editing images by fixing imperfections such as acne, blemishes, and unwanted small objects. In essence, the Spot Healing Brush allows us to blend pixels seamlessly to create a desired appearance.
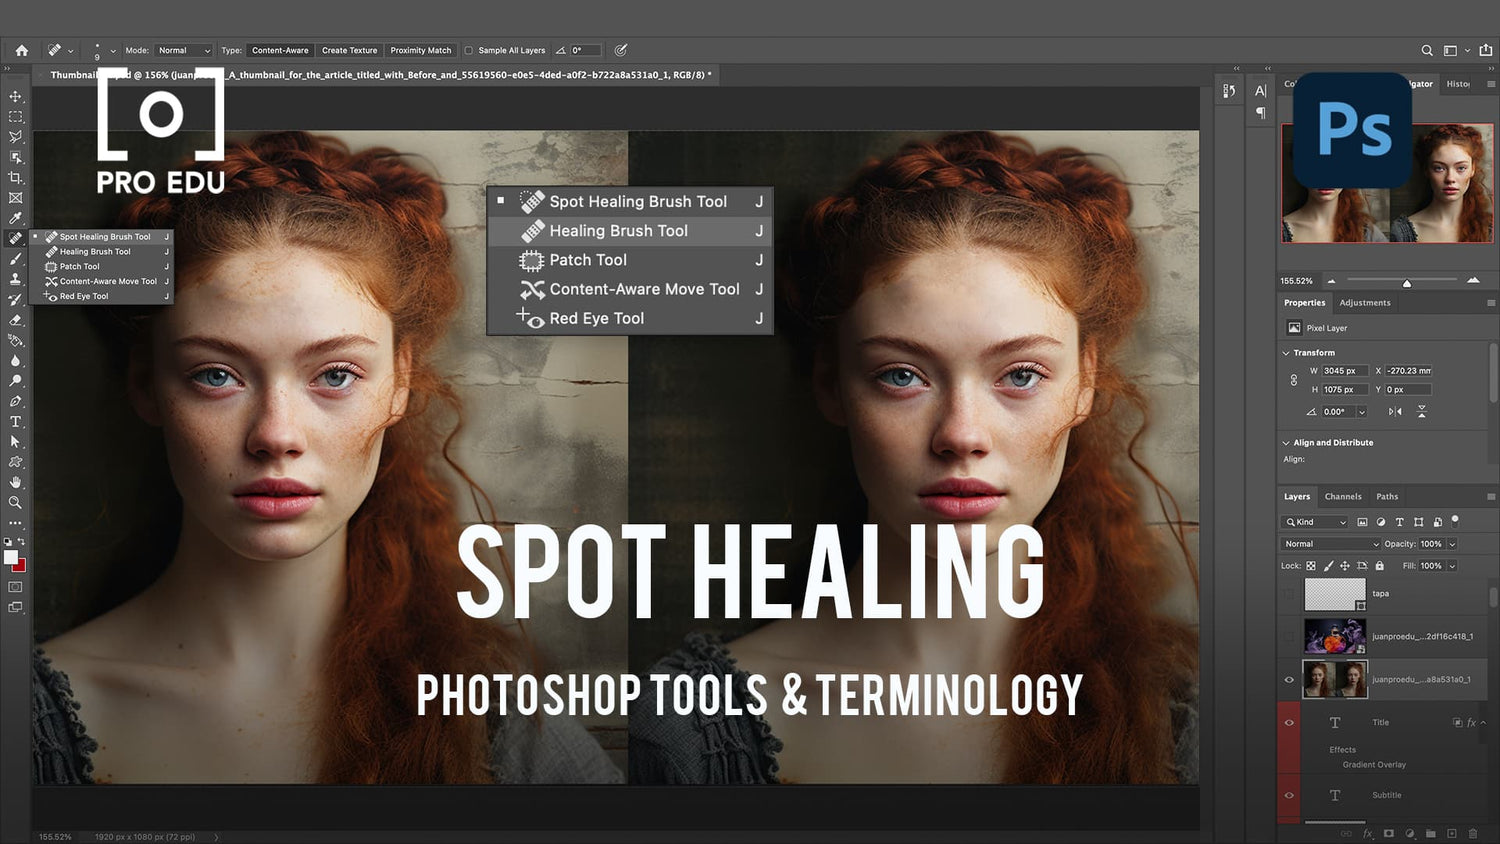
To use the Spot Healing Brush, we simply need to select it from the toolbar and apply it on the area we want to improve. Photoshop then uses an algorithm that selects the best pixels around the area and blends them together. This makes the Spot Healing Brush particularly effective for removing small imperfections like acne and blemishes.
It is worth noting that there is another tool called the Healing Brush which is also useful for retouching photos. However, the main difference between the two is that the Healing Brush requires a source point to sample pixels, whereas the Spot Healing Brush automatically samples surrounding pixels.
To summarize, Spot Healing in Photoshop is an invaluable tool for retouching images by removing and blending imperfections. By understanding how to effectively use the Spot Healing Brush, we can significantly improve the overall appearance of our images and ensure outstanding results.
The Spot Healing Brush in Practical Use
The Spot Healing Brush tool is an incredibly useful feature in Photoshop that allows us to quickly repair imperfections in our images. By simply clicking on the spots we want to fix, the tool intelligently blends the surrounding pixels to create a seamless result.
To use the Spot Healing Brush tool effectively, it's important to adjust the brush size to match the scale of the imperfection. We can do this by either increasing or decreasing the brush diameter to cover the targeted area with precision.
The tool achieves its magic by considering factors such as color, texture, and lighting. By clicking, moving, or dragging the brush over the unwanted spots, Photoshop replaces the flawed pixels with a harmonious blend from nearby areas.
To ensure the best results, remember to:
- Adjust the brush size appropriately
- Click or drag over the desired area for repair
- Remain patient as each click may produce different outcomes
By following these steps and using the Spot Healing Brush tool, we can easily remove blemishes or fix various imperfections in our images, leaving them looking polished and professional.
Advanced Techniques and Troubleshooting
When using the Spot Healing Brush in Photoshop, advanced techniques such as Content-Aware and Proximity Match are flexible ways to repair image imperfections. With Content-Aware, Photoshop intelligently samples pixels from the surrounding areas to blend and replace the selected area seamlessly. Proximity Match, on the other hand, searches for similar textures and patterns in close proximity to the selected area to create a smooth, natural result 1.
It is essential to work on a separate layer when using the Spot Healing Brush. We recommend creating a new, blank layer above your original image and selecting "Sample All Layers" in the brush options, which allows you to work non-destructively while preserving the original image2.
While using the Spot Healing Brush, you might encounter issues relating to blending and edges. To achieve better results, set the blending mode to Normal and adjust the brush options accordingly, such as size, hardness, and spacing. Ensuring your brush has a soft edge will help create a smooth transition between the repaired area and the surrounding pixels3.
In some cases, the Spot Healing Brush may not provide the desired outcome, requiring troubleshooting steps to resolve the issue. First, double-check your layers and ensure that the appropriate layer is selected 4. It is important to analyze the area you are trying to repair, as complex textures or patterns may require a different approach. In such instances, experimenting with different brush options or utilizing alternative tools like the Clone Stamp Tool may be necessary5.
Keep in mind complex situations where changing settings and troubleshooting may still not yield satisfactory results. In such cases, it may be beneficial to resort to manual retouching methods, exploring different tools, or combining multiple techniques to achieve the desired outcome6.
Working with Other Related Tools
In addition to the Spot Healing Brush, there are other essential tools in Adobe Photoshop that can help us improve and retouch our images. Let's explore some of these vital tools.
Healing Brush Tool: This is a versatile tool that can repair imperfections by painting with pixels from another part of our image (source). To use it, first select the Healing Brush tool (J) from the toolbar. Then, we choose a suitable source point and start painting over the unwanted area.
Patch Tool: The Patch Tool works similarly to the Healing Brush but allows us to select and drag an entire area to be replaced by another, creating a seamless effect. It is particularly useful for larger areas that require more precise adjustments.
Clone Stamp Tool: Unlike the Healing Brush or Patch Tool, the Clone Stamp Tool copies and pastes pixels from a selected source directly onto a target area, without blending them (source). This feature makes it ideal for duplicating objects or patterns within our images.
Layers: To apply non-destructive edits and keep our original image intact, we often work with layers. Adding a new layer allows us to try out edits using these tools while preserving the initial state of our photos.
Options Bar: When utilizing any of the tools mentioned above, we may need to customize their settings. The Options Bar, located at the top of our Photoshop workspace, lets us adjust settings like size, hardness, and pressure to achieve the desired effect (source).
By combining these powerful tools, we can enhance and modify our images in diverse ways, ensuring a polished and professional result.
Beyond Spot Healing: Broadening Your Photoshop Skills
In addition to using the Spot Healing Brush for quick retouching, it's important to broaden our Photoshop skills to make the most of this powerful image-editing software. One essential skill in Photoshop is working with selections. Using selections, we can isolate and edit specific areas of our image. It's vital for more advanced retouching, painting, and compositing tasks.
Furthermore, we should familiarize ourselves with a wide range of brushes available in Photoshop. This includes basic brushes for painting and retouching as well as more specialized brushes for adding textures or effects. By understanding the different brush options, we can better match the needs of individual projects and create more advanced visual effects.
When working in Photoshop, we need to have a clear and accessible workspace. This includes customizing the toolbar, panels, and menus to reflect our personal preferences and needs. Efficient workspace organization can significantly reduce the time it takes to complete tasks and improve overall workflow.
Lastly, the ability to zoom in and out quickly and accurately is essential when retouching or applying effects to specific areas of an image, especially when doing detailed work like skin retouching. By mastering the zoom functionality, we can greatly enhance our precision and control while working on an image.
By developing these skills and incorporating them into our repertoire, we will be better equipped to handle a wider range of projects in Adobe Photoshop, resulting in more professional and polished final products.
Frequently Asked Questions
How does Spot Healing Brush differ from the Healing Brush tool?
The Spot Healing Brush automatically samples the surrounding area, making it ideal for small blemishes or spots. On the other hand, the Healing Brush requires manual selection of the source area, giving you more control for larger fixes. Both tools blend pixels for a seamless result (source).
What are the common settings for the Spot Healing Brush tool?
Common settings include adjusting the brush size and hardness to cover the area you want to fix. Additionally, set the brush options to Content-Aware and Sample All Layers for filling in the unwanted spot with appropriate content (source).
How do you effectively use Spot Healing Brush in Photoshop 2023?
First, zoom in on the area you want to work on. Next, select the Spot Healing Brush tool and adjust the brush size and hardness. Ensure brush options are set to Content-Aware and Sample All Layers. Finally, brush over the blemish or spot to remove it (source).
Why might the Spot Healing Brush tool not work properly?
The tool might not work well due to incorrect brush settings, low resolution, or when working with complex textures. In such cases, adjusting brush settings or using alternative tools like the Healing Brush or Clone Stamp may yield better results.
What are some alternatives to the Spot Healing Brush tool?
Alternatives include the Healing Brush tool, the Clone Stamp tool, and the Patch tool. Each tool offers different levels of control and blending options, depending on the specifics of the image and the imperfections you wish to correct (source).
Can Spot Healing Brush tool be used in Photopea?
Yes, the Spot Healing Brush tool is available in Photopea, a free online Photoshop alternative. The tool functions similarly, allowing you to quickly fix imperfections in your images.
Footnotes
-
(https://helpx.adobe.com/photoshop/using/tool-techniques/healing-brush-tool.html) ↩
-
(https://design.tutsplus.com/tutorials/how-to-use-the-spot-healing-brush-in-photoshop--cms-36377) ↩
-
(https://essential-photoshop-elements.com/why-your-spot-healing-tool-may-not-be-working-troubleshooting-tips/) ↩
-
(https://helpx.adobe.com/uk/photoshop/using/tool-techniques/spot-healing-brush.html) ↩
-
(https://www.photoshoptutorials.ws/writing-tutorials/spot-healing-brush/) ↩


