HOW TO GET DEPTH OF FIELD RIGHT IN CGI
Depth of field is a fantastic way to bring added realism to your 3d renders when working with scenes that include background and foreground elements or working on macro-level detail shots!
Highlighting the focal point of an image to a certain degree helps make your subjects pop and draws the eye into the specific area you want your focus bases around.
OPTIONS
When it comes to depth of field in 3d, there are a few ways to accomplish this.
One option is to enable depth of field in the final render output, but sometimes this isn't always the best solution depending on the plans for compositing. Chances are, if there are plans for masking or color correction on specific aspects of the image, it can be time-consuming to get clean masks from your render passes as they will also have a depth of field in them. However, enabling depth of field in the final output can give you slightly more realistic results regarding things like glass and transparent objects that you can see through.
The second option is to set up a Z-depth pass and produce the depth of field on the compositing side instead of baking it into the final render output. Using render passes and taking advantage of the Z-depth pass allows a broader range of flexibility in your workflow. Compositing with a Z-depth pass gives you on the fly control over how heavy the depth of field is in the image, in addition to allowing you to fine-tune your focus distance to a degree.
SETTING UP A Z-DEPTH RENDER PASS
Setting up and taking advantage of the Z-depth pass in Octane and C4D is similar to other render passes. Under the Render Settings window, click on "Octane Render" on the left-hand side, then go into the "Render Passes" tab. Next, check the box under "Render Passes" that says enable at the top of the window. At the bottom of the window, inside Info Passes, the option to enable Z-depth is available.

Directly beneath the option to enable the Z-depth pass, the setting for Z-Depth Max exists. The Z-Depth Max setting allows you to increase or decrease the distance in which Octane will calculate the Z-depth pass. Activating the Octane Live Viewer and switching over to the pass that is labeled "Z" from the bottom “passes” menu (small tabs)

ADJUSTING AND UNDERSTANDING Z-DEPTH PARAMETERS
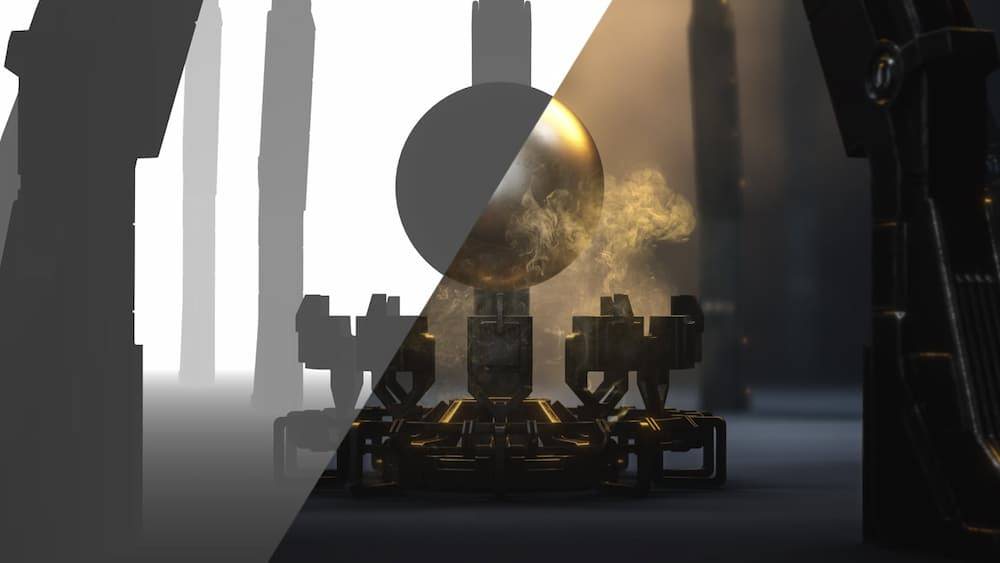
Z-depth works on a grayscale value range to create a depth of field effect when used. The colors in the pass will range from black to white based upon distance from the camera, with black being in the foreground, closest to the camera, and white in the background, with mid-gray values being in-between.
The key to getting the Z-depth pass set up correctly is to adjust the "Z-Depth max" setting to an amount that will give good separation between the other elements in the scene. Think of the mid-gray value as the color that represents the focal plane in the shot. If the pass is used for macro style or detail shots, the amount will need to be adjusted so the 3d model being framed has a good gradient of black to white encompassing it.

USING THE Z-DEPTH PASS IN COMPOSITING - PHOTOSHOP
Z-depth works on a grayscale value range to create a depth of field effect when used. The colors in the pass will range from black to white based upon distance from the camera, with black being in the foreground, closest to the camera, and white in the background, with mid-gray values being in-between.
The key to getting the Z-depth pass set up correctly is to adjust the "Z-Depth max" setting to an amount that will give good separation between the other elements in the scene. Think of the mid-gray value as the color that represents the focal plane in the shot. If the pass is used for macro style or detail shots, the amount will need to be adjusted so the 3d model being framed has a good gradient of black to white encompassing it.

CONCLUSION
The 3d render layers in Photoshop are very powerful when used in compositing. With the help of the Z-depth pass, you can achieve a convincing depth of field in any of your renders and adjust them for mood or focal points relatively quickly. It is also possible to use curves or levels to tweak the Z-depth pass further if need be. The effect can be easily removed or added and is no longer in the final render output, leaving you with an unchangeable depth of field.


