In this article I’m going to break down how I shot this portrait underwater, from the initial concept, underwater equipment used, all the way to the post-production and final photo. Hopefully you’ll get a good idea of how to take underwater photos and are inspired to try one yourself!
Concept
To be honest I didn’t have too much of a preconceived concept going into this underwater photography shoot, as I was working with the model Jessica Dru for the first time. Jessica is a cosplay/fantasy model who likes to create her own characters and outfits so I really just wanted to let her drive the theme with whatever she brought to set on the day
Equipment
This setup for underwater photography is pretty standard for me. I used an Aquatica 5Dmkiv underwater housing with 8-inch acrylic dome port to protect and waterproof the Canon 5D Mk4 camera with a Canon 16-35mm 2.8 ultra wide angle lens to take my photos.

For lighting, I used a Sea & Sea YS-D2 underwater strobe on a Manfrotto Nano lightstand for lighting below the surface, and a Flashpoint AD600 strobe with a 36 inch octobox on a 7-foot lightstand for above the water. To trigger the lights I used a combination of a Flashpoint R2 Pro radio trigger for the above water strobe and an optical trigger for the underwater strobe.
Pre-production
In the days before the underwater shoot, I was in contact with Jessica to chat about the images and the concept. Having seen some of her other work I knew that no matter what she brought to the shoot it would be really cool. She’s also a very experienced underwater photography model so I was very confident in her abilities.
In terms of my own pre-production, I usually like to know the pool I’m working underwater in - whether it’s a pool I’ve used before or maybe some photos of a new one. This was taken before I had a pool studio at my home in Los Angeles, and wasn’t a pool I’d photographed underwater in before so it was all a bit unknown.
I wasn’t able to get any detailed information about the pool before the day so I prepped what I thought I would need for any eventuality - mainly a black backdrop in case the pool was ugly.
Setting up
On the shoot day I arrived at the location and checked out the pool - it wasn’t great but it would totally work for this underwater photography. The walls weren’t tiled but they had a strange green tint to them and lots of stains so I figured it would be best to drop in the black backdrop to take photos against.
Outfits
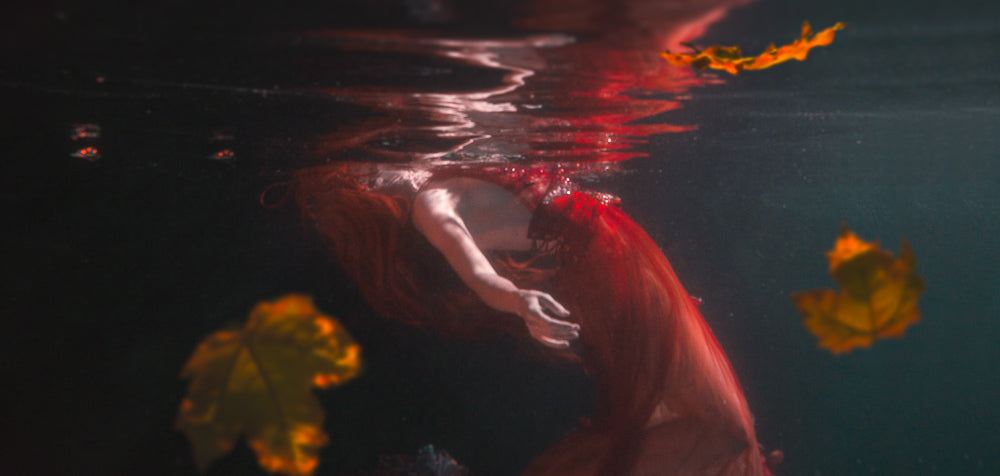
I went inside the house to chat with Jess about underwater outfit options and she showed me some really cool stuff. She had this amazing red dress with flowers sewn into the fabric which we both thought would look amazing against the black backdrop.
She had also brought along some silk autumnal leaves which went really well with the dress, and we decided to try and get them to float around her in the water.
Jessica had also brought some synthetic wigs with her, as they tend to hold their shape and move nicer underwater than natural hair does. We chose a beautiful sunset red wig for her to wear and she started pinning it on as my assistant Brianna and I headed out to the pool to get ready.

The Pool
Since the pool walls weren’t what I wanted for an underwater background we dropped the large black fabric backdrop I’d brought in to the deep end of the pool. The fabric is synthetic which means the chlorine of the pool won’t bleach it, and it’s fairly lightweight but not buoyant so once we secured one side of it to the pool edge the rest of it sunk down to the bottom - entirely covering the back wall of the swimming pool.
Since the lightweight fabric tends to move in the subtle water currents created underwater when the model moves around, I would also drop some small soft diving weights down to hold the bottom of the backdrop in place as well.
Lighting
I knew I wanted some beautiful soft light coming from above the water, as hard light tends to create contrasty ripples on the model, so Brianna set up the key light with an octobox on the camera right side of the pool, in line with where Jessica would be underwater. I then set up the YS-D2 strobe with the optical trigger on the camera left side of the pool, about halfway to the bottom, with a thin diffuser to give her a little side light and fill from the left.

Camera
My underwater camera went into its aquatica underwater camera housing with the 16-35mm wide angle lens, and the radio trigger went into a custom made housing that allowed my camera to trigger the strobes from underwater. I tend to keep my white balance on Daylight and shoot in RAW, which gives me the ability to adjust the white balance in post-production.
As I was using the strobes for the lighting I set my ISO at 200 to start with, knowing that the strobes should give me enough light to keep the ISO low and the quality high. I mostly use the aperture to adjust the overall light brightness once I’m in the pool, but I do like to have it at a midpoint like f8 to start with since both the model and myself will be moving underwater so I want as much focus latitude as possible.
I also set the focus to AI Servo to track the model as I find this helps to keep things tack sharp.

Underwater Shoot
Once Jessica was ready we both got in the pool, she in the deep end and me around midway. I like to be around 4-7 feet away from the model once we’re underwater as the closer you can be the clearer the water is for underwater photography.
After a little bit of discussion about poses, we start shooting, with me going under a breath before Jessica so I can move into position and frame up the shot. She then slides under, releasing all her air so that she sinks and starts to pose. Jessica is great, she knows what looks good underwater and knows how to move the fabric of the dress in ways that make it look alive.
Each time we go under we get some amazing shots, and since we both have fairly decent breath-holds (around 1.5 - 2 mins) we can take some time to get it right - but even if it was only for 30 seconds it would have been great as Jessica was into the poses straight away.
After around 15 mins of shooting with just her in the dress, we threw in the fake autumn leaves to see what we could get with them, but quickly found that they sunk too fast to get a decent shot with them and Jessica in the right spots - so I decided I would photograph the leaves separately and then composite the whole shot together later.
Post Production
After the shoot, I went through the images to cull the best ones and sent them to Jessica for feedback. Since this was a collaboration I like to get the model’s input as well, as they will see things that I might miss - and visa versa. We both liked some of the same shots, with this one of her floating at the surface being our favourite.

Lightroom
My first steps are to bring all my images into Lightroom, choose the selects, and adjust the overall white balance and contrast. The pool was a little cloudy so I used the dehaze slider to bring back some details and contrast into the images. I then take the image I want to edit into Photoshop for the heavy lifting.
Photoshop
Looking at the image out of camera I think it looks pretty good, but I feel the composition is a bit too much towards the bottom of the frame so I use the crop tool with Content Aware checked to move the whole frame upwards and let Photoshop fill in the new area below. I then go through the image just cleaning up any distracting items, and doing a beauty pass over Jessica and the dress.
Next up I bring in some of the images of the leaves I shot separately and mask them out on new layers. I try to use only the leaves that look right in the place they will end up - making sure their lighting matches the main image.
After moving them around, testing their placement, I settle on a configuration I like and then get to work making them look right. This means making sure they are blurred just the right amount for how far from the camera I want them to look. I also decide to put one large leaf high in the frame and blur it like it’s close to the camera - I like the way it balances out the smaller ones below.
I hit save and head back to Lightroom to finish the process.
Lightroom Again
With the hard work done in Photoshop, I like to use Lightroom to do the final grading and polishing. This includes upping the Texture slider to bring some sharpness to the details, some clarity and sharpening to give it definition as the shot is a little soft, and I turn up the vibrance to make the colours pop.

Final Thoughts
I love the way the image turned out, and whilst I wish I’d been able to shoot the leaves and Jessica in one shot, I think the composite looks pretty lifelike. This is a pretty standard workflow for me of how to take underwater photos, hopefully it helps you in your one underwater photography!

90 DAYS OF CONTENT
Over the next 90 days we are going to be working with some top artists to explore recommendations giving you solutions to problems we have all gone through. We are paying the writers a really fair wage for every original article, and we are writing about things that aren’t sponsored by any brand. There is no one but our opinion behind it. We would love it if you do use our affiliate links here so we can continue to keep writing awesome articles that you can trust.


