Bringing Color to classic Black & White photos is a relatively simple process. While some may like the ease of a black and white photo colorizer app or plugin, when it comes to Photoshop all you need to do is paint.
The trick is paying attention to detail, making sure you use a subtle variety of hues while paying attention to how the color interacts with the tonality of the base layer. Let’s get into how to colorize a black and white photo.
Colorizing Strategy
Adding a little method to the Photoshop madness helps you achieve a more realistic result. Establishing a color palette, then working in layers along with some Color Adjustment layers simplifies the process and gives you control over subtleties that help make it look “real.”
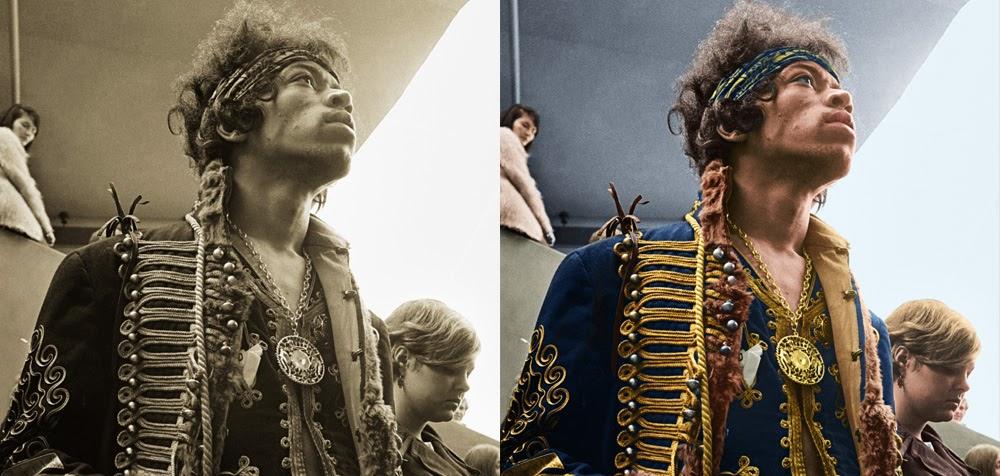
I colorized this image of Jimi Hendrix, shot by William James Warren at the Monterey Pop Festival in 1967, using Photoshop. The first step was to figure out what colors Jimi’s outfit actually was. A quick Google search turned up a few other shots of Jimi wearing this coat, so I knew the coat was a dark blue with gold braid and trim.
Pro Tip: As you decide on the basic palette of colors, make it easy to select those same colors over and over again by adding a layer to your file with patches of those colors, or by adding them to your Swatches palette.
The next step to think about is layer structure. It’s important to make sure all the colors and layers butt up against each other correctly, which will help avoid telltale white lines between the various layers and colors. The order the layers are added in will make that easier.
Starting with Jimi’s coat, the gold trim lies on top of the blue fabric. If we first color the coat entirely with the blue color then paint the gold on top of that, the layers will blend seamlessly, instead of leaving thin white gaps in between the layers.
Keeping the layers at 100% opacity will make sure each color is distinct from the others without any ‘bleeding’ where the lower layer’s color comes through.
Using separate layers in Photoshop for each color will make it easier to add some subtle variation in the colors. For example all of the gold trim on Jimi’s jacket was added in one layer with a few Adjustment Layers masked and clipped to the base gold layer. This allowed the gold rope and medallion etc to have slightly different colors bringing some realism to the end result.
Convert Toned Image to Black and White
Let’s take a look at how the colorizing of this image was done in Photoshop. Since the original image was a toned Black and White photo, the first step was to add a Black and White Adjustment layer to neutralize that color.
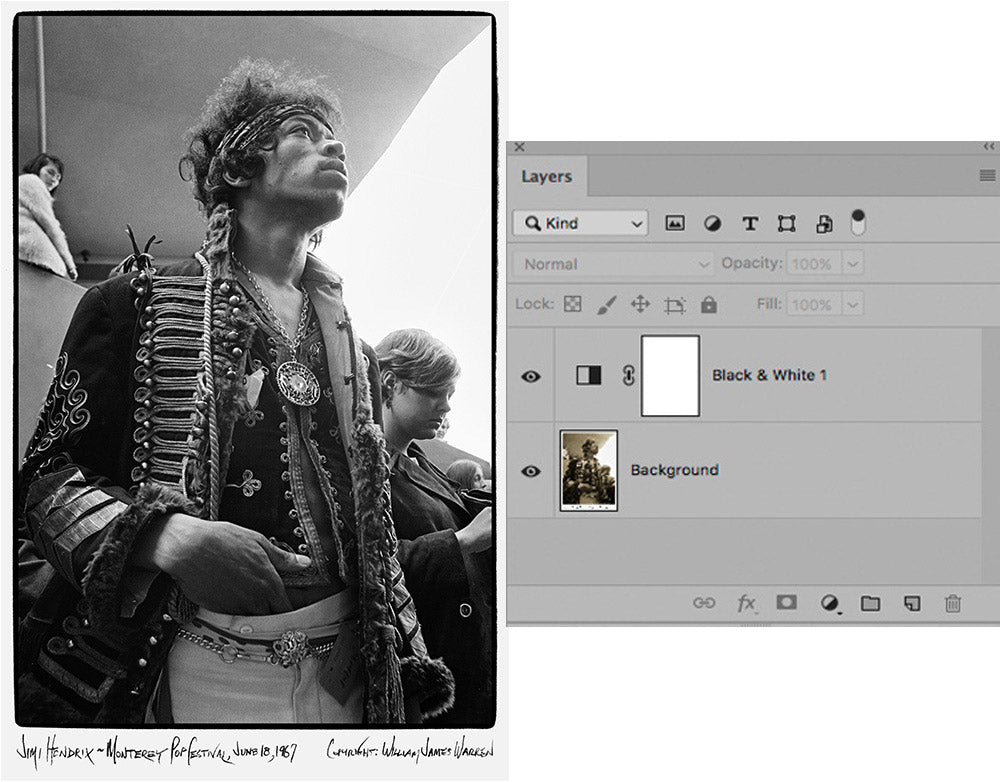
Add a Black & White Adjustment layer to neutralize the warm sepia tone in the base image.
Adding Color to the Jacket
The next step was to paint in the blue color for the jacket. I created a new layer and set the Blending Mode to Color. This let me paint the color and saturation in while allowing the tones of the Black and White base to show through, keeping all the detail.
Note: Since the Color Blending Mode uses both the Hue and the Saturation of the color to affect the image you’ll often find the colors look very over-saturated as below:

The jacket’s Blue color was added using a new layer set to Color Blending.
To fix this, add an Adjustment Layer so you can desaturate the color while being able to easily adjust it later. (As you build the colors it seems you’ll be going back and forth tweaking the saturation and color, so using an Adjustment Layer makes that easier.)
My favorite way to adjust the color and saturation in Photoshop is to use a Curves Adjustment Layer set to Color Blending. Here you can see the White Point of the RGB Curve has been pulled down about halfway. With this clipped to the Blue Coat layer it will affect only that layer, making it easy to control that layer without affecting the rest of the image.

A Curves Adjustment Layer set to Color Blending allows you to easily desaturate the color of the layer it is clipped to without affecting the rest of the image.
Adding Gold to the Trim
With the blue color for the jacket in place I next moved on to the gold trim. Looking at the image there looked to be 4 different materials that needed to be colored gold. The braid-trim on the blue coat, the trim on his vest, the gold metallic necklace and belt, and the clasps on the right side of the coat.
Giving all of these materials a slightly different color helps add richness to the image while avoiding the monotonous look that many colorized B&W images have. The simplest approach for adding this variety is to use one base layer for the gold, then add Curves Adjustment Layers for each of the different materials.

Using one base layer of Gold made painting in the color easier.
After choosing a gold color I then added a new layer set to Color Blending and working carefully. I painted the gold color over all the areas that looked to need this color added. The result looked a little duller than I wanted, so the first step was to clip a new Curves Adjustment Layer to the base gold layer and use that to dial in a more pleasing color.
Once the overall gold color was looking close, new Curves Adjustment Layers were added to bring the variety of color to differentiate the golds on the vest, necklace, etc. Those layers clipped to the base gold layer using Layer Masks (to be sure they only affected the gold) made it easy to control which Adjustment Layer affected which part.
The final adjustment was adding another Curves Adjustment Layer to brighten up the gold colors. Since the base gold layer was set to Color Blending, adding another Adjustment Layer to that one would not affect the luminosity or brightness of the golds. Before adding the new Curves Adjustment Layer, Command-click on the Gold Trim layer to load the transparency of the layer as a selection.
With this selection active Photoshop will automatically make a Layer Mask for the new Curves Adjustment Layer, allowing you to dial in the brightness of the Golds without affecting the rest of the image.

Clipping a few Curves Adjustment Layers to the base Gold layer made it easy to create variations in the Golds making for a more interesting image.
Continuing to work on coloring the rest of Jimi’s costume the browns for the fur trim and the leather strap on his shoulder were added in much the same way as the blue and gold colors were. Next came the tans, for his pants, the inside lining of his coat and the small piece of note paper on his vest.
Again, one base color was used for the tan color with Adjustment Layers used to create the variations needed for the different parts. The last part of Jimi’s costume to be colored was his headband.

Jimi’s costume colored in using 5 Layer groups, one for each basic color.
Adding Color to the Skin
After the color has been added to Jimi’s costume the next, and most tricky part, is adding the color to the skin. Inevitably no matter what skin color you sample from a reference image it will tend to look oversaturated and orange.
In addition to adjusting the basic color so it looks more realistic we need to remember to work on adding a subtle variation to the skin color so we don’t wind up with that monochromatic skin that screams “Colorized”.
Looking at examples of color portraits we can see the shadows and highlights have different saturation levels as well as subtly different hues. To have a good looking colorized photo we need to bring these differences to the skin color for Jimi.

Simply painting in a sampled skin color tends to give oversaturated and monochromatic skin color.
After adding the base skin color we can adjust the saturation and dial in the hue by clipping a new Curves Adjustment Layer to the base skin color. Setting the Blending Mode to Color will let us control the Saturation by pulling down the White point of the RGB Curve until it looks about right.

The saturation and color were adjusted by adding a Curve Adjustment Layer set to Color Blending.
Finesse the Skin Color
After adjusting the saturation and color for the base skin color layer it’s looking better, but the shadows are clearly oversaturated, and we still have a monochromatic skin color. To make this look natural we need to pull some of the saturation out of the shadows, and shift the hue of the color for the shadows and the highlights in slightly different directions.
Since this image was a Black and White photo, the tonality of the image makes it easy to separate the shadows from the highlights by using a copy of one of the channels as a basis for a mask.
And since the Red, Green and Blue channels for a B&W image are the same we can simply make a copy of the Red Channel to use for separating the shadows and highlights.
The copy of the Red Channel needs to have the contrast pushed a bit to help us with separating the tones as needed. If we push the contrast of the Red Channel copy so the shadows of Jimi’s face are black, while also pushing the highlights towards white, we’ll have a channel we can use for our task.
After making a copy of the Red Channel the contrast was pushed so it would make a better basis for separating the shadows and highlights.
By loading the tweaked copy of the Red Channel as a selection we can add a Curves Adjustment Layer for adjusting the shadows. The active selection will automatically be turned into a Layer Mask. Set the Blending Mode to Color so we can pull out some of the saturation and shift the hue of the color with one Adjustment Layer.
(Be sure to clip these two layers to the base layer for the skin color so they will only affect the skin color.)
After adjusting the Curves for the shadows we can make a copy of that Layer and invert the Layer Mask to adjust the highlights. Since the photo was taken outside, highlights on his face were lit by the sky. We want to shift the highlights towards blue and the shadows towards a warmer color.

On the Left is the Curves used to adjust the Shadows, and on the Right to adjust the Highlights.

Using Curves Adjustment Layers the basic skin color, and shadows and highlights have been made to look more realistic. Additionally color has been added to his lips and his hair.
Finish the process of colorizing Jimi by adding some red to his lips and color to his hair.

The scene has been fully colorized, but it looks a little flat still.
Adding Contrast to Finish
After filling in the color on the rest of the scene the image looked a little flat, so we’ll add one more Curves Adjustment Layer with a gentle “S Curve.” This adds contrast and completes the image. Here is the final image.

The final image with a little added contrast. For anyone interested in buying a print of either the original toned B&W shot, or the colorized shot click here: Buy a Print.
Conclusion
Today we’ve looked at how to colorize a Black and White photo. We can use Photoshop to add color to any Black and White photo by methodically adding one color at a time, then using Curves Adjustment Layers to dial in the way those color layers work with the image. By taking extra care to adjust the saturation in the shadows and adding some subtle variations to the colors used, we get a natural, realistic end result.
About Dennis: Since 1991 Dennis has been adding the Photoshop Magic to movie posters and images for ad campaigns. He loves working on cool images with cool creatives whether they’re for the latest blockbuster movie or a shot of a beautiful model or a product shot for a new ad campaign. His work can be found at: www.dunbardigital.com.
90 Days Of Content
Over the next 90 days we are going to be working with some top artists to explore recommendations giving you solutions to problems we have all gone through. We are paying the writers a really fair wage for every original article, and we are writing about things that aren’t sponsored by any brand. There is no one but our opinion behind it. We would love it if you do use our affiliate links here so we can continue to keep writing awesome articles that you can trust.


