YOUR GUIDE TO USING OVERLAYS IN PS
Overlays, to put it simply, are one of the easiest and most popular ways to add additional elements to images that weren’t available during the photo shoot, or are too difficult to capture in camera. This is the beginner's guide to getting the most out of Photoshop Overlays.
WHAT ARE PHOTOSHOP OVERLAYS?
An overlay is a photo, typically in JPEG format, that can be added to another image as an additional layer. Using Overlays in Adobe Photoshop can generate extra depth, dimension, atmosphere, temperature, texture, grit, elements, energy, and mood to an existing photograph.
Typically through the use of Blend Modes, these Overlays can easily blend into the base image without the need for any time-consuming masking with tools like the Pen Tool. This is possible through the various types of Blend Modes available in Photoshop that instantly give the user different effects from Overlays, usually created on a black background and then quickly blended into the image.
WHY DO PHOTOGRAPHERS USE OVERLAY ASSETS?
To put it simply, the top Photoshop Overlays can turn a good image into a great image. While there are many free Photoshop overlays available all over the internet, it’s important to note that the quality and types of overlays are important when building your library for portraiture or composite retouching work in Adobe Photoshop. It can really help people from stopping the scroll when they see work that utilizes Overlays really well.
Some of the best overlays for portraits are subtle and help draw the eye into details of the image, or create mood or atmosphere in the image that may not have been there when the original RAW image was captured.
While many might not think adding a few overlays to something simple like a portrait isn’t a composite, it actually is. When we talk about composite overlays, we are simply meaning that when you add any overlay to an image, it does in fact become a composite because you’re adding elements to an image that weren’t there in camera.
This could be to create mood, texture, atmosphere, temperature, cinematic qualities, light glare, composite resin, rain, snow, sleet, hail, falling leaves, lens flare, bokeh effect, or an element that helps navigate the eye in the image to some place you want your viewer to look.
The beauty in all of this is the absolute control you have in the overlay effect and the power you have to add elements like bokeh overlays, light leak overlays, sky overlays, lights overlay, or the myriad overlays that are found in our overlay pack.
The effects to your photos from photo overlays is simply stunning when done correctly and can easily be paired with your photoshop action of choice.
HOW TO ORGANIZE AND PREVIEW YOUR OVERLAY LIBRARY
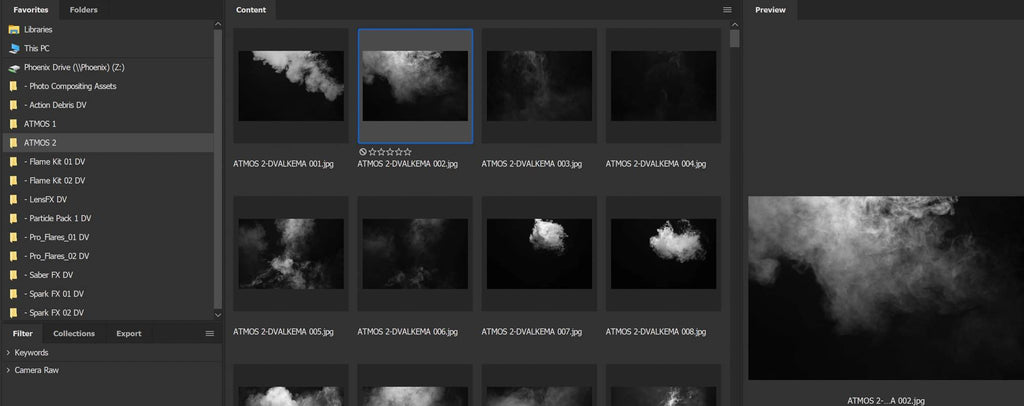
Before we discuss the application of Overlays, let’s talk about the best way to organize and browse through them for your projects. Dustin uses Adobe Bridge for previewing his library of Overlays. Bridge allows you to organize your Overlay libraries, preview them, and simply drag and drop your asset into Photoshop for use in compositing with easy tools in the file menu for organization.
The ability to rate your overlays and tag image assets is a great feature as you begin to find your favorite assets for various scenarios. Adobe Bridge is key in the workflow Dustin has for photo compositing.
HOW ARE OVERLAYS APPLIED TO A PHOTO?
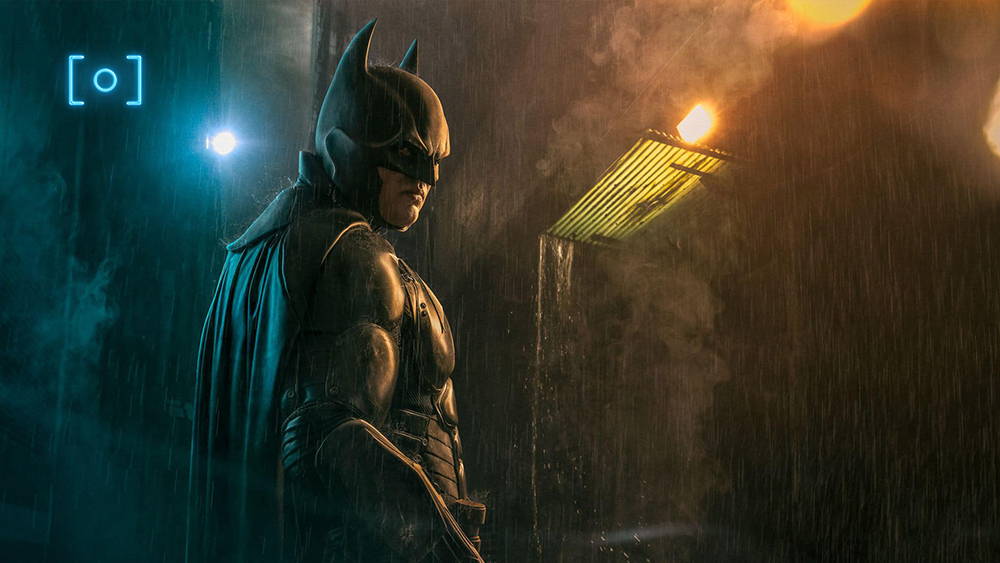
Applying your overlays in Photoshop is quite a simple process at its core, simply drag and drop your Overlay into photoshop and use a blend mode. Knowing which blend modes to use and alternative ways of manipulating your Overlays can, at times, be a bit trickier. Don’t worry, we'll have a few approaches explained using the Jedi image in our example below.
As a general rule, when creating quick comps, Dustin likes to separate his subject from the background. This makes it much easier to create foreground, mid, and background separation quickly. Many times, this is quick and dirty, making use of tools like “select subject” and “remove background” in Photoshop. These results can be refined at later stages in your composite.

USING THE RIGHT BLEND MODE
Using Overlays is hands down one of the fastest ways to build a sense of drama and a cinematic feel in your image. Smoke and Fire/Light emissive Overlays like lens effects, light sabers, and embers, generally work best when using the Screen or Add blend modes.
These blend modes allow you to stack your overlays atop one another, building depth and details in your composites while maintaining the “light” properties. Within just a few moments, you can have a nice base of atmosphere built around your subject.

PROBLEM SOLVING HARD LINES IN PHOTOSHOP
Dealing with hard lines when using overlays is a regular occurrence, and quite easy to deal with. Simply create a layer mask on the problem layer(s) and use a black brush to paint out your harsh lines. Boom, it’s almost like magic!

HOW TO USE ADVANCED BLEND MODES
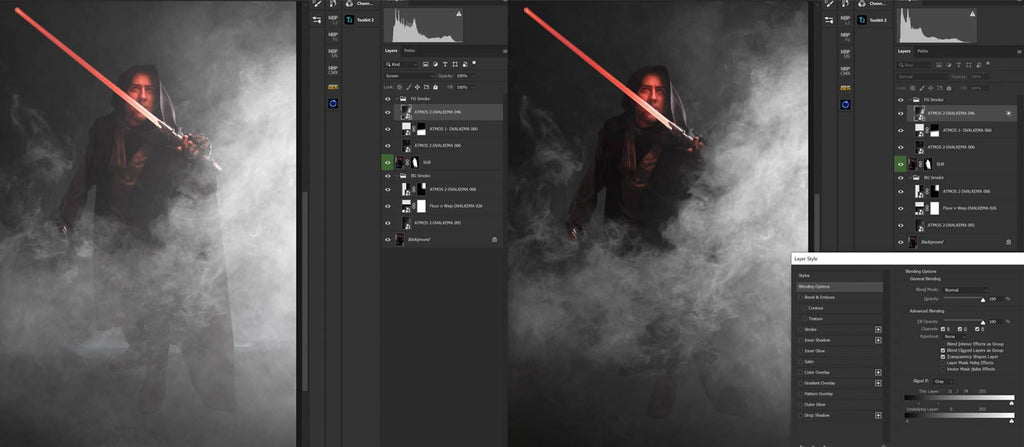
Using the Screen and Add blend modes is great for many applications in which you want a translucent or light emissive atmosphere, however there are times when you want more of an opaque smoke or desired fx. You can achieve this by using the “Layer Blending Options” in Layer Styles vs the “Blend Modes”.
In this case we’ll continue with smoke. Double Clicking the smoke overlay Layer, this will open our “Layer Styles” window. We’ll use the “Blend If” options, on the “This Layer” slider to remove the darkest parts of our smoke overlay.
"Overlays gave my images that extra 5% awesome by allowing me the control to put exactly what I wanted where I wanted. It's the perfect way to finish almost any image and give it that extra bit of sauce."
— DUSTIN VALKEMA

By dragging the black point (left handle) in the “This Layer” Slider to the right, you’ll start removing the darkest parts of the overlay, revealing your composite behind. This may look a bit crunchy at first, however, by pressing ALT or OPTION while dragging the slider handle, you will split the handle in two, allowing you to feather your result.
Now you’re on your way to awesome results with opaque smoke! See image below for Screen vs Blend If methods. Though both versions look good, notice the more opaque nature using the blend if technique alone.
- Note: You can use Blend If AND Blend Modes together, don’t be afraid to experiment with it. Layer Masks also work well with aiding in blending of any effects. This is your playground!
HOW TO ADJUST THE COLOR OF OVERLAY EFFECTS
Changing the color of an overlay is quite the same as any image you may adjust in Photoshop. You can simply use a layer adjustment like hue and saturation to adjust or colorize your overlay image as seen below. It works great with smart objects, as these effects are applied as smart filters, allowing you to make adjustments after the fact.

While this is a great way to gain control over each layer independently, it can be quite cumbersome when needing to work quickly, especially when working with an atmospheric scene. You might wish there was a way to adjust multiple layers at once without destroying your layer structure. Of course there is!
The way Dustin likes to do this is group his layers by blend modes. For example, all background smoke layers using the “screen” blend mode will be grouped. This allows for cool blend mode magic! Simply set the entire BG smoke group to use a “screen” blend mode.
Place a Hue/Saturation (or any) adjustment layer as the top layer inside the group and adjust the color to your liking.
This adjusts all of the overlays inside the group without affecting the pixels underneath, unless the overlay’s grey or white values sit atop the image, as we see in this example over the jedi.
Note: In this example, Dustin placed a black “color fill” layer underneath his BG Smoke Screen group to block the original image from peaking through.

Not only does this method save a bit of size in your overall file size, it also makes your adjustments far more manageable than having per layer adjustments to deal with. It’s all about working smarter, not harder.
GET A FREE OVERLAYS | DOWNLOAD THE SAMPLE PACK


