Choosing the items that make up your photo editing and retouching workstation can be an important decision to determine how accurate and efficient your workflow results will be. Your abilities and skills as a retoucher are increasingly important. With that in mind, let's get a wide overview of the essential items for your imaging workstation and how you should select them.
Many people will spend the bulk of their investment in photography in their camera lens and lights. However, you may actually spend more of your photo-related time at your retouching workstation with the tools you use to retouch than you do with your camera and lighting equipment. Keep that in mind as you make your equipment decisions.
Computer
Choosing your computer is the most important decision in terms of how efficient your post-production workflow. This can be a huge part of profitability for a photographer or retoucher and also affect how enjoyable it is to retouch.
Desktop vs Laptop Computers
Most photographers own a laptop as it can be used on location for downloading, tethering, or processing while on the go. However not only is the maximum processing power of a desktop system greater than what can be contained in a laptop, a desktop computer also offers more bang for your buck in terms of processing power.
That being said, laptops are growing more and more powerful and many photographers are making sizable investments in their laptops. Because of this, they may want to rely on only their laptop as their one post-processing device.
If you’re purchasing a laptop, consider the screen size and resolution. Screens are usually between 11.6 and 17 inches. Most photographers will purchase the biggest screen they can afford.
If you choose not to invest in a desktop computer, you will still need to purchase an external monitor for a professional retouching workstation. Therefore a laptop might not be as much of cost savings as you are expecting once you factor in the professional monitor.
CPU
The central processing unit (CPU) is the main powerhouse of a computer. Most retouching applications require a lot of resources. Make sure to get a powerful enough CPU for the demands of these applications.
I would recommend prioritizing the number of cores - quad core, six core or 8 core are all good options. Processors from the Intel i5/i7/i9 series or one from the AMD Ryzen 5/7/9 series are always solid choices.
Graphics Card
One of the most important features of your retouching computer should be a dedicated graphics card (also known as a video card) with mid or high range performance. Without a graphics card, it will rely on the CPU to render images which is far too slow.
If you already own a computer where the graphics card can be replaced, that can be a good way to boost the performance of an existing computer without purchasing a new one.
RAM
When choosing a computer for photo editing and retouching, another major factor to consider, especially if you like having multiple editing programs at once, is a large amount of RAM.
When customizing or choosing the features in your computer RAM is a good place to make upgrades to improve photo editing capacity.
Storage
When selecting the hard drive space of your computer, ask yourself if you will be working mostly off your hard drive. If so, how much space will you need for ongoing projects? If you’re going to be working off external hard drives, choose those carefully.
Editing files directly off an external drive can slow you down so consider your workflow before investing in an external drive. The speed of the drive can have serious implications for the efficiency of your workflow.
External graphic accelerators are also capable of upgrading your existing computers without completely replacing them.
Recommended Systems
TheApple 16" MacBook Pro 2019 is a great example of a powerhouse laptop. On the other hand, theMac Pro is for those looking to go all-in with a high-performance desktop machine.
Some photographers also find theSurface Pro to be a good portable PC laptop solution. For PC users, gaming computers can be a good place to start looking as they have powerful graphics cards and large amounts of RAM.Surface Studio 2 is a good option for a powerful PC desktop system.
A cheaper possible solution if you are limited on desk space and are going to buy an external monitor anyway is you could buy aMac Mini to attach to your third party monitor.
Different photographers may have different processing needs. A wedding or event photographer who is editing multiple shooters images, sometimes thousands every weekend for an entire season, will especially need a graphics card that can create fast previews of images. A fine art photographer who shoots low volume might have lesser needs for theirphoto retouching equipment. Different editing software can make different demands on the computer.
Consider how many images you’re going to be working with, how high resolution they are, and what your photo editing needs are. How many different applications and editing software do you have open at once? Landscape shooters doing a lot of HDR work may also need more processing power.
Monitors
As mentioned above, it’s important to think about the cost of monitors before making a choice on a laptop as it will also be a large contribution to the budget for yourphoto retouching equipment. Utilizing a monitor with a wide gamut of color and one that can accurately represent highlights and shadows is really important to creating a professional photo .
The majority of screens sold nowadays are LCD (Liquid Crystal Display). They are flicker-free, energy-efficient, and very accurate.Laptop LCD screens are nowhere as color accurate as professional stand-alone monitors. They also don’t have the wide gamut that full-size screens have and are often not as adjustable in terms of color.
Another issue to keep in mind is that laptop LCD screens are often shiny not matte. Ideally a matte screen is always the best when choosing a primary monitor for retouching as reflections can be a serious issue.

Two is Better than One
Most retouchers work best with a two-monitor setup. One screen can be used for toolbars, retouching instructions, or your email, as you use the larger screen for photo editing or video editing. The other screen can be less cluttered with just the image or file you are retouching.
It’s possible to connect your laptop to an external monitor which is a quick way to get a two-monitor setup. The external monitor should be the primary monitor used for crucial color decisions and exposure evaluation. The laptop screen would be the one used for toolbars or emails.
If you already have a desktop with a single monitor,working with two monitorswill increase your efficiency and ease of retouching. You may want to add a second monitor the same size as your first for consistency. Matching models, quality, and color can be an issue in this scenario.
Widescreen
Another option is a superwide monitor or widescreen monitor. These are currently very popular. If you’re a landscape photographer or someone who does a lot of panoramas, a superwide monitor can be a great asset.
Some photographers appreciate the simplicity of a widescreen, you will only have to calibrate one monitor. The 16:9 ratio leaves space on the side for palettes or toolbars while still viewing the complete image.
An example of an affordable but solid superwide monitor would be aDell UP3216Q UltraSharp 32" Widescreen 4K LED Monitor.
I personally prefer two monitors as it’s easier to separate tasks. It also provides a more portable monitor that I can bring on location to certain photoshoots. With two monitors, some retouchers will place one screen vertically and the other horizontally to add more flexibility.
How to Evaluate a Monitor
When evaluating monitors consider the size of the monitor, the number of pixels, how large the color gamut is, the brightness, and thestatic contrast ratio. Ideally, you are looking for a monitor that captures as close to 100% of the Adobe RGB color space as possible.
Another factor to consider when choosing a professional monitor is viewing angle. More expensive monitors will have a wider viewing angle. This is most important if you plan on using your monitor on set or in a group setting, more than as your primary retouching workstation.
If you are purchasing a used monitor make sure there are no dead pixels on the screen by examining it when it is turned on and looking for black specks.
Generally,EIZO is considered an industry leader for professional monitor options for creative professionals but also carries a hefty price tag. Their CG series is often seen filling professional studios. A common model is theEizo ColorEdge CG279X 27".
Another brand isBen-Q with more affordable monitors that still have excellent color performance such as the popularBenQ SW321C 32" 16:9 4K Monitor. Some will argue that the 4k of the BenQ make it superior though many also argue that the actual color and performance of the Eizos are still superior and more important than the 4K stat.

Calibrate Your Monitor
Ideally, all colors would be consistent across your devices automatically and the printer would print everything exactly how your camera captured it. But the way color migrates from device to device is actually complex.
To that end calibrate your monitor on a regular basis with acolorimeter. When choosing a monitor it’s very important to choose one that is professional enough that itcan be calibrated.
Some high end monitors now actually come in with a built-in colorimeter. Usually, an external calibrator will still be more accurate. X-rite and Spyder are considered professional solutions for monitor calibration. You will be well served with a professional model that will last for years across multiple monitors such asX-Rite i1Display Studio or aDatacolor SpyderX Pro.
External calibrators attach to the computer’s USB port and then hang over the top of your monitor on a cable with the sensor facing in to read the color on your screen. It’s recommended to do this at least monthly and includedcalibration software that will provide automatic reminders.
Choose Your Environment Carefully
Just as important as calibrating your monitor is creating aneutral color environment to work in. Place your workstation in a room that is relatively low light. You may need to hang dark curtains. Avoid reflections of lighting or windows on your windows when setting up your station.
Do not work in an office with bright yellow walls. Your eyes may adapt to color casts created by the surfaces in an environment and think it is ok but the ambient lighting will have color casts that will affect your perception of your images. Remember to always calibrate your monitor in the same ideal environmental conditions as you would retouch- lights off, curtains closed, etc.
Hood your Monitor
High-end professional monitors will come with their own black hoods. This is very important as it can block reflected light. If your monitor doesn’t include one, you can easily make your own out of three pieces of black foam core. I recommend not attaching any type of adhesive as it will tend to melt when the monitor heats up. One DIY solution is a u-shaped bracket attached to the back of the monitor to give the hood somewhere to rest.
Backup
A good workflow for retouching should also include always backing up to high capacity hard drives or aRAID system. One high-end solution that photographers use is NAS servers with RAID options. Consider what the connectivity of the backup drives will be as that is crucial for speed.

Editing Software
Consider editing software as part of the overall system cost for your image editing workstation. Many will license the entire Adobe Creative Suite, some will just license Photoshop and Lightroom. Others may use Capture One, On1, Affinity Photo, Luminar, as well as preset bundles. The cost of purchasing and licensing creative software should be considered in your workstation planning.
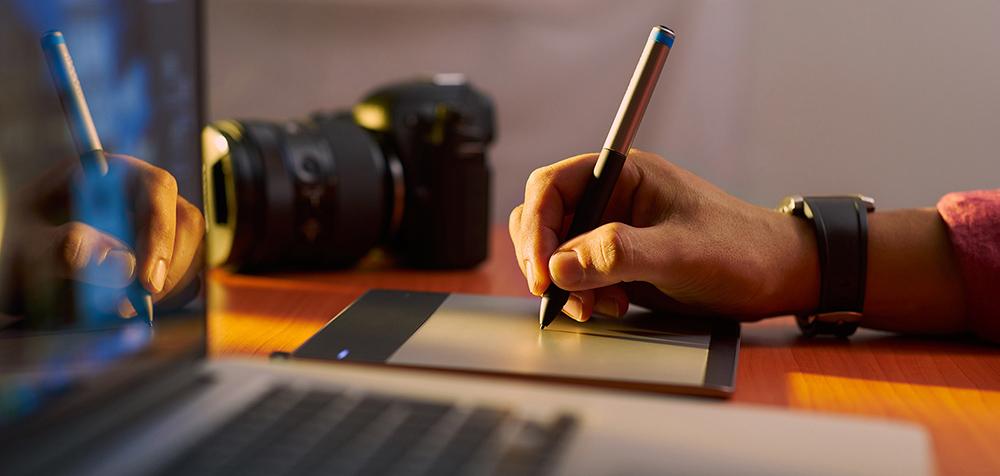
Tablet and Pen
Most professional retouchers or anyone who does a lot of retouching swears by using a tablet. Keep in mind if you have never used a tablet there may be a bit of a learning curve before the efficiencies begin to pay off. But eventually, they definitely will. Especially a pressure-sensitive pen can open up a world of possibilities in retouching that are just not accessible with a mouse.
The most popular tablet for photographers is probably those in theIntuos Pro series. There is a variety of sizes and versions. The larger Intuos Pros have more buttons than you will probably ever need to customize the device.
Some tablet users never actually even use the plethora of custom buttons but just crave the larger space of a more advanced tablet.
TheCintiq Pro comes in a variety of sizes and versions operates as an additional screen and is targeted more towards artists but some photographers find it useful.
Some people own multiple tablets, a full-size one for their retouching station, and a portable one for travel.Consider how much room you have on your table when selecting your tablet model.
The Wacom pens have two buttons on them, also customizable. One of which operates similarly to the right click on your mouse. Once you get used to them you may rarely use your mouse again. Make sure to replace the nibs to keep up your pen’s performance.

iPad as Tablet
Some people use theiriPadconnected to their computers via Bluetooth as a retouching tablet paired with anApple Pencil. If you work in iOS and already own an recent iPad and are looking to save money this can be an option. It may not have the same performance as a Wacom tablet as it may suffer from delay but can save money.
Desks
A computer, tablet, two professional monitors and keyboard can take up a lot of space. Especially if you want any space left for a pile of papers or your coffee. While ordering all of these items you may also want to consider a desk that has enough space and weight capacity to be comfortable.
At the beginning of my career, I made a giant desk out of a piece of scrap wood with a piece of brushed metal affixed to the top which I held up with two metal sawhorses. It was the biggest desk I ever owned and could handle as much weight as I could ever pile on it.
Remember that the base of professional monitors can take up a lot of space on the desk. One way to free up space on the desk is also to mount the monitors on articulating arms. That can make your desktop even more customizable.
Sitting and Standing
Consider choosing the correct ergonomic chair as part of creating a perfect retouching workstation. It’s important to have a comfortable station that you can work for hours at. Many people prefer standing desks. Make sure your tablet, screens, chair, and keyboard are all positioned to avoid any repetitive stress.
Wrapping Up
In conclusion, selecting the components of your photo retouching equipment is an important set of decisions. In this overview, many different factors have been outlined for you to consider when purchasing or upgrading a retouching workstation. A station with improved performance, comfort, and efficiency can improve the post-production on your images.

90 DAYS OF CONTENT
Over the next 90 days we are going to be working with some top artists to explore recommendations giving you solutions to problems we have all gone through. We are paying the writers a really fair wage for every original article, and we are writing about things that aren’t sponsored by any brand. There is no one but our opinion behind it. We would love it if you do use our affiliate links here so we can continue to keep writing awesome articles that you can trust.


